Showing posts with label Techniques. Show all posts

Sunday, January 21, 2018

Winding Sticks Epilogue - Fixing a Screw Up: Part II - Fixed

Yesterday I realized that I really can't be happy with a giant gap in one of the inserts for my pair of winding sticks. I decided to fix it. I'm happy with the results:
I left the new insert clamped up overnight. Today I removed the clamps to inspect my handywork.
This looks more promising.
I left the two winding sticks in direct sunlight this morning for 1/2 hour or so to see if it would darken up a bit.

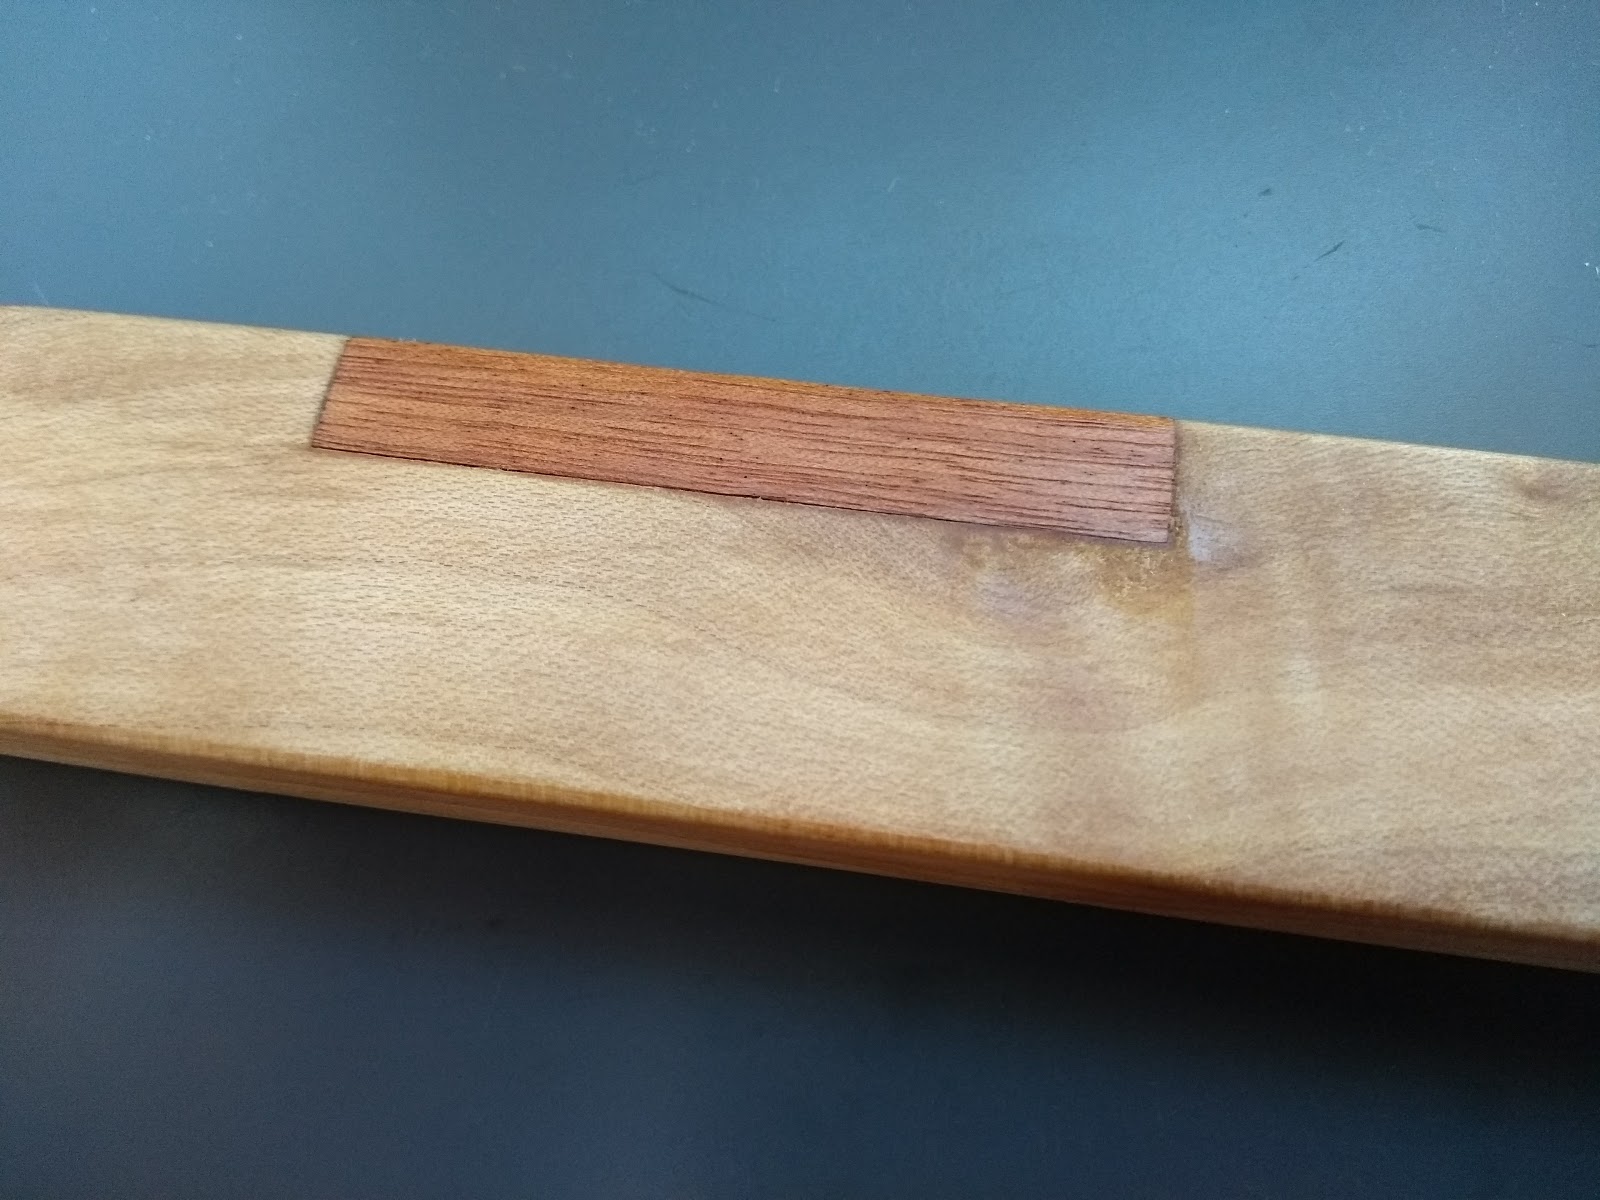
After I got back from doing my things this morning, I shaved the insert flush with the winding stick.
I'm pleased with this.
It's not perfect, but it is much better.

On went some of my special home-made BLO, and I am in business. This linseed oil is phenomenal. The best I've yet used. I'll definitely have to make some more.
Very nice BLO.
After all was done, I noticed the mystery wood that was in the sun was already remarkably darker than the new one.
Above with a suntan, below without.
Over time I expect the orange wood will turn a nice, rich color of deep brown. It should work great.
Here it is.
In case you wondered what to do with these sticks, they are for measuring twist in a board you are planing.
In use.
Notice that I just set them on the stick I am planing (using the center dots to help balance them there faster). Then it is just a matter of lining your eye up to see if the outer parts line up like in this video:
They exaggerate the twist in the board to let you know where you should focus planing in order to make the board truly flat. This stick I am testing is a real-world example, and the exact reason I felt I needed these winding sticks. Now I know where to plane to get it flat.

If you would like to read the post about the construction of these winding sticks, click here. Next up: more work on the brown oak Shaker side table.

Saturday, January 20, 2018

Winding Sticks Epilogue - Fixing a Screw Up: Part I

One of the inserts in my newly constructed winding sticks turned out pretty ugly. You'll notice I didn't have too many close-ups of them in my last post. These winding sticks will work just fine (in fact, the inserts are overkill, in my opinion), but I realized that every time I use them I will be embarrassed of the giant gap in one.
Giant Gap.

The others, while not perfect, look pretty good to my eye.
I decided that since the inserts were attached only with liquid hide glue, it should be easy to fix. I decided to remove the insert, make a new one and replace it.

Incidentally, I am extremely happy with how my center markers turned out. I drilled all the way through each stick, and inserted a 4mm bamboo skewer.
I think these bamboo dots look great.
Back to scheduled programming: I used some hot water and a blow dryer to weaken the glue holding the insert. I then popped it out with a chisel being careful not to bruise the sycamore, as I didn't want to re-cut this joint. The mortise itself is pretty good.
Insert coming out.

Insert out.
I have plenty of this insert wood for lots more inserts, so it was just a matter of cutting a piece a little oversize.
Oversized insert stock.

I split it to rough width with a chisel.
I wound up with a piece a little oversize. Once the glue cures, I will plane it flush for a perfect match.
A bit oversize.
If you wonder how I plane with only my two sawbenches as work surfaces, here is a photo of my setup. I put one sawbench near a corner in my office, and use a piece of wood with a birdsmouth cut out of it as a planing stop that is braced against the corner of the wall. If I need a longer worksurface, I just add another sawbench behind the first. I also added a strip to my planing stop to act as a shooting board. It works perfectly.
Shooting the ends of the insert to sneak up on a perfect fit.
I also slightly beveled the underside of the insert, so any dreck will not interfere with a tight joint where it shows.
It has the potential to be nice and tight.
All that's left is to add some glue and clamp it up.

And, cross my fingers that it doesn't move again. I think the C-clamp is what caused the problem before: I probably used too much clamping pressure.
Hopefully this clamping strategy will get it to look nice and tight.
Come back tomorrow to see how it turned out! I will take the clamps off, plane it flush and add some more finish. If all works as I hope, it will be a perfect repair!

Saturday, February 11, 2017

Bevel Up Jack Plane - Will It Work as Your Only Plane?

A few weeks ago, one of my very favorite woodworking heroes, Richard Maguire, wrote a blog post about low angle planes. I've been thinking hard about this post for a while, because I have in the past advocated big time for my Veritas bevel up jack plane (BU jack).

I have to say that Richard's conclusions about the BU jack are spot on, 100%.

Does this mean I am recanting my endorsement of this tool? Absolutely not.
Richard's premise in his blog post is that BU planes work better than other planes at the extremes of the spectrum - basically that they do one thing really great. That is planing end grain.
This plane is really great at end grain.
I whole heartedly agree. They are much better at end grain due to the low angle possible with the BU design.

What about the rest?
Can one joint with this plane?
Well, I agree with Richard. Other planes do a better job at basic tasks than this plane. A 24 inch jointer does joint better than this jack plane. A dedicated jack with a cambered blade does better at hogging out lots of material than this plane. A #4 smoothing plane with a finely set chip breaker will do a better job at smoothing than this plane.
This thing works great shooting end grain. Did I already say that?
Then why do I endorse this plane so enthusiastically?

Well, I have to say that while those other planes do better at those tasks than this plane, the BU jack will indeed do them all.
I almost always do all my jointing with this plane.
A while back, I spent more than a whole year using only this plane and no other bench plane, for no other reason than to put my money where my mouth was regarding being able to build with an extremely limited tool set.

I had noticed that many great woodworkers had recommended "beginner's tool sets" that required many thousands of dollars to fill out before a beginning student could feel like they could do "proper" woodworking.

I thought that was baloney then, and I think it is baloney now. A jack plane (whether BU or bevel down, new or vintage), is a great first tool to get because of the versatility.

Other tools work better for those everyday tasks, but one plane instead of four can be a deal maker for a beginner.

After my exclusive use of this plane for the time I used it, I found out that "plane monogamy" (as Christopher Schwarz puts it), is a wonder.

Face it, there are all kinds of situations where even the largest hand tool shops require making a plane do a bit more than what's in it's name.

To be able to do these amazing tricks with a plane, one really, REALLY needs to know their tool.

I learned that it really is true that you can't buy skill by purchasing a new tool. One should learn how far they can push (get it?) a tool they have before deciding if another is needed in their situation.
Plus, using the same tool is faster: you already have it out.
There are a few things I do to make it easier on myself.

For rough work, I do my best to avoid having to thickness stock very much. My wooden jack plane with an eight inch camber on the blade hogs off wood like crazy and in no time flat. A BU plane is difficult to put a camber on the blade because of the angle of the bed. Taking 1/16" thick or thicker shavings isn't going to happen.

It will take medium sized shavings. If your wood is roughly the thickness you need it, and mostly flat to start with, it is a breeze to bring it to good working dimensions with this plane.

For fine smoothing, again, choose your wood wisely. This plane will easily achieve a finish quality surface without much work. Even without going crazy with steep sharpening angles. Make sure the blade is as sharp as you can get it, and you will be fine. At least until you try to plane against the grain. Even then, lighten the cut a little more and close the adjustable mouth as tight as you can.

For jointing, I find this plane to be long enough to joint nearly anything I can throw at it accurate enough for gluing up a panel. It does take some skill. One will get good at making edges flat eventually with this tool. Just keep checking with a good straight edge, and practice removing the parts that aren't flat. Follow that up with a fine shaving from one end to the other. I find it rare that I need to pull a jointer out for edge jointing anymore.
In conclusion, I would just like to agree with Richard again that this plane shouldn't replace everything in your plane corral. However, if you are looking for your first bench plane, this might be a good place to start.

Sunday, July 12, 2015

Fingers In the Till - European Scrub Plane

One of my favorite tools ever, this flea market find has turned into a workhorse in my shop.
Here it is, I used it to bevel the underside of this chair.
This is one ugly tool, but it works like crazy.  There is a lot of instructions on the internet for turning a jack plane or a smoothing plane into a roughing plane for thicknessing, but I find that this dedicated plane has earned the real estate it occupies in my tool chest.

What makes this particular one special, is that it is old, well used, and well modified by some thrifty German carpenter in it's previous life.  There is a couple of big cracks in the stock of this plane held together with various bolts and screws.  It feels awesome in my hands.

It's a fairly narrow plane, I suspect the blade is between 1 1/2" and 1 3/4" in width.  If you build one, go with a narrow blade. 
When I got it, I ground it at a pretty dramatic radius.
Most roughing plane instructions on the internet recommend something like an 8" radius for rounding a plane like this.  I decided to go bold and ground it at 3" instead.  Since it is so narrow, I can get away with this.  If you grind a 2" blade at three inches, you won't be able to set it so deep as to get a shaving wide enough to justify such a wide blade.

This plane has a crazy open mouth.  I could probably put my thumb in there.  This keeps it from jamming with the rough chips you'll be getting. 

Of course there will be tear out, but this is for course work.
Wow!
As you can see, the blade in this plane isn't something precision made from Starrett.  My guess is it is from a leaf spring, spray painted red for good luck.
Before grinding, you can see how un-flat the steel is.
I sharpened this up to 8000 grit on my waterstones when I got it more than two years ago, and the blade hasn't been out of the plane since.
The crazy tight radius on the blade allows this plane to thickness wood faster than any other hand tool method I have.
Here's how I've found that this tool works best when thicknessing:  I put the board on my bench with the grain oriented right to left.  I traverse which means going across the the grain, like the above photo.  I then plane diagonally, with the grain.  I go from the near right hand side to the far left hand side.  After this, I go diagonally, 90 degrees from the first diagonal.  However, I am careful not to go from the near left to the far right, I must go from the far right to the near left.  To do this I turn the board 180 degrees in the vice and take the plane left-handed.  This allows me to continue going diagonally with the grain, instead of against it.  If I do the diagonal the wrong way, the tear out goes DEEP. 

If that explanation doesn't make sense, you'll find out what I mean when you try it.

For some reason Stanley scrub planes (like the #40) are getting expensive in the US.  There doesn't really seem to be a cheap alternative.  Lucky for me, I live in Europe, and these things are everywhere.  I wonder why?

Wednesday, March 11, 2015

How I Clinch Nails - A Photo Essay

Here is what I want.
There are lots of ways to clinch nails.  I like this method because it is quick, and requires nothing special besides a hammer.  

The first time I heard of clinched nails was during the episode of the Woodwright's Shop when guest Christopher Schwarz was discussing his book, "The Joiner and Cabinet Maker." During this episode, Chris made a shipping crate with clinched nails for joinery.

Clinched nails are great because they are quick to do, require no glue (so no drying time), and are amazingly strong.  Also, they make a great joint for a cross-grain batten as while the wood contracts and expands, the nails can give just enough to keep everything nicely together and flat.

There are a couple things that are not shown in this photo essay.  My cabinet door is soft spruce, which is less than ideal.  I figure if clinching nails works with spruce it will work anywhere.

The ship lapped panels I am using are 18mm, the crossbraces are 28mm (3/4" and 1 1/8" or so).  I wanted nails that were at least 2cm longer than the thickness of all the wood.  I bought some regular unplated brad nails at the home center that were 80mm long for this.   Brad nails in order that they could be countersunk.  This panel will be painted, so a little putty and the nail hole on the face of the cabinet should disappear.  I think practically any wire nail should work.

The first thing I did, which is optional depending on how the piece needs to look, is I drilled pilot holes for everything.  As this is a piece of furniture, I wanted to minimize blowout and cracking.  If you are making something like a shipping crate, going straight to nails should work just fine.  If it matters, spend a little time laying out where the nails will go for strength and beauty.  I drilled holes that were significantly smaller in diameter than the nails, so there would be a tight fit.  I don't want them too loose, as brads could be pulled all the way through.
While I used a bradawl on the crossbraces, I used my hand drill for the panels.
With the pilot holes drilled, I insert the nails so they just poke through.
Notice I already painted the rabbets for the ship lap.  I won't get a chance to paint that later.

This lets me line up the cross brace into the pilot holes I already drilled.

Here are all the nail tips just poking through.

I found it easier to line up the holes for the battens on one board at a time.

Now it is time to flip the piece over.  I have the batten resting on the edge of the bench, but the nails are hanging over so I don't put nail holes in my bench.

Pound the nail down about half way, so there is still plenty sticking out.  I used this woodblock as a rough guide, so I could drive all of the nails about the same distance in.

With the nail sticking half way out the back, bend all the nails over. 

Now I am bending them over as far as they will go.

Flip over again, and drive the nails as flush as you can get with the hammer only.  No need to set these yet.  Once again, this step and the previous ones are done with the piece halfway on the bench.
Flip it over again to show the bent nails.  I have no idea why this happens, but some of your nails will be pointed in wonky directions.  Not to worry: just twist them into a straight line with your fingers.
It's OK to twist these straight again.

Now I use the hammer again to bend the nails a bit more, so they are pointing down.

Now you can set the nails.  The previous step might have pushed them out a bit, so make sure they are all the way in as far as you want now.

Here is what my panel looks like at this point.

Using an angled blow with the hammer, try to bend the nail over where the tip will re-enter the wood.

Like this.

Super-duper slo-mo.

Take your time and pound it in just where you want it.

Even more.  Is this level of detail perhaps a bit unnecessary?

The last blow.  Notice that in soft wood like this the nail is now set below the level of the wood.  I like this, but this doesn't happen with some of the harder woods.

I didn't notice until it was too late that the nail cracked this board on the end.  There was not enough wood to support it.  On the next door, I cut the nail a little shorter, and drilled a pilot hole where the nail tip re-enters the wood and there was no crack.

The completed door.  I feel like this will never come apart.
This method works great.  Especially if it isn't critically important what the clinched part of the nail looks like.  While not everyone may like it, I am fine with the way this looks on the inside of this cabinet door. 

I think that if you want the clinched part of the nail to be as short as possible, you might try a different method which involves driving the nail through the wood into a steel plate.  I haven't had such good luck with that method, as I have yet to figure out how to steer which way the nail will bend.  This way, I feel is dummy proof.  Anyone should be able to get the nails in a relatively straight line.