Sunday, June 22, 2014

More Fun with Fairham

Needing a quick gift for a good friend's 40th birthday party, I pulled out my trusty copy of William Fairham's Woodwork Joints, and found a quick project that looked both fun to build, and fun to use:  the Chinese Puzzle.
Fairham's Chinese Puzzle
"No problem, I should be able to knock this out in a couple hours after work," I thought.

I find that it is really difficult for me to estimate the time required for a project, if I haven't made that project before.  I wound up spending about six hours total on this project. 

I never said I was fast enough to make a living at this.

Decisions, decisions.
The first order of business was to find appropriate stock.  Fairham says to use 1/2" square stock for this project. 

I find that when making puzzles, it is a good idea to stick to the directions exactly for the first time, so an understanding of the puzzles function becomes clear before one starts messing around with the dimensions.

I have quite a bit of stock that would be OK for this project.  However, the pear, walnut and oak I had was all just a smidge too thin.  It was at this time that I remembered that I have actually started this project once before, and already dimensioned some maple (Acer platanoides, I think).  

I abandoned this project before because it appears I crossed my layout line while ripping on one of the sticks.  Lets charge ahead anyway, as I think that there is enough without that one.  One of the other sticks appears that I dimensioned three sides, and left one for later.

My first step is to plane this last side down to my mark.  I find that with small parts it can be easier clamping the plane in the vice and moving the small parts over the plane.
Thicknessing small parts.
Using a cutting gauge is nice for precise jointing, as it is obvious when final thickness is reached.  As in the photo below, a little strip comes up to let us know we're there.
In this case, there is a little more to go on one side before I'm done.
After the stock is prepped, all 21 pieces can be cut to length.  I do this on my shooting board,
Cross cutting parts to length.
because I can shoot the ends without changing the set-up on my bench.
All parts are now perfectly the same length.
It doesn't take too long before I am done, and realize I am still short quite a few of the needed 21 pieces.  I need some more 1/2" stock!
This bit of 3/4" maple will have to do.
So much for being smart. 
Ripping a 1/2" strip off of my scrap.
This wound up slowing me down.  Dimensioning this stock is not difficult, but you must take your time to do it right.  All of the puzzles pieces must be as perfectly the same as possible in order that the puzzle will go together and come apart again.
Finally.  Let's start cutting the notches.
Once all of the parts are dimensioned and cut to length, the notches for the puzzle can be made.  I marked the notches out with my cutting gauge, sawed to the line and chopped out the waste with a 3/8" chisel.

Now that the party is coming up fast, I need to hurry.  I'm afraid to say that the inside of my notches look pretty rough.  With a little care, the insides should look pretty, because the recipient will spend some time looking at them trying to figure out how the puzzle goes together.

Too late for this one, though.  At least it should look nice once it goes together.
Finally, all the parts are done.
One quick word about what makes this puzzle work, is a small piece called the "key."  This one has a notch on two sides, and the inside is rounded over a bit.

This piece took me quite a bit of fiddling, as not enough material was originally taken out of the inside corner to allow the key to work properly.  Take some time with this step, or the puzzle simply will never go together.  Not a result you should strive for.
The key.
Once all of the pieces were tested and fit, I put a tiny chamfer on all of the sharp edges to make it a bit more comfortable to hold, and finished it with a homemade furniture polish concoction made of beeswax and orange oil.
My Chinese puzzle.
My good friend seemed to enjoy the puzzle.  He spent a little time and put it together three times in a row!  
Gary is thinking.
AAR:
  • Construction of this project took a little longer than I thought it would.  This is normal for me.  I am confident, however, that next time should go faster.  
  • Now that I understand how the puzzle functions, I can adjust the dimensions of the puzzle to make bigger and smaller versions.  It was good to stick to the plan for my first try, as without a full understanding of the functions of the different parts, this first prototype worked correctly.
  • I think the notches I cut were a bit too accurate.  A little slop in some of the joinery might make the pieces slide a bit easier.  As it is, a few of the pieces need to be forced into the right place where the fit is tight, and the key on this one turns with only great difficulty.  Especially when disassembling.  Some looser tolerances should help things.  I went for a nice friction fit such as you would want on a dovetail joint, when what is really needed is a fit that allows the pieces to drop together without force.
  • When you give a gift to someone with kids, a bag that plays "Bad to the Bone" is an awesome distraction.
  • I think next time rather than cutting all of the pieces out, and then making the notches, I will run a dado on a wide 1/2" board, and then rip the pieces.  This should be faster, neater, and more accurate.  Gang cutting six pieces at once sped things up a bit, but there is a danger the cutouts won't all be exactly the same.
  • This is a perfect project to make with only tools from my Beginner's Tool Kit - I used a BU jack plane, a marking gauge, a Ryoba saw and a 3/8" chisel.  I also used a 5pt. rip saw for ripping, a dovetail saw for cutting notches, and a 1/4" chisel for one piece that has an especially narrow notch.  I think that these extra tools are optional, and evrything could be done without them.
This is the second puzzle I have made from Fairham's book.  If you would like to see the first, see this post.
Diagonal Chinese Crosses - my First Fairham puzzles.

Tuesday, June 10, 2014

Rehab #4 Slöjd Knife

OK, the title is a little bit accidentally misleading on purpose.  It gives you the impression that I've rehabbed four knives so far, but it really is just the one.  From yesterday's post, the #4 knife is the one I rehabbed today.
Before.
This knife was the only one that was a bit overly rusty.  I gave it an hour or two in citric acid yesterday to take care of the rust, and was pleased with the result.  There were only two little spots that were deformed a little bit from rust, and neither near the cutting edge.

The next problem was that the cutting edge was just about as dull as the back.  This will need some grinding.

I have been waiting for an excuse to re-mount my hand-cranked grinder to a place where it would be a bit more stable and where I could mount my tool rest.  I thought I would make my saw bench into a grinding platform when the need arises.

After excavating a huge hole in the middle, which didn't work (and had I thought the process through, I would have realized it), I settled on the below configuration.

Saw bench come grinding station.
The only problem with this configuration is that it requires the wheel to be spun backwards, and this magnificent grinding wheel doesn't like that as well.  I'll have to play with this a bit.  Too bad I don't have more space.

Moving on, I made do, and ground the knife to a rough shape.

It turned out rough, indeed.  But, going through the grits on my waterstones, I finally got a suitable edge.  It took a couple hours all together, but I suspect maintaining this edge should be easier now.
After.

Here's a better view of the logo
Not quite as pretty as the one Jonas' dad did, but it should be functional.  Now, to put it to work!

Monday, June 9, 2014

Goodies from Denmark

I was pleasantly surprised today with a package from Denmark.  Jonas (the author of Mulesaw) sent me a box that included a big chunk of canvas and a bunch of slöjd knives.

First, the canvas:
That's a good chunk of canvas.
This sheet should be enough for four or five Roorkee chairs.  Jonas said he got it as surplus naval stores from some ship he worked on.  Probably the Black Pearl.  Maybe the Flying Dutchman.

The canvas is heavy, about the same weight as the tent we used to camp in when I was a kid.

Speaking of camping, if that tent was ever rolled up and put away when it was wet, it would smell to high heaven if it wasn't unrolled and dried out within a day or so.

Unfortunately, this canvas smelled just like that.

I unrolled it outside, hoping that it would air out.  After about five minutes, the smell had permeated the open windows and almost gassed us out of the house.  I suspect the package was exposed to some moisture during transit, as Jonas said it didn't smell when he sent it.

I really hope that the commercial washer at work will take care of it, as the material itself looks superb.

More on this later.  Thanks, Jonas!

I once mentioned to Jonas that I was considering getting a slöjd knife from Amazon.  He forbade me, as he said his dad has dozens of these knives laying around.

Here are the knives that were in the box:
I couldn't wait to check these out.
From what I could tell, there were three Morakniv #2's and two #1's.  All vintage, and all badass.

None of them had the modern company logo on them, but they all are different vintages of the same knife.  I'll post some closeups of the logos at the end of this post.  Perhaps some Swedish galoot like Bengt would have some info on the dates these knives were made!

The first one I pulled out was the one that was wrapped in cardboard.  I was surprised as I did not expect any of these knives to be sharp.  This one was sharp enough to shave with.
This thing is sharp!
Jonas said his dad runs them through a couple grits on an electric grinder, followed by a buffing wheel to give them a mirror polish.  I am guessing the eye-balled grinding angles are just what they should be.  Jonas' dad, after all, is a retired slöjd teacher.

A couple of the others were also sharp, and a couple of them were in "as found" condition.  I look forward to rehabbing them.  In fact, I already have the one rusty one derustifying in citric acid.
I originally wanted to use the champaigne glass in the back for this treatment, but the procedure was vetoed by SWMBO.
I already have ideas on where all of these knives will be used, and would like to publicly thank Jonas and his dad for their kindness sharing some old tools (and canvas).

I can hardly wait to put them to work.  I suspect they will make all kinds of chores easier, such as using them to clean up the inside curve of a Wierix square.

Here are some closeups of the knives with logos.  Click on each image for a closer look.
#1

#1

#2

#2 - I think this is the oldest one.

#2

#2

#2

#3

#3

#3

#4

#4 - the only obviously plastic sheath, but with a leather beltloop.

#4

#4

#5

#5

#5

#5

#5
I have no idea if the sheaths are original to each knife, but I have no reason not to think so.  I suspect that the sheaths change over time a lot more than the knives do.  If you clicked on the Amazon link, you will see the design has hardly changed over time.

Wednesday, June 4, 2014

My Wierix Square


Fun build.

The lady's desk project I have coming up one of these days will need some serious resawing, unless I decide to go find some more, thin lumber.  I decided to practice up the other day.

I got a cool, new (to me) old hand saw a couple years back intended to become a re-sawing monster.  For some reason, it is filed crosscut, with massive 4 PPI ( 3 TPI) teeth.  I figured this saw would be awesome once it was filed rip.  So I started working on it.
No idea what someone was thinking filing this monster crosscut.

More on that project another time.  Needless to say, I didn't finish this yet.  Re-shaping those massive teeth is turning out to be a lot of work.

Moving on, I decided I had to try making one of those cool batmosquares that Christopher Schwarz has been talking about lately.

I had a perfect piece of quarter sawn oak, that was left over from a saw handle build a while back.
Perfect shape for this project.
I find that I have built quite a few of the Schwarz' projects over the last couple years.  I probably wouldn't if they weren't so darned fun to make.  My only criticism of this project is that he recently put plans up for these squares on the internet.   I am just guessing, buy my thought is a plan is going to make this project way harder than it needs to be.  You should use a real wide piece of scrap for this square, if you have one.  No need to scour the planet looking for the perfect piece of wood that will fit the dimensions he's got.  Just get this project over with using whatever wood is at hand.

The first thing I did with this piece of oak that was a bit over 1" thick, was to rough out the shape.  I laid it out using a french curve template that I printed out from the internet.  No need for this to be too pretty, though.  I just thought I would get the unnecessary bits of lumber out of the way to make resawing easier.

Turns out, that was a good call.
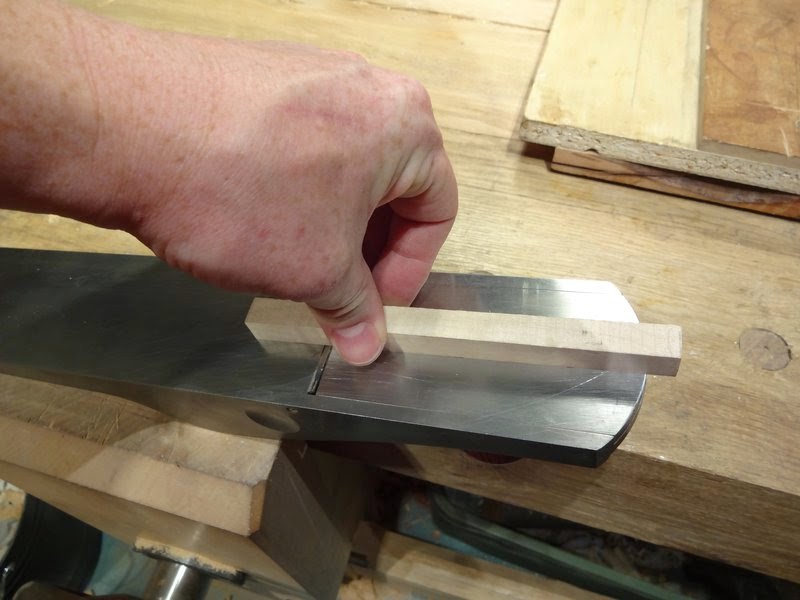
Resawing the stock was simpler with the piece cut to rough shape.
Wayyy easier.  I've tried some resawing of oak like this before, and it wasn't pretty.  Perhaps my technique is getting better, but most of this resaw job was on the skinny end of the stick.

In case you are wondering, the saw I used for this was a 5 point rip.

To be on the safe side, I laid out the board at 9/32", and cut a little fat of the line.  Turns out there was no need.  I wound up having to plane a lot away to get it to fit in the 1/4" groove I cut in the stock of the square.
I wound up with plenty of extra for another one.  Maybe even two!
I cut another bit of scrap oak to rough dimensions, and spent some time squaring it up.  I didn't worry about the ends, but I made it perfectly four square.  This will help if I want the square to be used both ways.
Squaring up the stock.  Is that considered a clever pun amongst woodworkers?

I couldn't be bothered with clamps.  When it finally went home with a tight fit, I got out the hide glue and stuck it together.  A couple whacks with a mallet to get it square-ish and I was done for the day.
Waiting for the glue to dry.
Today I spent a little time in the shop after work finishing this up.  First, I used my bowsaw to finish cutting the pattern out the way I wanted.  I clamped it up in my Moxon vice to get it higher up off the bench.
See what I mean about building CS projects?  Moxon vise, Roubo bench, and CS' bowsaw being used to hold a Fledermaus square.
The bowsaw worked really well cutting the shape out except for the parts I spazzed out on.  Although I am getting better with this tool, I suspect a bit more practice wouldn't hurt anything.  I cleaned everything up with a fine rasp I have that is oval shaped, and a scraper.
Hand cut rasps with fine teeth seem to work well enough for this.
I still don't have any decent hollows and rounds, so I decided to make my molding with only a rabbet plane.  First I cut 1/8" rabbets on either side of the stock,
Unfenced rabbet plane in use.
then I chamfered the side down to a point that I liked.  I set my marking gauge to the distance I cut here, and transferred the mark to the other rabbet, so the chamfer would look exactly the same on both sides.
Chamfering the edge.  I used the rabbet because I already had it out for the rabbets I just cut.  No need to get another plane out.
I think it turned out as a nice detail.  I'll have to remember that trick the next time I want to chamfer something.  A side benefit is that I am fairly confident that the chamfer is exactly 45 degrees, because I was able to register the rabbet plane on both arises taking the guesswork out.
I like it.
I have to say, that this square feels better to me than any of the other wooden squares I have in my shop.  This one is a little bigger, and I know it is dead-nuts accurate.  I checked.