Showing posts with label More Beginner's tool kit. Show all posts

Friday, June 9, 2017

Un-Asked-For Advice For "Sven"

I am lucky in that I often get to chat with Jonas from Mulesaw when he is at work. He is chief engineer on the starship "Enterprise," and basically is sent to work for a month on his ship and then gets a month off at home where you and I rarely get to hear from him.

Jonas mentioned to me yesterday that one of the officers on his ship is interested in getting started in woodworking. I don't know this officer's name, but Jonas said he lives in Stockholm, so I'll call him "Sven."

Sven is single (aka: no one to keep him from spending all his money on Lie-Nielsen tools), and started by buying a set of Narex chisels and joined a woodworking club where he can go to use power tools like table saws, jointers, planers, etc.

I thought it might be an interesting mental exercise to recommend to him what tools he should consider.

Especially since I wasn't asked for my opinion.

This is fun because everyone is different, and there are lots of opinions out on the internet (including on this blog) of what a hypothetical "beginner" should buy to do woodworking. This case is a little different, because we know something about him.

Shannon Rogers recently put a video up on his blog, the Renaissance Woodworker, his opinion of what a beginner should put in his kit first, and it looks an awful lot like what I recommend. Since we know that he already has a set of chisels and access to some woodworking machinery, I'll tweak my recommendation especially for Sven.
A great first project could be saw benches.

Chisels


First, I'll recommend putting all of your new chisels away in the box and not using them, except for the smallest one, a medium one like a 10mm, and a wide one like a 25mm.
Photo credit: workshopheaven.com
This might seem sacrilegious, focusing on fewer chisels will allow you to keep them in better shape and assist you greatly in your sharpening skills.

I find I very rarely need a chisel that is a specific size, and I have gotten by just fine by using a small number of chisels like this for a few years now.

If you don't believe me, remember I said so when in six months you reach for a chisel out of your nice graduated set and choose one not because it is the exact size you need, but because that one is the least dull of all of them. Keeping seventeen chisels razor sharp and perfectly tuned is much more difficult than keeping three that you use all the time that way.

After you get used to these three chisels, you can then add another one or two into your working set when you have a reason to do so.

Planes


I still need to stick with my recommendation of a jack plane being your first plane. If you choose a Lie-Nielsen #5, it will work perfectly right out of the box. Take a close look at a bevel up jack, too. This could be the answer for you. I really like mine and use it to do an awful lot. Stick with one blade for now (It's easy to get caught up in buying three different blades that you don't need). If you get the Veritas, you have the option of the A2 blade (like the Lie-Nielsen), O2, or PM-V11, Lee Valley's proprietary powdered metal blade. I would go for the O2, or maybe the PM-V11 if you want to spend a bit more. You'll also get excellent results out of an A2 blade. At this point, you don't know what you prefer yet, so it probably doesn't matter.

Another option would be to get a good vintage plane. Bailey style planes were made for a long time in Sweden, and those are awesome because they come with a blade made by one of the most fantastic tool steel blade makers of all time, such as E.A. Berg. The plane bodies themselves are of widely varying qualities, in my experience, so if you go this route you would benefit picking out your prospective vintage Swedish plane with the help of an experienced hand tool junkie. I'm sure Bengt would love to help.

I would recommend using this one plane for a while to get the hang of it, and if you think you need more planes, get a smoother (probably a #4, or maybe a #3 if you like that better), and then a #7 jointer (or a #8, if you can find one).
My vintage Sargent planes. A #4 size and a #8 size. They work every bit as good as a Lie-Nielsen now that I've tuned them up.
Jonas said he recommended to you one of Veritas' moving filetster planes. I hadn't really thought of this as a plane for beginners, as they are pretty expensive, and they are not absolutely necessary. If there is money burning a hole in your pocket, you could do worse. This plane works like crazy right out of the box. Adding it to your kit sooner rather than later will have it's biggest reward when doing dovetail joints. Of course dovetails are possible without it, but this plane will make the inside corner of your joint look like you've been making dovetails for decades.

Other Tools


Check out my series of posts about hand saws, sharpening equipment and layout tools. I still stand by those.

Except that I've moved to oil stones. I suppose I need a blog post about those, now.

What else should Sven spend his hard earned Starfleet pay on? I know there are about 50 million more opinions out there. Let's here some in the comments!

Saturday, February 11, 2017

Bevel Up Jack Plane - Will It Work as Your Only Plane?

A few weeks ago, one of my very favorite woodworking heroes, Richard Maguire, wrote a blog post about low angle planes. I've been thinking hard about this post for a while, because I have in the past advocated big time for my Veritas bevel up jack plane (BU jack).

I have to say that Richard's conclusions about the BU jack are spot on, 100%.

Does this mean I am recanting my endorsement of this tool? Absolutely not.
Richard's premise in his blog post is that BU planes work better than other planes at the extremes of the spectrum - basically that they do one thing really great. That is planing end grain.
This plane is really great at end grain.
I whole heartedly agree. They are much better at end grain due to the low angle possible with the BU design.

What about the rest?
Can one joint with this plane?
Well, I agree with Richard. Other planes do a better job at basic tasks than this plane. A 24 inch jointer does joint better than this jack plane. A dedicated jack with a cambered blade does better at hogging out lots of material than this plane. A #4 smoothing plane with a finely set chip breaker will do a better job at smoothing than this plane.
This thing works great shooting end grain. Did I already say that?
Then why do I endorse this plane so enthusiastically?

Well, I have to say that while those other planes do better at those tasks than this plane, the BU jack will indeed do them all.
I almost always do all my jointing with this plane.
A while back, I spent more than a whole year using only this plane and no other bench plane, for no other reason than to put my money where my mouth was regarding being able to build with an extremely limited tool set.

I had noticed that many great woodworkers had recommended "beginner's tool sets" that required many thousands of dollars to fill out before a beginning student could feel like they could do "proper" woodworking.

I thought that was baloney then, and I think it is baloney now. A jack plane (whether BU or bevel down, new or vintage), is a great first tool to get because of the versatility.

Other tools work better for those everyday tasks, but one plane instead of four can be a deal maker for a beginner.

After my exclusive use of this plane for the time I used it, I found out that "plane monogamy" (as Christopher Schwarz puts it), is a wonder.

Face it, there are all kinds of situations where even the largest hand tool shops require making a plane do a bit more than what's in it's name.

To be able to do these amazing tricks with a plane, one really, REALLY needs to know their tool.

I learned that it really is true that you can't buy skill by purchasing a new tool. One should learn how far they can push (get it?) a tool they have before deciding if another is needed in their situation.
Plus, using the same tool is faster: you already have it out.
There are a few things I do to make it easier on myself.

For rough work, I do my best to avoid having to thickness stock very much. My wooden jack plane with an eight inch camber on the blade hogs off wood like crazy and in no time flat. A BU plane is difficult to put a camber on the blade because of the angle of the bed. Taking 1/16" thick or thicker shavings isn't going to happen.

It will take medium sized shavings. If your wood is roughly the thickness you need it, and mostly flat to start with, it is a breeze to bring it to good working dimensions with this plane.

For fine smoothing, again, choose your wood wisely. This plane will easily achieve a finish quality surface without much work. Even without going crazy with steep sharpening angles. Make sure the blade is as sharp as you can get it, and you will be fine. At least until you try to plane against the grain. Even then, lighten the cut a little more and close the adjustable mouth as tight as you can.

For jointing, I find this plane to be long enough to joint nearly anything I can throw at it accurate enough for gluing up a panel. It does take some skill. One will get good at making edges flat eventually with this tool. Just keep checking with a good straight edge, and practice removing the parts that aren't flat. Follow that up with a fine shaving from one end to the other. I find it rare that I need to pull a jointer out for edge jointing anymore.
In conclusion, I would just like to agree with Richard again that this plane shouldn't replace everything in your plane corral. However, if you are looking for your first bench plane, this might be a good place to start.

Wednesday, January 28, 2015

Fingers In the Till - Lee Valley Low Angle Jack

Things have been a bit quiet in my shop lately.  I have a couple projects down there that are itching to get finished, but for one reason or another, time in the shop just seems to come up less frequently than I would like.

As a way to continue to record my thoughts for posterity, I thought I might take some time occasionally to dip my hand into my tool chest and share with you whatever comes out.

I think I'll dub this series:  Fingers In the Till.

A rather fetching photo of my LV LA Jack in action.
First up is my beloved Lee Valley Low Angle Jack plane.

I've written about jack planes before, and I think now that I have been using this plane differently since then, I can say a bit more about it.
Used to bevel this large panel.
In my original treatise on my take of what a Beginner's Tool Kit should look like,  I stated that one can do woodworking with just a few tools.  One of them should be a jack plane.  To put my money where my mouth is, I built a few projects using only those tools.

Something unexpected happened when I moved to exclusively using this plane:  I really got to like it.
Rough work across the grain.  In this case, flattening my workbench.
I think that using one plane, to the point where you know every single little quirk about it and can use that knowledge to the tool's best advantage is far more useful than having a choice between 50 specialty planes to do specific tasks.  Up until the time I wrote that beggining tool kit post, I would typically use a scrub, a jointer and a smoother for those respective jobs, and 99% of my work with this plane was relegated to use on a shooting board.
This plane excels on a shooting board, but that's not all it can do.
Intelectually, I knew this plane could do all this other stuff, but figured that if I had a dedicated smoothing plane and a dedicated jointer plane, those should work better for those tasks.  Right?

Thickness planing with the jack.
Well, the truth of the matter is for most furniture sized work, the jack plane works just fine for those tasks.  In fact, it can be easier.  Not only do I only have one plane to maintain and sharpen vs. three, this one plane can stay on my benchtop within easy reach to do whatever task is next. 
Dimensioning a piece of cherry.
I feel like this plane is now an extension of my arm.  I know how this plane will work and what to do to it for any particular job.  I have never experienced that before.  Continually switching between different planes prevented me from really getting the most from those planes.  Using this one exclusively (mostly) not only helped me get the most out of this plane, but made me a better planer in general. 

In short, I thought using only one plane would be do-able, but instead I found out using only one plane increased my skill exponentially. This was a far bigger gift than only having to buy one plane.
It only took minutes to get this nasty piece of pear looking silky smooth using only one plane.
If it sounds like I am going crazy over the experience of getting good with one plane rather than specifically this Lee Valley plane, well, that's true.  I know that Jonas thinks the same about a wooden smoother he has.  He switches out his smoothing blade to a radiused blade when he needs to take thick shavings.  Paul Sellers recommends a vintage Stanley smoother is really the only bench plane one needs.  Christopher Schwarz has only a jack plane on his list of essential tools in the Anarchist's Tool Chest (incidentally, this book is what set me on the path to what I currently keep in my tool chest).

So, enough about all that philosophy.  Let's get to this plane specifically:
Sometimes I clamp it upside down in the vice when working small parts.
This plane is of the bevel up variety, similar to a standard block plane.  This means there is no chipbreaker, and the cutting angle includes whatever angle the blade happens to be sharpened at.  This can be a powerful feature to use to your advantage!

What I really like about this plane is it's versatility.  I find myself twisting the front knob to adjust the mouth all the time.  I always set up the plane by adjusting it for a fine shaving, ensuring the shaving is the same thickness all the way across.  Then, I will turn the adjuster knob to make a more agressive cut, depending on the task at hand.  I like to take the most agressive cut appropriate for the task.
Smoothing a cribbage board.  I love this shaving!
Generally, the deeper the cut, the more I open the mouth.  I think the mechanism to adjust the mouth on this Lee Valley plane is better than anything else out there.  Even better than the Lee Valley jointer!
Chamfering with the aid of my Moxon vice.
I like the fact that you can change blades out for what you are doing.  I have the standard 25 degree blade, a 38 degree blade, a 50 degree blade, and the toothing blade.  I bought them all before I really started using this plane.  In my experience 99% of usage with this plane works with the standard blade.  If it doesn't, try sharpening it before you go crazy with other blades.  But, when you need it, those steeper angles really do the trick.  I've only "needed" to use the 50 degree blade once.
I think in the old days I would have bevelled this board with a block plane.
This plane is also built like a tank.  I am embarassed to say that it has fallen from my bench twice (that I can remember, anyway), no worse for wear.  However, I wouldn't recommend trying that out just to see if it works.
Here's a photo of my friend John playing trombone.  He sometimes reads this blog, and I'm sure he'll be amused to see his picture completely out of context here.
A famous woodworker said in a class I attended that this is the finest plane Lee Valley makes.  I don't know about that, but it's the finest one I have.
More little parts.  If you try this, watch your fingers!  I have clamped the handle in the bench vise.
When I first bought this plane, I wanted it for use with a shooting board.  I also didn't know if I wanted this one, or the one made by Lie Nielsen.  I chose this one based solely on that it was cheaper in price.

If I were to do it over again, I might choose the Lie Nielsen plane because the fit and finish on the Lie Nielsen is a bit finer, and it might be a bit easier to push since the blade is somewhat narrower.  I think that the two plane manufacturers both came out with an excellent tool, and it is not worth it for me to make that small of an upgrade (and learn another tool).
Here I am smoothing the grooves made with the toothed iron in the same plane.
I suppose the moral of this extremely long blog post is that if you are an experienced hand tool woodworker, and don't yet have an LA jack, you probably don't need to go out and buy one.  Instead, try narrowing your working arsenal of planes down to just the minimal amount.  If you are new to woodworking and looking to buy a plane to fill a hole in your tool chest, this is a fine choice that comes with my highest recommendation.

Do you have experience with this plane?  Do you have a favorite plane?  I would love to hear about it in the comments.

Sunday, June 22, 2014

More Fun with Fairham

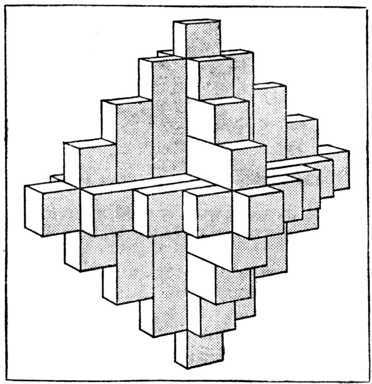
Needing a quick gift for a good friend's 40th birthday party, I pulled out my trusty copy of William Fairham's Woodwork Joints, and found a quick project that looked both fun to build, and fun to use:  the Chinese Puzzle.
Fairham's Chinese Puzzle
"No problem, I should be able to knock this out in a couple hours after work," I thought.

I find that it is really difficult for me to estimate the time required for a project, if I haven't made that project before.  I wound up spending about six hours total on this project. 

I never said I was fast enough to make a living at this.

Decisions, decisions.
The first order of business was to find appropriate stock.  Fairham says to use 1/2" square stock for this project. 

I find that when making puzzles, it is a good idea to stick to the directions exactly for the first time, so an understanding of the puzzles function becomes clear before one starts messing around with the dimensions.

I have quite a bit of stock that would be OK for this project.  However, the pear, walnut and oak I had was all just a smidge too thin.  It was at this time that I remembered that I have actually started this project once before, and already dimensioned some maple (Acer platanoides, I think).  

I abandoned this project before because it appears I crossed my layout line while ripping on one of the sticks.  Lets charge ahead anyway, as I think that there is enough without that one.  One of the other sticks appears that I dimensioned three sides, and left one for later.

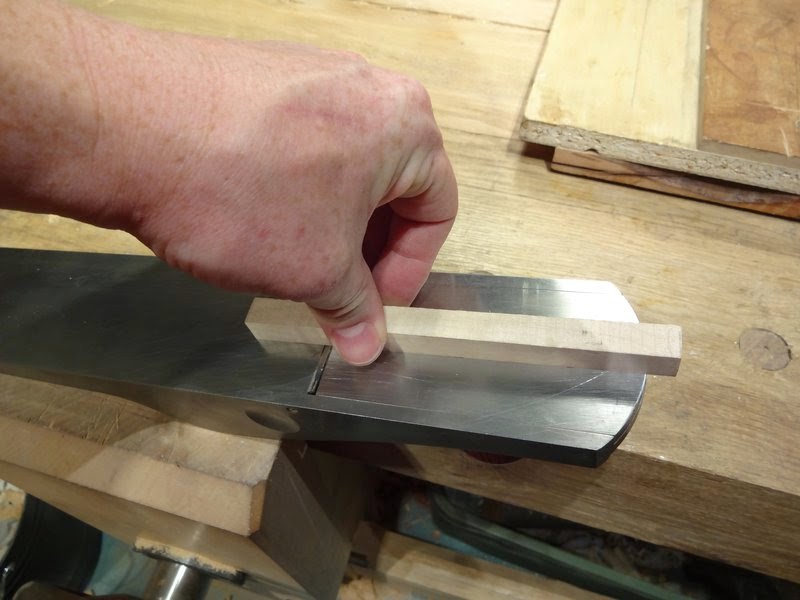
My first step is to plane this last side down to my mark.  I find that with small parts it can be easier clamping the plane in the vice and moving the small parts over the plane.
Thicknessing small parts.
Using a cutting gauge is nice for precise jointing, as it is obvious when final thickness is reached.  As in the photo below, a little strip comes up to let us know we're there.
In this case, there is a little more to go on one side before I'm done.
After the stock is prepped, all 21 pieces can be cut to length.  I do this on my shooting board,
Cross cutting parts to length.
because I can shoot the ends without changing the set-up on my bench.
All parts are now perfectly the same length.
It doesn't take too long before I am done, and realize I am still short quite a few of the needed 21 pieces.  I need some more 1/2" stock!
This bit of 3/4" maple will have to do.
So much for being smart. 
Ripping a 1/2" strip off of my scrap.
This wound up slowing me down.  Dimensioning this stock is not difficult, but you must take your time to do it right.  All of the puzzles pieces must be as perfectly the same as possible in order that the puzzle will go together and come apart again.
Finally.  Let's start cutting the notches.
Once all of the parts are dimensioned and cut to length, the notches for the puzzle can be made.  I marked the notches out with my cutting gauge, sawed to the line and chopped out the waste with a 3/8" chisel.

Now that the party is coming up fast, I need to hurry.  I'm afraid to say that the inside of my notches look pretty rough.  With a little care, the insides should look pretty, because the recipient will spend some time looking at them trying to figure out how the puzzle goes together.

Too late for this one, though.  At least it should look nice once it goes together.
Finally, all the parts are done.
One quick word about what makes this puzzle work, is a small piece called the "key."  This one has a notch on two sides, and the inside is rounded over a bit.

This piece took me quite a bit of fiddling, as not enough material was originally taken out of the inside corner to allow the key to work properly.  Take some time with this step, or the puzzle simply will never go together.  Not a result you should strive for.
The key.
Once all of the pieces were tested and fit, I put a tiny chamfer on all of the sharp edges to make it a bit more comfortable to hold, and finished it with a homemade furniture polish concoction made of beeswax and orange oil.
My Chinese puzzle.
My good friend seemed to enjoy the puzzle.  He spent a little time and put it together three times in a row!  
Gary is thinking.
AAR:
  • Construction of this project took a little longer than I thought it would.  This is normal for me.  I am confident, however, that next time should go faster.  
  • Now that I understand how the puzzle functions, I can adjust the dimensions of the puzzle to make bigger and smaller versions.  It was good to stick to the plan for my first try, as without a full understanding of the functions of the different parts, this first prototype worked correctly.
  • I think the notches I cut were a bit too accurate.  A little slop in some of the joinery might make the pieces slide a bit easier.  As it is, a few of the pieces need to be forced into the right place where the fit is tight, and the key on this one turns with only great difficulty.  Especially when disassembling.  Some looser tolerances should help things.  I went for a nice friction fit such as you would want on a dovetail joint, when what is really needed is a fit that allows the pieces to drop together without force.
  • When you give a gift to someone with kids, a bag that plays "Bad to the Bone" is an awesome distraction.
  • I think next time rather than cutting all of the pieces out, and then making the notches, I will run a dado on a wide 1/2" board, and then rip the pieces.  This should be faster, neater, and more accurate.  Gang cutting six pieces at once sped things up a bit, but there is a danger the cutouts won't all be exactly the same.
  • This is a perfect project to make with only tools from my Beginner's Tool Kit - I used a BU jack plane, a marking gauge, a Ryoba saw and a 3/8" chisel.  I also used a 5pt. rip saw for ripping, a dovetail saw for cutting notches, and a 1/4" chisel for one piece that has an especially narrow notch.  I think that these extra tools are optional, and evrything could be done without them.
This is the second puzzle I have made from Fairham's book.  If you would like to see the first, see this post.
Diagonal Chinese Crosses - my First Fairham puzzles.

Monday, December 16, 2013

Walnut Dining Table

I have no idea why, but this project has elicited very little excitement from me.  I'm sure it will be cool when I am done, but the motivation to work on it has been low.  I bought the lumber about 18 months ago and basically all I have done to it in that time was run all the boards through a surface planer.

I decided that this has to change, so I recently started working on it again.  I am hoping that putting it up on the blog will give me that extra "have to" to finish it.

Lately, I got the boards laminated together for the top.  I spent a couple of days when I first got this lumber laying it out to make it look pleasing, and I think I did OK with what I had available.  It was now just a matter of jointing the edges and gluing them up.

Doing a big table top (this one is a bit over 150 cm long and 90 cm wide) increases the complications with gluing up a panel exponentially.  Add to that, that I wanted to do it all with my LV BU jack plane just because I could, and I was busy for a few days.

Edge jointing for the laminated table top.
Most of the joints went together easily, but there were a couple that took a while to get right.  It is weird how that works.  All went OK and I got it all glued up pretty much to the standard I envisioned.

Last weekend I got to start working on flattening.  I started on the underside.  There were a few boards that were proud of the others, but overall it was a good glue-up.  I was happy.  I continued to use my BU jack, but I did use a toothed iron to go cross-grain for heavy cuts.
Toothed iron for cross-grain material removal.
I haven't ever flattened a panel this big by hand before.  My bench top is less than two feet wide, and that makes a big difference.  Pushing this plane across the grain for more than 90 cm was a real workout.

Oh, I forgot to mention, the table had a bit of twist in it that I had to plane out, too.  Luckily the underside doesn't have to be that pretty, as it was definitely functionally flat as opposed to a glass-smooth surface.

Now it is time to plane the show surface.
When I started the show surface, I knew from experience that there was a lot of wood to remove, but I had to be careful not to let any of the massive tear-out occur that happened on the underside.  After a few careful passes with my toothing iron, I gave up.  This particular walnut has some spots that either are soft or the grain is going crazy, or both.  There is no way I can bring the surface down with this plane making it look neat with no tear out.

Did I mention I was doing this at the Army's woodshop on my post?  No?  Well, I was working this piece at the Army's woodshop on my post.  This small shop has few machines, and pretty much none of them would I use on a piece of furniture I would put my name on.  Especially, there is not a machine that will surface a table top.

But...

There was an old Stanley #5 there that was rescued from the dump who knows how long ago.  I asked the owner if he minded if I grind a radius in the blade, and he didn't as he has had that plane for decades without ever having used it.

I ground an 8" radius on the blade, and honed it to a state of "sharp enough."

I am amazed.  I haven't ever used a vintage Stanley like this before, and it worked pretty much perfectly to flatten out this panel without gouging out giant chips from deep within the middle of the panel like the toothing iron did.
Stanley #5 and an iron sharpened with an 8" radius for rough work.
I have used in the past my scrub plane, which has a 3" radius.  I would say the difference is stark.  The scrub with the 3" radius is perfect for actually reducing the thickness of a board, where this did a fantastic job of doing the rough part of flattening this giant panel.  It is a thick top at 40mm, but I wasn't looking to bring it down to 4/4, just bring it down to a state of flat-enough-for-a-dinner-table.
Here is where the top stands now.  Note the wavy lines left from the jack plane.


I have taken the parts for the legs home to my own bench to get them ready.  I am laminating the legs together.  Each leg will be however square I can get them laminating two 40mm thick pieces together.  Probably about 75mm square or so.  I am planning on veneering some walnut veneer on the edges of the legs that show the lamination joint, similar to how I did the legs for the in-law's oak table I finished about a year ago.

Not sure if you can see it, but this laminated leg has veneer on one face to make quarter sawn figure show on all sides.

The Frau votes against this idea, she thinks that it will be obvious that some of the leg faces are veneered, but I think it will look better than showing that big lamination seam.  I'll have to test it to find out.  In the end, I think it would have been better to spend a bit more money on some thick stock to make the legs from one piece of lumber.

The other thing I haven't settled on yet is the final design.  More on that in a following post.

Sunday, June 30, 2013

Polite Disagreement

Today I read a blog post by Paul Sellers that I would like to offer an alternate view of.

If you haven't heard of Paul Sellers, he is one of the big names in hand tool woodworking at the moment. He has schools in both the UK and the US, and seems to be making a lot of converts to hand tool woodworking by cutting out much of the B.S. and marketing prevalent in many publications today.

I'll not argue with his results.  I'll not argue with his vast experience. I'll not argue with his success, nor the success of his students. I really don't want to argue with him at all!

Paul Sellers is good for woodworking today, as he has been able to reach a lot of people. I love his YouTube videos.

Paul Sellers is a big fan of the Stanley #4. Older ones, not the new ones. I can't argue with what he does with that tool. One of his best YouTube series is about making a workbench in the back yard with home center lumber, and the only plane he uses is a #4. Brilliant.

His blog today has a question from one of his readers on whether or not a bevel up plane is a good first plane, as many state. He argues that a woodworker's first plane should be a #4, that it is much more versatile than a bevel up plane, and argues with the fact that a 25 degrees is much too low for a plane like this.

Here is my take. I advocate a first plane being a jack plane, and a bevel up jack is a more-than-valid choice. But not the only one. You can read about why I think this in a post I did a while back about what I think should be in a beginner's tool kit. Essentially, you can fudge both smoothing and jointing with a jack plane without too much new to learn.

I think jointing with a #4 smoothing plane is something that a beginning woodworker may have a little more trouble getting the hang of.

Oftentimes for beginners, cost is also prohibitive. Here is where Paul wins big points. An old, rusty smooth plane can be purchased for the fraction of the cost of a new Lie-Nielsen. But, let's look a bit closer. He also advocates in this article getting a #5, a #4 1/2, and a #5 1/2. I'll agree that in the UK you can get these four planes in good shape for a lot less. But, in the US getting these planes in the kind of shape that you will be able to get working as a beginner might cost quite a bit more than a brand new bevel up jack. I think the big advantage here goes to the premium manufacturer.

My Veritas BU jack in action
If you get a BU jack made either by Lie Nielsen or Veritas, you can reasonably expect to go straight to work with this tool right out of the box only having honed the blade. You can't say that about a vintage tool no matter how new it looks. Don't get me wrong, it isn't hard, but it is another skill you need to acquire as a beginner, and I think you should learn woodworking first.

Also a word about the 25 degree thing. I grind my BU jack blade at 25 degrees (or so). The reason I do this is because of the way I sharpen. I think that this is probably what most BU enthusiasts also do. I sharpen and hone a microbevel at 30 degrees. This is the angle that Paul Sellers recommends. His method for sharpening is a lot different than mine, but we both get to the same angle when the blade hits the wood. I know people who use and swear by his method. If it gets to sharp, and you can do it, then you are doing it right, in my book.

The real versatility with this BU jack is the fact that it is so easy to make that microbevel any angle you want. What I do is have a few different blades sharpened at different angles depending on what the application is.  Changing the angle on a bevel down plane involves back bevels.

In conclusion, I think I will say there are many different ways a beginner can go with a plane intended for multiple uses.  The argument for a bevel up plane is valid because in my opinion there is no better way to turn off a new woodworker than for him or her to think that it is too hard.  Indeed there are skills to learn in order to build furniture (part of the fun), but adding skills needed to set up a finicky vintage tool to the mix might be one hurdle too many for the average newbie getting their only information from the internet. There isn't only one way to learn woodworking.

What are your thoughts?

Monday, June 3, 2013

Shut Up and Sharpen - My Entry

Chris Schwarz recently challenged people to shoot a quick video of how they sharpen.
Here's mine.

Tool Review: Trevor the Mallet

Trevor the Mallet
Finally! I am able to work on this Shaker side table project. It is weird how a month can slip by without having an opportunity to get any time in the shop.

Today the first order of business was to finish bashing out the mortises.  A while back, I did a poll on how I should fix a mistake, because I went and chopped two mortises out of a leg that only needed one. 

Oops.

Feedback I received on that post was nearly unanimous in the desire for me to stick with the original leg orientation, and patch the extra mortise.  It was a great idea, as the drawer would cover the patch and no  one probably would ever know.

With this information and advice in mind, I promptly ignored it and decided to re-orient the legs.  These legs all look good, and I don't think it will detract too much.  The biggest benefit, is I was able to move forward with this project, rather than go back and fix a mistake.  

Worst comes to worst, I'll just build another one.

What does this silly table dilemma have to do with Trevor the Mallet, you ask?  Well, nothing.

I was able to finish the mortises on the legs without causing a revolt with the neighbors.  It is Monday morning, I waited until most who would be going to work left, and spent an hour bashing away.  I found out that putting the leg in a clamp and chopping them on the floor Japanese style makes remarkably less noise in my shop than doing it on the bench.

Too bad, really, because my Roubo with a 5 1/2" oak top was born for mortising.

Chopping these mortises really gave me an opportunity to give my new heavy mallet, Trevor the Mallet, a good workout.

The mass of this mallet is perfect.  It isn't so heavy that you get really tired chopping a few mortises, but it is big enough to make mincemeat out of the cherry that I am working on.  The mass makes things nice and easy, just the way I like them.

The handle is comfortable, and the traditional shape of it lends itself well to knowing exactly where you should be holding it.

The big advantage, in my opinion, is the angle of the faces of this mallet.  While constructing this mallet, I measured the distance between where the center of the mallet face would be to the tip of my elbow.  I used a string to lay out this angle on the face of the mallet, and cut the face using this mark.


This angle is a lot steeper than any commercial mallet I have ever used.  I am convinced that this is the perfect angle for me.  

I had absolutely no problem hitting the chisel square every single time without even having to think about it.  This lets me focus on the angle my chisel is at when entering the wood.

As long as the lamination holds together for this mallet, I see no reason why this mallet won't last me a good, long time.  There seems to be very little damage to the face of this mallet, which gives me even more confidence.

If you didn't catch it, I built this mallet using only the tools in my basic tool kit.  You can read about this build here.

Next up, a review of Trevor the Mallet's little brother, Travis the Mallet.


Sunday, April 28, 2013

Essential Tools for Newbies: Revisiting the Bevel Up Jack

Last December I wrote a series of blog posts about what hand tools a beginner should first focus on.  There are a lot of list of "essential" tools out there, and making sense of them for someone new to hand tools can be daunting.  I have seen some lists of tools that every woodworker "must" have that would have scared me off of hand tools if I had seen it before I got started.

My thoughts are that one should start woodworking with the tools you already have, along with some truly essential tools for woodworking.  In short, my list includes only the following tools, which I think make a great place to start:
This seems a bit simplistic.  I'll admit that it is.  However, you can use these tools to build some cool stuff.  My recommendation is to start with these and once you get good at them, you'll soon find out what other tools you need.  Hopefully, you will find out that there are even more tools you don't need.

I had intended to build some real furniture using only these tools.  Yes, I did build several projects using only my Beginner's Tool Kit (BTK), but I have yet to get a furniture build completed.  Jonas from Mulesaw stole my thunder a bit by building a dovetailed sea chest (with canted sides, secret compartments and self-made hardware) using only the tools that happened to be on the ship he was on at the time.  This included only a Stanley #3 smoother, a hacksaw, a powered hand planer and a few junky chisels.  Trust me, it is possible to do fantastic things with just a few tools.

Made with a hacksaw, duct tape and chewing gum by Jonas.
Moving on to the actual subject of this post:  since I have written this series I have used my Veritas Bevel Up (BU) jack plane with the stock 25 degree iron for all of my planing tasks, almost exclusively.  My jointer and smoothing planes have rested comfortably in the bottom of my tool chest since then.  I only used a vintage (new to me) scrub plane on my current project just the other day.

My overall impression:  This plane works like crazy.  I haven't really missed the others.

BU Jack it use.
Handplane monogamy has not been the sacrifice I thought it would be.  In fact, it is quite liberating.  Not having to spend time choosing a plane, or for that matter, not having to keep four or five different blades sharp is a big benefit.  Focusing on just keeping one iron sharp makes it feel like I am being a lot more productive.

The secret is in the BU jack's versatility.

Ninety percent of what you need a bench plane for is one of three things:  rough work for removing a lot of material, flattening, and smoothing.  Let's go into how the BU jack performs in these three tasks, as well as some others.


BU Jack as a Fore Plane

A fore plane is one of the first planes I use on a board straight from the lumber yard.  After sawing a board to rough dimensions, I will use a fore plane to remove all of the fur and get things sort of flat and square, taking the board down to near final thickness.

Traversing my bench top.
Adjustments needed 

Open the mouth wide.  On the Veritas model I have, it just takes a twist of the front knob to loosen the mouth, and the knob pushes forward to open the mouth. It takes about a half a second to do, and I am back to work.  Once the mouth is open, the blade can be advanced for a heavy cut.


How to do it

From a rough board I always start by making a couple swipes along the back edge to create a chamfer to prevent spelching, or blow out.  Then, I will traverse along the whole board, planing across the grain.  After a few passes across the grain, I will switch to a diagonal pass, followed by another diagonal pass 90 degrees to the first diagonal pass.  If at this point, there still are some low spots that haven't been touched by the iron yet, I will start the process over.

Once the whole face is clean, I will check the width and along the length with a straight edge to see if it is flat, and use winding sticks to check for twist.  The board does not have to be perfect at this point.  If there is a major flaw, it might be quicker to fix it at this stage.


BU Jack as a Jointer

After your board is roughed into shape, you will want to make it perfectly flat on it's faces and edges.  The Veritas BU Jack is 15" long, which is a bit short for a traditional jointer, but with a bit of care you can get excellent results.


Adjustments needed 

Retract the blade and tighten the mouth.  The finer the cut, the more accurate the results, but the longer it takes.  One benefit of the versatility of this plane is you can start with a medium setting and make it fine once you start getting close to finished.  It wouldn't hurt to run your iron over your honing and polishing process before jointing.


How to do it

If your board still looks a bit rough after the fore planing process, you can start on the face with more alternating diagonal cuts.  I wouldn't do any traversing at this point.  Alternate diagonal and with-the-grain passes until the deep gouges are removed.  Once the face looks perfectly flat, check with your straight edge and winding sticks.  Your face might start looking like it is ready for finish at this point, but don't pay attention to that.  We are looking for dead-nuts perfectly flat reference surfaces.

Once the reference face is done, we mark it and move to a reference edge.  I will take my time planing this edge as it is easy to mess up.  Once the plane is taking full length and full width shavings, I can check my progress just like before with a straightedge and winding sticks.  If I am satisfied, I will next check with a square to ensure this edge is perfectly 90 degrees to the face.  It often is not.  To correct this, I will move the plane over to the high side of the edge and take a full length shaving with just the edge of the plane taking a shaving only half the width of the edge.  I use my fingers as a fence to ensure the width of the shaving is consistent.  After this, I will take a full width shaving and check my progress.  It should be better.  Continue this way until the edge is perfectly 90 degrees.  This edge is marked to keep track of the reference edge.

Now that there is a reference face and an edge, I can use a marking gauge to mark the final dimensions of the remaining face and edge.  Now it is just a matter of planing down to the line.  If there is a lot to take off,  the mouth can be opened and the blade advanced for a thick cut like in the first step.  When I get close to the line, I change everything to a very fine cut and move to the line.  When it disappears, it is done!


BU Jack as a Smoother

This plane makes a pretty big smoothing plane, but if you were careful in the flattening steps, this plane can be made to work nearly as good as any smoother.


Adjustments needed 

It is not a bad idea to touch up the blade on polishing medium.  Hopefully, after this step the wood will be in good enough shape to apply finish, so our best edge is useful.  Set the blade back to a very thin cut.  I like to close the mouth to as tight as I can get it without it touching the blade.  One alteration I did to my blade was to round over the sharp corners on a course stone.  It just takes a couple rolling swipes, and instead of a sharp corner, the blade will have rounded edges.  This helps avoid plane tracks during smoothing, and I haven't found that it has any negative side effects during roughing or jointing.

If you really want it to be a smoothing monster, hone a 50 secondary bevel on your blade, or drop in a dedicated 50 degree blade.  There is not much that this plane (with a total 62 degree angle) will not be able to handle.


How to do it

I will take my time and inspect every part of the surface.  There likely are some plane tracks or tear out left over from the jointing process.  These fine cuts should take care of those.  I look for wispy paper thin shavings as a sign that things are working correctly.  The final test is if the surface meets your exacting standards.


Other Things in Which a BU Jack Excels

Shooting

Nothing squares end grain as easy and fast as a plane with a shooting board.  This easily made shop appliance needs to be in every shop.  With this appliance, perfectly square end grain is a sure thing, every time. The real secret to shooting quickly, is to get better at crosscutting.


Jack on a shooting board.

Adjustments needed 

Sharp.  As always.  If your end grain has a line or two after shooting, it means there is a ding in your cutting edge.  A quick couple swipes on a polishing stone might be enough to give you a perfect cut.  A medium cut with a medium mouth opening should work fine in most cases.  I only ensure that when the plane is laying on it's side that the blade is perfectly 90 degrees to the bed of the shooting board.  Contrary to popular belief, the plane's side doesn't need to be square to the sole for this to work.


How to do it

This plane was born to shoot.  Indeed, I purchased this plane for the sole purpose of shooting.  It was a happy accident that I found out how truly versatile it is.

First, I examine the board to ensure I know which is the reference edge.  This edge will always go against the fence of the shooting board.  Next, I make a little relief cut or a chamfer on the edge to prevent blowout.  There are a lot of ways to do this, but I find it quick and easy to shave it with a chisel.

Proper technique involves holding the piece against the fence with one hand while moving the plane with the other.  Don't try to use the handle, a more effective grip is holding the side of the plane with fingers wrapped around the lever cap.


Tapers

Before and after
I never cut a taper with only a plane before just a few days ago.  I am currently working on a Shaker side table in cherry which has tapered legs.  As per instructions in the DVD, I used my jack plane to cut them.  Christopher Schwarz uses a vintage Stanley jack plane to cut them.  I was able to do it with my BU jack, as well as joint and finish the cut.


Adjustments needed 

I set the plane up the same as I would for roughing.  As I get closer to the line, I make adjustments to take a finer cut by retracting the blade and closing the mouth.


How to do it

I started the cut just like in CS' DVD:  I start with a short stroke off of the end of the leg.  The second stroke is started a little farther back.  The next a little farther, and so on.  When I get near the mark for where the taper starts, I start over.  I think it is important to check the taper cut is square to the reference face every once in a while.  If the cut goes off, you can easily remedy it using the same technique described in jointing.


Chamfers

I normally do chamfers with a block plane.  If one doesn't have one (because this is your only plane), the BU jack does an excellent job.  This plane, after all, is just a giant low-angle block plane.


Adjustments needed 

It depends on how big your chamfer is.  For a big one, start course, and set to fine as you get close.  For a small one you can start fine.


How to do it

I like a grip where my fingers from the hand that is holding the front knob are on the underside of the plane.  My thumb goes right behind the front knob.  I then use my fingers as a fence, which holds the plane at a specific angle to the piece being chamfered.  After a few strokes, I check the end to see if the angle is where I like it.  After a few correcting strokes, I plane down to the mark.  If there are multiple identical chamfers to cut, I count the number of strokes it takes and do the same on all cuts.  They should all look similar.  If the chamfer is fat on the ends and skinny in the middle, I take a few strokes out of the middle only until it evens out.  Then I continue with full length strokes.  This is a sign that I am not planing evenly.


Plowing Grooves

OK, the BU jack cannot plow grooves.  I was just checking to see if you have read this far or not.


In conclusion, a BU jack plane truly is essential if you do not have dedicated planes that can do all of these other common tasks.  I have also found that using this plane exclusively has really allowed me to get to know this plane.  I think I can do twice as much with this plane than I could when I originally wrote the BTK series.  My guess is I am not even using it to half of it's potential.

Perhaps you have found other uses for a BU jack.  What are your experiences?