One of the things I did on the current table build (more on that later) was to fill the knot holes with black epoxy. Whenever I mix epoxy, I use the leftovers to fill some of the cracks in my bench top. There are a lot of cracks, because the top is four beams of French oak laminated together, and the beams all contain the pith.
I think the top is stable, and would recommend if you build a bench not to turn up your nose at wood with the pith in. Just be warned that there will be cracks. The cracks are not a problem unless you drop something small like finishing brads on your bench top. They will get lost in there, but structurally they make no difference to the bench.
I figure that while I have extra epoxy, I can just dump it in these cracks, and someday I will have a bench top with no cracks in it.
 |
| Here is my bench top after I poured extra epoxy into some of the cracks. |
Not too long ago I went to a flea market and found a cool hand cranked grinder, an American Champion made by American Hydraulics. I think it is the bee's knees. I like it so much, that when I found two more on eBay, I bought them. Now I have three awesome grinders.
 |
| Why three? I'll let you know as soon as I figure it out. |
There wasn't much to getting these new two running. One of them worked perfectly, the other felt like there was bubble gum wrapped around the axle. A little WD-40, and it works perfectly, too.
There was a surprise, in that one of them had a one inch arbor. That means it will fit a modern grinding wheel out of the box. The second one had a 5/8" arbor, and it fit a modern grinding wheel using the plastic bushings that came with it. In the past, I have found hand cranked gridners (including the first of this trio I found) have a 3/8" arbor, and need some real fiddling to make work. I had both of these running new wheels in five minutes flat.
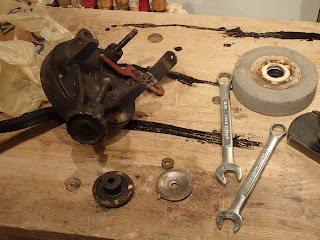 |
| Lucky me, a one inch arbor. |
I took a recommendation from Larry Williams' InstaGram feed, and bought from
Victor Machinery, a 24 grit 6"x1" Meda grinding wheel. The good news is it was less than ten bucks, but there is a minimum to order. I bought two of these wheels and a bunch of wet/dry sanding paper from them.
 |
| 24 grit seems awfully course, but Larry knows his stuff. |
The six inch wheel fit perfectly on the blue grinder, and surprisingly I found out the green one would take a seven inch wheel. Next time I'll order a bigger one for that grinder.
 |
| Everything installed in no time flat. |
I have a brace of new Ohio Tools bench planes that all need rehabbing, so I thought I would try out this new wheel grinding a plane blade, one of my least favorite pastimes.
This Meda wheel, I have to say, is pretty awesome. The blade never got very hot, and the grinding went very quickly. Definitely an upgrade from my brown Norton wheel (80 grit, I think - maybe 40). The only thing is the grit seems to come off quickly. But, for the price, I think it would be worth burning through these wheels twice as fast.
 |
| Here's my grinding set up using my saw bench. |
Enough of that, back to the bench. I haven't flattened it since the first time in 2012. Over that time, the top has settled quite a bit. There was a dip in the center I would estimate at about 3/16" deep in the center.
 |
| Before |
I learned in this time that I can work just fine 99.5% of the time with a bench that isn't perfect and doesn't look like the cover of a Fine Woodworking article. As long as the bench stays still while I'm planing, I can make many other deficiencies work.
With this in mind, I decided to make it flat, but not to waste time making it too smooth.
This was over before I really got a chance to photograph the progress.
I took a big wooden jointer set with a heavy cut, took passes front to back evenly across the grain for the whole length of the bench. Next I took shavings at a 45 degree angle across the top. Last, I went with the grain using a medium cut with my BU jack plane.
Done.
 |
| After |
It has made a big difference in looks, but I really needed it to be flat to plane the couch table's top. I would say about 20 minutes of work, probably less, from start to finish.
 |
| Here is a close up of a crack that has been filled with black epoxy, then planed. |
The bench is great. I built it in a class with Christopher Schwarz in 2012. What I like is it is heavy and stable.
So far I have yet to put finish on it, and I think I probably never will. Someday I might put a shelf on the bottom. The only thing it really needs is the sliding deadman, which I need about twice a year for the kind of work I do. So far I have gotten away without it. The bench is about 18" deep, maybe a little more, and a little over six feet long. I have upgrades still awaiting for the tail vice, and I have a nicer piece of elm waiting to be installed as a face vice, along with a Benchcrafted CrissCross.


