Showing posts with label Shaker Side Table. Show all posts

Monday, January 1, 2018

Another Shaker Side Table - Part I - Resawing

A few months back I got a package in the mail. A fellow woodworker sent me three nice hunks of gorgeous quartersawn chocolate brown oak. I originally wanted to use it to make a staked coffee table, but this oak was too nice for a project like that.
Freshly re-sawn panel that will hopefully make an 18" x 18" panel.
The nicest piece of furniture we own that I have made is my cherry Shaker side table.
My Shaker side table in cherry that I made a couple years back.
I used an inordinate amount of lumber for that side table because I tried to choose the best parts of the wood I had in the perfect orientation for that piece. It paid off big time. The above picture looks a bit off, because the base sat a long time before I finished the top and drawer. When it was done, those parts were much lighter in color than the rest. Over time, the whole thing has darkened up nicely, and looks more beautiful every day. Unfortunately I have no picture of it in this state.

The biggest lesson I took from that build was that wasting all that lumber was no waste at all. Grain orientatioin and the thought put in to what grain goes where made all the difference.

Having these beautiful oak boards, all about 1 3/4" thick, is plenty of lumber for this table, as long as I can squeeze everything out of these parts. Since this is all gorgeous quarter sawn wood, I think that it will work.

I spent some time deciding which boards are going to yield which parts. I had briefly thought of resawing the widest piece, to get a panel about 11 inches in which I would take the center of a three piece lamination to make an 18" wide panel for the top. I eventually decided against that, because that wide piece has the straightest grain and will make the best leg stock for the table. The narrowest piece will yield two nice resawn pieces wide enough to get the 18" square top. The grain on this piece had the most pronounced curvature to the grain of the three, so I chose to mark out  and crosscut the piece where the curvature makes the least impact. I haven't decided yet if I'll glue those two boards up to be bookmatched or one next to the other. It all depends on what the final look will be like.

The apron boards and the drawer front will come from the third piece that hasn't been mentioned yet. Resawing that board will yield four nice boards for that purpose.
I've started by crosscutting one piece in order to get the length to size before resawing.
All this resawing is the purpose behind my recent purchase of the giant Dick saw. It is the Ryoba that is 300 mm long, has a much thicker sawplate and larger, more aggressive teeth. It should work well for this.

The reason I bought it is I couldn't get my Diston D-8 that I usually use for resawing in my suitcase, and I didn't want to build a framesaw for the purpose before starting this project. The saw was about 40 Euros from Dictum.
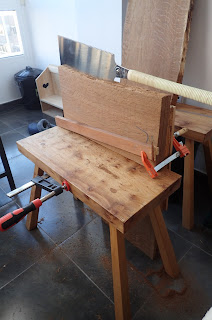
My set up for kerfing my wood before resawing.
I have been thinking a lot about a kerfing plane. I think getting a good kerf all around a piece of thick wood is a great trick for keeping everything aligned for resawing. I thought that perhaps instead of using a kerfing plane, which I didn't have, I could clamp my Dick saw an appropriate distance off of my bench and run the wood past it.
After some experimentation, I discovered kerfing with the crosscut teeth worked better.
With the blade removed from the handle and clamped firmly in place, I just pushed the wood past the blade until there was a kerf around 1/4" deep or so all around the piece.
Pull the wood past the clamped blade.

It seems to work really well!
Once that was done (and I think with some practice it could be done freehand), it just took some creativity to clamp the piece to my sawbenches (my only work bench surface) in order to saw away.
Deepening the groove on the end grain.

Deepening the groove on the long grain.
With the kerf cut, it is just a matter of sinking the saw in the kerf and connecting the lines. Yes, it sucked, but it was much quicker than waiting until I befriended someone in town with an appropriate bandsaw setup.
The giant Dick saw actually seems to cut fairly efficiently.
Once I started making progress, I wedged the cut parts open with my shop knife.
For scale, the wood is a bit over nine inches wide.
I thought I might have to spend a couple days resawing this wide piece, but it was actually finished in a relatively short time. This was the hardest cut of the whole project, so it will be downhill from here.
All the way through!
As you can see from the first picture in this post, the cut turned out exceptionally well, in my opinion. I think this was the smoothest resaw cut of a wide board I have ever done. The thicker plate on this saw did a nice job of keeping the cut straight. No humps or crazy saw marks!
That's enough work for me for today.
I clamped the pieces up just in case the inside of the board was a different moisture content than the outside. If it is, it could cup as it dries. However, I'm not too worried as I think the wood has been well dried, and it is quartersawn, which should resist cupping.

Over all, I would have to give this giant Dick saw a positive review. It might not be my first choice for resawing a nine inch wide board, but in my circumstances it worked perfectly. I recommend it if you find yourself in a similar situation.

Next up, resawing the aprons and ripping the legs!

Monday, January 4, 2016

Shaker Side Table - Finished

I finally got this one done.
This was supposed to be an anniversary gift to my wife in 2013.
I don't know what the struggle was, as I said this table was a fun hand tool build. I think it is only that it got interrupted for one reason or another, and when it was time to get back in the shop, there were other things ahead of this in line.

I have a couple projects I am itching to get started, but I made myself focus on this.  I am glad I did, because this little table is really nice.

I left off needing to construct the drawer.  Appropriate stock I had on hand that was 1/2" thick or less was oak, and this nice scots pine (Pinus sylvestrus).  Oak really would look funny with this drawer. Pine should be plenty stout for this.
Lucky me, this was wide enough to make the drawer bottom with only one glue line.
This pine was wide, clear, and perfectly quartersawn, which means it should be fairly stable.

For some reason, I goofed up and cut the sides of my drawer 1/2" too short. As a result, this drawer is 1/2" shorter than it ought to be. I can live with that, rather than start over with less appropriate wood.
I need to learn to clean up after myself in the middle of a project.
The last drawer I built, I used slips.  That was fun, so I thought I would do it again. Besides, this pine was closer to 3/8" than it was 1/2", so grooving slots in it might compromise it's strength.

For some extra overkill, I decided to use ash (Fraxinus excelsior) for the slips. I thought the ash would match the color of the pine inside the drawer, and not detract from the look of the inside of the drawer.

Being lazy, I plowed the groove for my slip stock after having nailed it directly to my bench top. I didn't really have another good option for work holding here without building something else.
I grooved the whole stick, then cut it in two pieces, one for each side of the drawer.
Now it's time for dovetails.
Slips and drawers. Woodworking or Victoria's Secret?
I have made very good dovetails in the past.  These, and the ones on the last drawer I made aren't quite there. I suppose I have to practice this some more.

I also might have to get a better light.
I used fish glue to glue the slips to the drawer sides.
Now that the drawer is done, this thing is looking like a finished project!
I used boiled linseed oil as a finished, and no finish at all for the inside of the drawer. I only burnished the wood with a polissoir.
The bottom actually is a stop that keeps the drawer even with the face. It sticks out so far because I made the drawer too short.
Here is a good shot of the inside of the drawer. The polissoir makes everything nice and smooth.
Nice and clean with no knots.
After a week or so putting on a few more coats of BLO, I will apply some paste wax and set it up with flowers on top, and all manner of crap in the drawer.

I like the top on this one. I found a board that was wide enough that I could glue it up with two boards looking pretty equal.
For now, it's empty.
I really like how the drawer is designed to stay up even when it's pulled out as far as it will go.
Just don't look too close at the dovetails.
The knob for the front I bought from Lee Valley. 
Artistic photography.
Hopefully the color will even out a bit over time. I decided against sanding the bits down that have darkened up over time with age. This would have made the color lighter, but also ruined the hand planed finish. I think the only sandpaper I used was some 400 grit on the knob.
The knob really gives this piece some character.
Here's my AAR:
  • It's probably better to finish the piece right away rather than move it from one part of the shop to the other for years on end. However, finishing it nearly three years late is better than not finishing it at all.
  • Cherry darkens over time, even in a shop with no natural light.
  • Taking time to lay out the parts on a board with grain flow and pattern in mind is well worth it, even at the expense of way more waste than otherwise.
  • Using a handsaw to cut the legs out so the grain is at a 45 degree angle is also well worth the effort. These legs have even, similar grain on all four faces of each leg. Had I not done this, the legs would not have turned out so graceful.
  • Tapering legs with a jack plane is a fun and easy hobby you can do at home!
  • More of these tables will need to be made to explore new and different things that can be done with the form.
  • Christopher Schwarz gets an A+ for his DVD which I used to build this table. I think that an absolute beginner could use this DVD to get good results, assuming he had the proper tools.

Friday, January 1, 2016

Back to an Abandoned Project

I started this project back in April of 2013. I have no idea why, but for some reason I got stalled on this project and moved on. Since that time, this poor table has looked like this:
State of this project for nearly three years.
It's not like I forgot about it, my shop is so small I have to move this thing every single time I walk in the shop.

It's just that there always seems to be something more important to work on.

Now that I am in between projects, I vowed I am going to finish this freaking thing before I start anything else. Man, do I want to start something else!

Don't get me wrong, this is a fun project, and I have yet to run into any problems with it that I am unsure of what to do next. Also, we really need this piece in our house. It is a really nice design!

I guess the only way to jump back in the saddle is just to buck up and do it. First up, I'll finish the panel I glued up for the top. I can't believe it is still straight!
A perfect use for my panel gauge.
After marking it to size, I planed it to width and crosscut it to length. Now it is time to smooth the top.

I have been playing a lot lately with my #4 bench plane. It is a Sargent #409, and is nothing special. However, I feel like I have finally dialed in what I should be doing with the chipbreaker to get the best results.
Smoothing with my Sargent bench plane.
I am really coming around to this plane. In fact, I recently fell of the eBay wagon and went crazy. More on this in a future post.

I really like that it's versatility. This board had last been scrubbed with some kind of jack plane to thickness. The surface was pretty rough. I started with a fairly deep cut using the smoother to take out the humps and the worst of the tear out.
Using a heavy cut, tear out like this didn't last long.
Once I started getting close to a uniformly smooth surface, I sharpened the blade, set the chipbreaker close (but not too close), and started on the most wispy shavings you can imagine. In no time the surface was glass-smooth.
I wish you could see the sheen on this just from the plane.
I eyeballed a chamfer around the edges after bevelling the bottom to make a nice, even 9/16" edge from the top of the board. This bevel gives the top a more delicate look, rather than the original 3/4" thickness.
The chamfer I did with the #4, except I used my block plane on the short edge.
I couldn't remember how Christopher Schwarz screwed down the top. The runners were in the way. My solution was to use a screwdriver bit in my socket wrench.
Necessity is the mother of invention.
Now that it is all together, I realized the edges of the rest of the table needed to be softened. My normal way is to use a small chamfer. This would have been easier if I had done it before the glue up.

I used my block plane and some careful work with the chisel for these chamfers. They are small enough where it is difficult to see them, but they sure can be felt.
Funny shavings making chamfers here.
A little work on the drawer front, and it is beginning to look complete.
All that is left is to complete the drawer and apply finish. 
One problem with the timeline on this project is the cherry has oxidized and darkened considerably over time. The new parts do not match.
You can really see which parts are newly planed.
I am hoping a couple of days in our sun room will even up the color. I would really rather not have to stain this piece.

Friday, November 28, 2014

Stupid Table

Although it has been a couple months (!) since I have posted last, it doesn't mean I haven't been doing any woodworking.

Just not much.

Most notably, I finished our stupid walnut (Juglans nigra) table.  It is not a stupid table, it is just one of those stupid projects that takes years to finish just because it is no fun.  Now that I think about it, it wasn't no fun because it was a dining table, it was no fun because of the particular nature of the walnut I used.  It wanted to tear out no matter which way it was planed.

I did all of the joinery, which included gluing up the top panel, planing it flat, and cutting all of the mortises and tenons by hand at the Army woodshop on the post where I work.

Once that was done, I took all the parts to our Garmisch apartment for assembly and finish.  The Frau helped with several parts of this build, most notably the finishing.

Many of you probably won't approve of our choice of finishes, but we are pretty gentle with our furniture, so we used boiled linseed oil followed by pure beeswax applied with a polisoir.  This is truly an amazing finish on walnut.

The walnut panel resting on top of our old, temporary table. 

This is the underside of the table, which shows some of the tearout I was dealing with.  There also are a couple knot holes that don't go all the way through.
M+T joinery with drawbored pins.  This was the most pleasant part of the build.  I really took my time to make sure these joints all fit together perfect before hammering the pegs home.  The goo is just some paste wax which lubricates and assists the pin when driving home.   I chose to drawbore these joints using no glue at all.  Great choice.  It made for a completely stress free assembly.  Oh, and you might notice the end grain looking weird compared to the face grain.  I laminated 8/4 stock together to make the thick legs, then veneered the faces of the legs that showed the glue line.  It looks awesome.

Done.
A close-up of the finished top.
The finish is amazing.  However, it turned out a bit different than we expected.  On the base, we went straight from a planed surface to the BLO, then applied the beeswax with straw burnishers.  On the top, we added the step of burnishing the raw wood before applying any finish.  The base looks just the way we wanted, but the top practically glows in the dark.  It is a bit glossy-er than we envisioned.  It almost looks like French Polish.  We wanted a little bit more of a matte finish.  I have let it set for about six weeks to cure, hoping the gloss would mute over time a little bit like paste wax would, but no luck.  I am thinking we might have to apply something else over the top of the wax to subdue the shine a little.

In other news, I have two unfinished projects sitting on my bench in a state of only needing a little more work until they are finished - the Welsh stick chair and the Shaker side table.  I have some time off to myself this week so I should be able to get them both finished - unless I start another project which is exactly what I did.

I need to get a Christmas gift built, so no time for anything until this is done.  Unfortunately, I left my camera in Garmisch so I have no pictures of this chair yet.  I spent two days at the Dictum shop in Munich working on it, so it is almost done.  Diane talked me into using some lumber I already had rather than buying some new ash or oak for this project.  I'm glad she did.

I had some wenge (Millettia laurentii) intended for something else that I haven't started yet laying around from when I used to think that exotic wood was good to use in every project.  I probably will stay away from using exotics for future hand tool projects, but I had this stuff laying around and it looked like it would make a freaking bad-ass Roorkee.  All of the woodworking is done, and it indeed looks bad-ass.  The leather is almost done, and it looks cool, too.  I am using leather from a whole hide of hair-on leather I got a few months back for exactly this project.  I thought it was going to look kind of silly-western, but with the wenge it looks super refined and swanky.  I can't wait to put a picture of it up.  I've decided to call it Coffee and Cream.  Coffee, because the pile of shavings left from the lathe looked exactly like coffee grounds, and Cream, because the rest of the chair was obviously made from cow, and Coffee and Steak just doesn't have the right ring to it.

It would have been finished yesterday, as I had the whole day to myself (The Frau works on Thanksgiving, being it isn't a German federal holiday).  While I was getting my shop ready for working on the Roorkee, I cut my finger bad enough on a loose tool while rooting around in the trunk of my car to earn a trip to the emergency room.  I sliced a chunk of skin off of the end of my finger.  The slice wasn't terribly big, but it was deep enough that it started to bleed like crazy and wouldn't stop.  Note to self - keep your car clean.

Hopefully, in a day or two I'll be back in the shop and the Roorkee will be in the mail.

Wednesday, May 15, 2013

Fresh Shavings in Bavaria!

Spargelzeit in Bayern
This time of year is great.  Fresh asparagus, potatoes and ham.  Yummy!

Yesterday I was having some problems chopping mortises.

Well, the problem is that banging on a mortise chisel in the basement storage room of my apartment building is likely to get me evicted.

Lucky thing.

My progress yesterday consisted of marking out all of the mortises for the legs on my Shaker side table and chopping out one and a little bit of the other one on the same leg.  Then it was quiet time in my building and I had to stop all the racket.

Last night, while laying in bed not sleeping, it occured to me that I marked all the legs the same.  In other words, I marked out each leg to take the mortise from an apron.  That's OK for the dining table I made last, but this table will have a drawer in the front.  Only two legs need mortises like that on each side.

Duh!

When I got home from work, I was worrying about these legs.  I have two that the grain is dead perfect gorgeous.  These were supposed to be the front two.  The rear legs the grain runs out a little bit.  Only the back legs get apron mortises on both faces.  I figured I had a 50/50 chance that I did it right.

I didn't.

Now the options are to either change the leg orientation or leave the orientation and insert a patch.  The patch shouldn't look too bad, as it will be covered by the front drawer.

But I'll know it is there.

What do you think?  Please take a moment and answer the poll at the right side of this blog.

At least I only screwed up one leg so far.

Tuesday, April 23, 2013

Thicknessing Stock By Hand

I had a plan for this blog post.  I was going to thickness three similarly sized boards for my Shaker side table build by hand using three different planes: my newly restored vintage scrub plane, my home-made Krenov style scrub plane, and a special technique with my jack plane that I read about and always wanted to try.

The problem was I was so amazed at how well that vintage scrub worked that I couldn't put it down.

Getting started with my scrub.
Here is my process:

First, plane one side of the board flat.  I took some really thick shavings with my jack plane to clean up one side.  I backed the blade off a bit to work it down to a perfectly flat surface.

Second, run a marking gauge all around all four edges of the board (using the flat face to reference the fence of your gauge) to indicate the thickness you want the board to be.  The first one I did was about 1 3/8", so I marked it down to a little over 7/8".  Plane a chamfer on one long edge of the board that goes down to this mark.  This will help support the wood and prevent blow out.

Mraked for thickness and a chamfer to prevent blow out.
Next, secure the board on your bench and start planing perpendicularly to the grain.  I like to start in the middle of the board, plane over to one side.  When I get to the end, I move the other direction until I reach the opposite end, then return to the middle.  Here is a shot of this board after this point.

One pass with this aggressive plane.
At this point, I may move to a diagonal stroke until all of the perpendicular marks are gone.

Diagonal strokes.
Normally, I would go the other diagonal, but this board did not like that at all.  Massive tear out.  I just alternated between cross grain and diagonal strokes until I got close to my line.  It is important to keep checking your lines so you don't blow past them.  It's also a good idea to check them to ensure you are taking an even amount off the whole board.  If not, focus on the high spots until they are even.

Once you are down as close as you  dare with this plane, it is time to clean up all of those crazy waves with your jack plane.  A few minutes with an aggressive cut and I was very close to my line.  I backed off to a fine cut for the last few passes, ensuring everything was square, flat and true.

This took less that 15 minutes, from start to finish.  Way faster than I expected.  Indeed, this was so much fun, I had to do the next one with this scrub, too.

This piece was from a different board which was a little thicker.  I also decided to take it down to a true 3/4" just to see if I could.  The first piece will be the back rail, and won't get in the way of anything if it is a little thicker than the side rails.

A bit more to plane off this time.
I went through the exact same process and brought the thickness down.  It took about 30 minutes, this time.  This was not nearly as unpleasant as I was expecting it to be.


Before and after.
I am not scared of thicknessing lumber by hand any more.  Granted, these were small pieces, but normally one doesn't hog off quite so much wood when thicknessing by hand.  The secret is a dedicated scrub plane.  There are a few other options, but nothing quite like this.  For example, the thickest shaving I could get with my jack plane on this cherry was .031"  That is a pretty big shaving, but I was getting shavings thicker than .051" without really even pushing this scrub plane to it's limit.  Shavings that thick remove a lot of stock in a hurry.

After today, I will have one more side rail and the drawer front to thickness in this manner, and I will have all of the stock for this Shaker side table processed by hand.  The thing that took the longest was the legs, due to the fact that I couldn't get straight, clear stock in thin boards to cut them out as CS recommends in his DVD.  That would have saved me about eight hours of labor.  I cut them out of much thicker stock to ensure I could get the bastard grain on all four legs.

All of this work probably seems unnecessary to someone with a tablesaw and a thickness planer.  I am not so lucky.  I did want to try doing this entire project by hand without taking my wood to another shop for machining, though.  So far it has been successful, albeit a bit slower.  I am sure I'll get faster over time, but for now I want to ensure accuracy.

Next time, I hope to show some progress on the joinery.

P.S.:  There was a request f\or a better view of my grinder, so here it is:

See, hand cranked!