 |
| Tea tray in sycamore and scots pine. |
Most of the work for me was in milling the lumber on hand into thicknesses equal to what Charles Hayward used. I resawed some laminated pine I had for the main panel from 18mm down to 1/2". I also had some sycamore two inch posts that I cut down to 5/8" widths.
I did run in to a few problems with this build. Just in case you would like to build one, perhaps this info will help you.
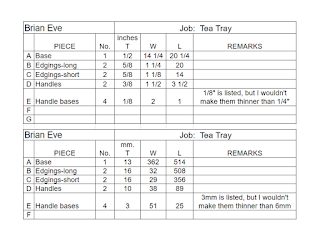
First up, I re-did the cut list because there was an error in quantities. It was also listed in feet and inches. Iprefer than just inches.
 |
| Edited cut list in inches and millimeters. |
I chose to repair this goof rather than cut it off and make the tray a little shorter. I wanted to see if it could be repaired with a decent looking patch. I think next time I do this I'll do a better job, but it looks good enough for now.
After that was a giant goof-up on my part. There aren't many pictures in the article, and I was mistaken in what I thought it said to glue up. For some reason, I didn't even question it in my head. I glued the base to the upper part rather than screw it from below, as stated in the instructions.
 |
| Don't do this. |
The problem with gluing the base is you are locking the panel in the base to a specific width, without allowing for the fact that the panel will expand and contract over time. I have no doubt that it won't take too long before I get this tray back with a cracked base or some other catastrophic failure. When that happens, I'll fix it by doing it the correct way: no glue, screwed from the bottom with the clearance holes in the base a little oblong so the wood can move past the screws.
I might have even just nailed the bottom on if I had been thinking.
I might get lucky, because pine can be a pretty stable wood once it has fully cured. Time will tell.
Last, I had a difficult time understanding what I was looking at in this picture:
 |
| It looks like the handle rests on top of the tab. |
I came up with making these parts in 1/8" sycamore:
What I realized later is that CH said to make a slanted rabbet which would give this part a bit more support:
 |
| This is one piece of wood, not the support with the handle on top of it, like I thought. |
 |
| Looking at it from the side, this is the shape of the piece I made. |
 |
| This is the shape the piece should be. |
 |
| The dotted line represents the rabbet. |
Once I figured out my way wasn't going to hold, I had to come up with a way to fix it. I decided to use bamboo skewers as dowels to reinforce the joint at a 45 degree angle.
They can only be seen if the tray is turned upside down, and you can hardly feel them when the tray is grasped.
 |
| I kind of like the look of this joint. |
In the end, I decided all the faults of this tray did not detract from it enough to prevent giving it to the intended recipient. She was thrilled, and thought it looked very nice.
I just told her if the base starts to rock or if it cracks, to bring it back and I'll fix it.
At least I used hide glue, which is reversible.


You glued the bottom to the tray? I hope your tray is in a humidity controlled environment, or humidity swings are minimal. Otherwise, the tray or the bottom will crack sooner or later. Richard
ReplyDeleteHey, Richard! Indeed you are right. This tray is doomed. It's just a matter of time.
DeleteSince you used hide glue, you could still fix it, only if you want to. Richard
Delete