A while back I made
a post about a panel gauge I got on eBay. I really like the way it looks, and it even
seems to work.
 |
| A neat vintage panel gauge. |
I have never seen a panel gauge like this before, but was surprised to see practically the same one on the
Full Chisel Blog. Stephen said it was in Salaman's Dictionary of Woodworking Tools. I didn't have this book, so I picked it up (worth it). Sure enough, it was in there:
 |
| Interesting form. It even has the oval shaped beam. |
As soon as I unwrapped the box with this gauge in it, I knew I wanted to build one similar. The only real weakness with this gauge is that some yahoo replaced the original cutter with a nail, and while driving the nail they cracked the boxwood insert.
 |
| The cutter leaves a bit to be desired. |
Today I decided to get started. I was given a cutting gauge replacement blade for an Asian style gauge (thanks
Jonathan!) It has a single bevel and should leave a nice, crisp line once installed in a good panel gauge. It will need to be secured with a wedge, which I haven't completely worked out yet.
I decided to start with a test piece to see if a wedge will hold this blade tight in a little piece of beech. Luckily, I have a 1/10" chisel that worked perfect.
 |
| This will work fine. The wedge is a template for a H&R project. |
Since that sort of worked out, I went through my pile of what I now consider to be scrap to find something I can make this project from.
I say scrap because years ago I bought a whole bunch of neat figured pieces, but have yet to find a project to use them on. I found out that if I consider this wood to be scrap, I am more likely to use it. It was just very expensive scrap. I found a really nice pair of bookmatched figured maple boards. I haven't built anything that needed this bookmatched pair yet, so I guess I never will. One of them is going to sacrifice itself to this project.
I wanted the grain for the beam to be as straight as possible, so I layed out a line that followed the grain as best I could and cut out the beam.
 |
| This should work out beautifully. |
 |
| My saw bench is on a job site, so I'll use my 'plan B' Ryoba saw. |
Once I had the beam out, I spent a few minutes squaring it up. As an aside here, I am learning that squaring stock up perfectly (this piece needs to be dead nuts perfect) is not nearly as hard as I used to think it was. It is just a matter of marking it out and planing to the line. I only measured this thing because it will need to precisely fit the hole in the stock. It is about 7/16" tall and 28" long, which is about four inches longer than the original. Plenty if I goof up and have to cut some off.
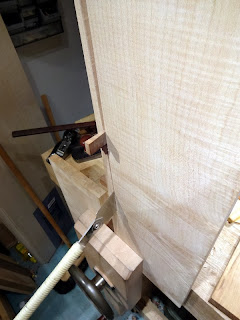
The next stop is to join the boxing insert at the cutting end. I don't have any more boxwood, but I do have a couple of tiny offcuts of ebony that should make a nice insert and wedges. After careful consideration, I decided to disassemble the old one to see how this sliding dovetail was done. It also made it easier to transfer measurements from the original.
 |
| disassembled I discovered the shoulder was angled. |
Having disassembled the original, it was an easy matter to transfer the measurements and begin fitting the insert. It starts very much like cutting a tenon.
Fitting the insert was much simplified by doing it while the beam was still square. After some fiddling, I got it to fit, although a bit sloppy.
 |
| A decent fit, it will look good. |
Then as the last move for the day, I thought I would trim it to fit. I turned it over on the bench hook, and cut the extra bit off.
The only problem: it must have slid out a bit when I turned it over.
the options now are to start over making a new insert, or (strangely enough) make a panel gauge with the original configuration of the nail as the blade. This insert now is the same size as the original. I intended for it to be a bit longer than the original due to the blade I have needing a wedge (and consequently more room).
What would you do to recover from this mistake?


If I had another piece of ebony I'd re-do this. If no ebony - stick a nail in it.
ReplyDeleteThanks, Ralph. I do have a bit more ebony, and I am leaning in this direction. I just feel stupid for making a boneheaded mistake after doing all that fiddling.
DeleteI'm glad you are putting that blade to use. I think I would redo it, but then I don't like pin style gauges.
ReplyDeleteThanks, Jonathan! I think the blade will work out great. It should be a snap to keep sharp.
DeleteFunny that you and Ralph both suggest a redo. I spent an hour last night doing just that. The second time always seems to work out better, anyway.
Mistake? I see no mistake. I see a design change.
ReplyDeleteK