Tuesday, September 25, 2018

Danish Chair Building Extravaganza III - Day One

DCBE III has begun in earnest. The first day is in the bag.

Jonas and I started the day early. Our normal routine is to get distracted right off the bat on one wild goose chase or another, so this year we both tried to guard against that. We jumped right in selecting wood for our projects yesterday, and were in the shop with seat blanks by around 9:00. It must be a record for us.

Jonas amazingly found a use for his new drafting whales. The perfect tool for the job.
Jonas is building a nanny rocker. It looks like a pretty complicated build. He started off the day after selecting his wood laying out his plan on paper. He spent most of the day laying out his design, and a good part of the rest of it building a bending form for the arm rail.

Late in the afternoon, the mailman showed up with some plans for the rocker that Ray Schwanenberger made Jonas and mailed him. Holy moly! Those were beautiful. He spent a lot of time drawing his design out full size on paper with all of the information Jonas will need for this project. We were all amazed with Ray's work on this.

Jonas decided that starting over using Ray's plan would save time and result in a better project in the long run.

I'm excited about my chair. I selected a solid, one-piece hunk of elm for a seat blank. It will be beautiful. However, it was a bit over-thick, about 2 1/2". I figured it would look better if I brought it down to 1 7/8". Jonas and I figured out a way to thickness it on his power jointer that seemed to work. First I would plane half of the board, then turn it around and plane the other half. Eventually, this left a hump in the middle, but I figured out that on the third pass, if one runs half of the board over the jointer not parallel to the grain, but perpendicular to it, that the board would remain relatively flat. It seems weird running aboard sideways over the jointer, but it worked.

Jonas testing if planing a board in this manner would work. Happily, we figured it out and saved a lot of calories.
After planing it in this manner close to my line, I switched to a handplane to finish the job.

I was then so excited, that I did my first screw-up. I laid out the shape of my seat on the blank, and cut it out on the bandsaw. I had intended to leave the extra wood behind the rear of the seat blank on until after I carved the seat so I had more wood to clamp to, but instead I cut it roughly to shape. I'll have to figure something else out.
Bandsawing the seat blank.
Around lunchtime the other participants arrived. Ty, another Dane, and Olav the Great, the local celebrity woodworker showed up.

Ty.

Some miniature versions of those froggy pastries.

I finally got to eat one. As an American, they are awesome. But, I see why they say they are too sweet for grown-ups.
Since I flew here, I didn't have all the tools I'd bring if I drove. Luckily, Jonas has a Veritas bevel-up jointer that I once sold him. This plane works very much like my beloved BU jack. It took some cleaning up, because Jonas rarely uses it. Once it was tuned, it worked awesome. I just wish this plane had flat sides so it could be used for shooting.
Me and my old BU jointer.
By the end of Day One, I had a good pile of parts. I should be able to make more progress tomorrow, unless I decide to re-do some of the parts that didn't turn out exactly the way I planned.
The result of my labor on Day 1.

Jonas can't seem to get away from building things out of a pallet.

Ty.

Selfie time!

Saturday, September 22, 2018

Danish Chair Building Extravaganza! - the Plan

Jonas during the first DCBE in 2014
This year's DCBE is going to be amazing. I just know it.

This is the third time we've gotten together at Jonas' place in Denmark to build chairs. The first time we had the general theme of Welsh stick chairs. Last time we made Roorkee campaign chairs. This time it looks like we'll be going back to some kind of Windsor type chair.

These rules have always been pretty loose, basically anyone is allowed to do whatever they want.

This year has been a bit hard to pick something, as I'm living in Spain temporarily, and bringing a chair back with me on a plane from Denmark is problematic.

That problem aside, I really need a proper office chair. So what should I make? 

Naturally, something completely unsuited for shipping or working in, a rocker!
Photo courtesy Elia Bizzarri. He built this stunning chair.
It's only been a couple of weeks since I've decided on it, but ever since I saw this chair called Velda's rocker on Elia Bizzarri's web site, I knew I had to give it a go. Jonas said if I finished it, I was welcome to leave it in his summer house until someday when I can go fetch it.

Who knows when that will be, as The Frau has no interest in a chair like this being anywhere in sight of anywhere we live.

I gotta be me. I've been dying to make a chair like this.

I'll not be sticking too strictly to the design, as all I have to go by is photos of Velda's rocker on the internet.

It turns out this chair was designed by Curtis Buchanan, whose chair making videos on YouTube I watch whenever I have the chance.

I sent both Elia and Curtis an email making sure there was no problem with me using the design. I even got a few tips from them both!

When it was first released, I bought Elia's video about building a continuous arm rocker, and have been wanting to build a chair like this ever since. I highly recommend the video. There are a lot of things in that video, as well as Curtis' YouTube videos that will help during this build.

My plan is to build a chair with similar lines to Velda's rocker, but with more of a stick chair feel that has been the mark of the chairs that I've built up until now. I think I'll turn very few parts on this chair, instead going for octagonal shaped parts, as I like that.

I'll be able to take a few tools in my checked luggage, including my tapered reamer, a roll of spokeshaves, a travisher, a two handed scorp, an adze, and whatever other bits and bobs I can fit in my suitcase. Hopefully Norwegian Air isn't too strict about their weight limit.

Jonas said he has solid, single plank seat blanks available in both elm and whitebeam. He probably also has some ash available, and an oak log. There also always seems to be a bit of apple flying about. We'll see.

Likely, all I will have to steam bend is the crest on this chair, which looks like it shouldn't be too much of a problem. I might do some bending to the spindles, too, but I think we'll see what the wood tells me I should do.

Stay tuned, as I plan to post daily about the event, as usual. Also, this time I'll be putting pics up on Instagram under #dcbeiii. Of course, I'm sure Jonas will also be posting on his blog, mulesaw.blogspot.com.

Wish us luck!

Monday, September 10, 2018

New Feature - Classic Posts Weekly

I just made a new feature for this blog: a new tab called, "Classic Posts Weekly."

This tab should take you to a page that I intend to update every week. I will revisit a classic (i.e. "old") blog post that I still thinks has some relevance for conversation.

My first entry on this page is there because I just plucked it out at random, read it and realized it was a pretty fun read. At least it was for me.

It discusses a forum discussion that was brought about from my exploration of how to make a panel glue up fail.

I'll just leave it at that, you can read the post here.

Enjoy!

Sunday, September 9, 2018

My Cribbage Board - Part III - Complete with Glamour Shots

Some people have commented privately to me that they don't know how to play cribbage. I think it is a fantastic game. A good way to learn it nowadays is to download an app. Many of the cribbage apps out there include a tutorial. After reading the rules, I suggest just jumping in and playing. One great thing about the game is there is a good bit of strategy and different ways to play that make it fun.

I learned cribbage and pinnochle (another card game) as a kid, and spent many hours playing with my parents, relatives and friends when I grew up. Card games like these have a social aspect to them that you can't really get with an app or a computer game. However, my guess is that these kinds of games are going the way of the dodo.

Let's get back to the build:

You'll remember that I left off at having marked out the points at where the holes are drilled. It is then just a matter of putting the brad from the drill bit in each of those holes and drilling them to depth.
Drilling lots of holes. The blue tape tells me how deep to drill the holes.
I forgot to mention so far that there are many different patterns you can use to make a cribbage board, such as traditional, racetrack, 29, etc., but the cribbage board is just a score keeping tool that keeps track of the points of each player where the winner is the first to score 121 points. Look around on the internet, and you'll see. This particular board is a traditional design, that has 30 holes up one side, and 30 down the other. Two laps on this board and you are done.

I bought pegs for this board from Lee Valley. It might be fun to someday make my own. The Lee Valley ones are really good, and come in metal or wood. They require a 1/8" hole. I don't have a 1/8" drill bit, so I used a 3mm drill bit instead, and it seems to work fine.

After all the holes were drilled out, I went to work on hollowing out the cavity on the underside of the board in which to store nine pegs. Nine pegs because each of the three players need two for playing the game, and this board has some holes in which to keep track of how many games each player has one, so another for each player for that.
Starting a cavity to store the pegs.
I carved out the cavity much the same way as I did as making the recess discussed in the last post, with the exception of skipping using the router plane because it just wasn't small enough. I used a bench chisel instead.
Cavity for storage of the pegs complete.
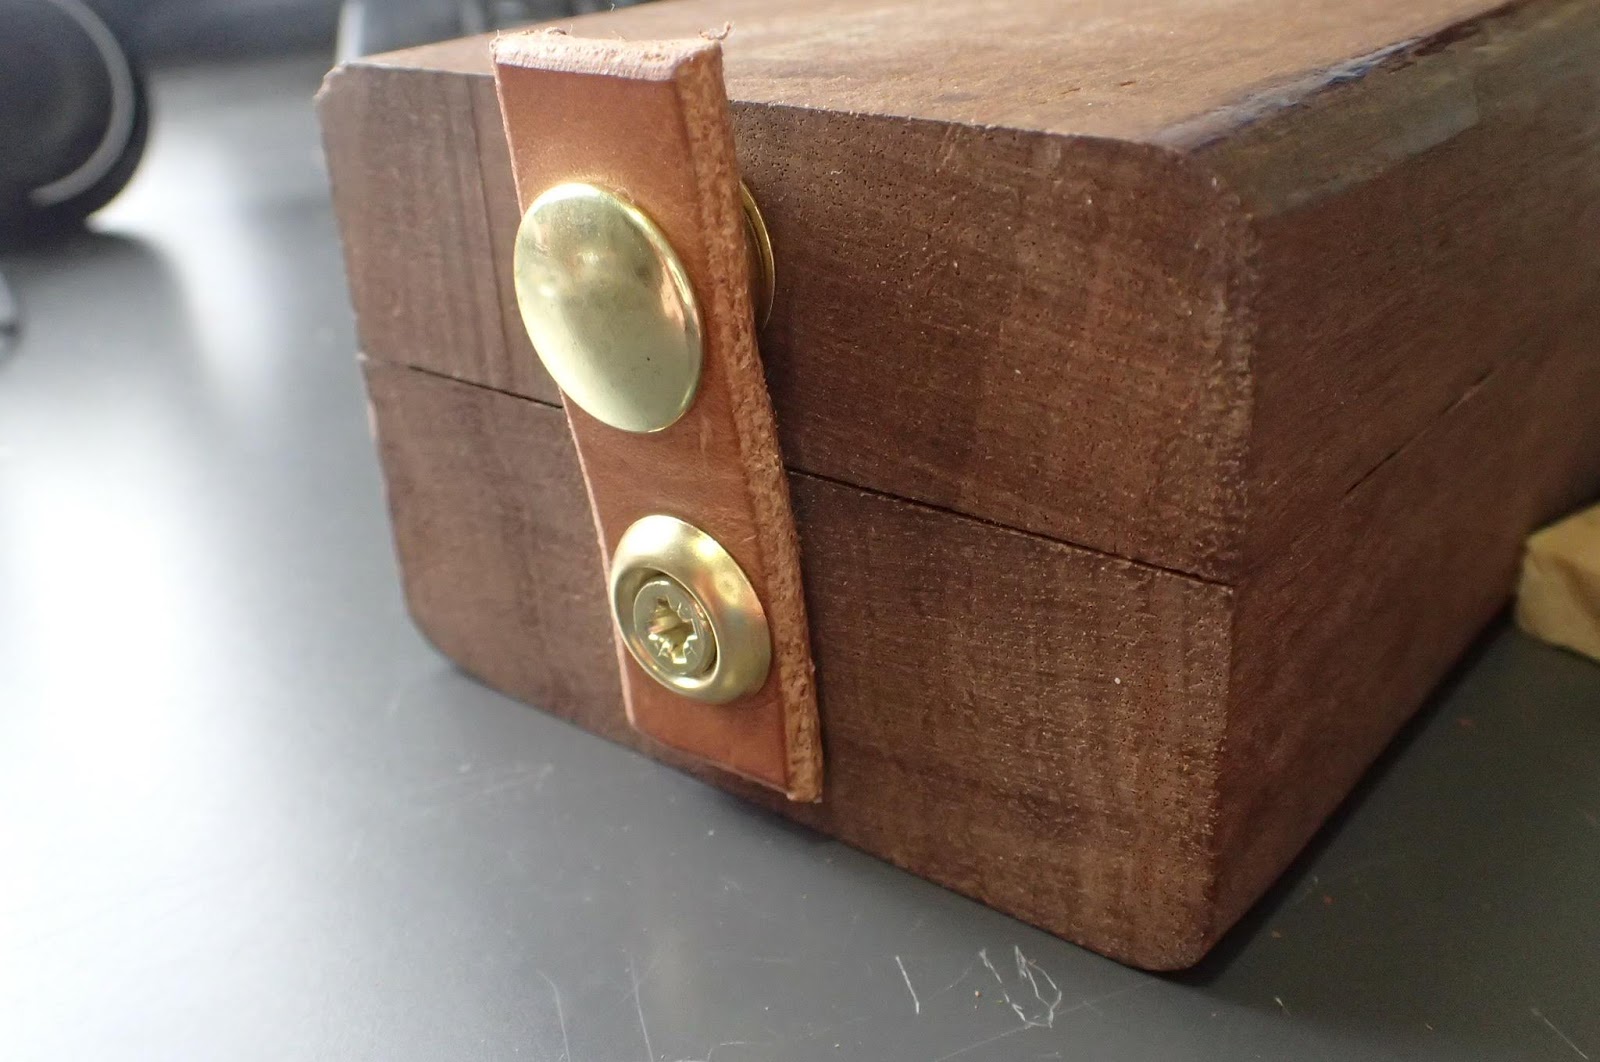
Now the pegs can be safely stored and the leather clasp snapped and the board can be stored anywhere.
Planing out the layout marks.
Next is planing everything smooth. I suppose you don't have to, but I think most people expect not to see them. This board is plenty thick enough that I could plane a lot of wood away, and it still will look good and work well.

After that, it is time to finish. I wanted some way of marking the board with colors that show which pegs go where on the board. This is totally aesthetic, as once your pegs are in your lane, everyone will know that that's your lane. I just wanted to see how this would work.

First I put a deep groove in the center of each track with my marking gauge, and then I deepened it and widened it with my shop knife. I taped off the whole board, except for the part as close to one of the marks as I could, and sprayed with black spray paint.

Each track I did this way, except for the gold and silver tracks, I used fingernail polish.
Here's the fingernail polish and spray paint.
The idea was to plane the board clean once everything was cured, so all that was left was a narrow strip down the middle of each track to show the color of the peg that should be used there.

The fingernail polish was a little tricky to work with, and tended not to plane so well. The spray paint I had tried once before this way, and it worked great. I had to do this three times before I was satisfied with the result, but it finally worked OK. We'll have to see how it holds up to years of abuse.
Paint and fingernail polish applied, ready to be planed down.
Finally, I coated the board with my home-made linseed oil and called it done. Here's some glamour shots:
Finished cribbage board, ready for a game.

Folded up and ready for storage.

Detail of the added color.

Stored pegs.

My version of artistic photography.

Three handed crib, anyone?

Another art photo.
Overall, I am happy with how it turned out. The wood is beautiful, and we'll see over time if I like the fingernail polish or not.

What do you think?

Check out the first two posts for this build: Part I and Part II.

Saturday, September 8, 2018

My Cribbage Board - Part II

If you are wondering why this post is called My Cribbage Board, it is because although I've made several cribbage boards, I actually don't have one of my own. The Frau hates playing cards with me because she always loses, so she has no interest in learning cribbage. Unfortunately, hardly anyone in Europe plays cribbage, so I haven't really needed one.

I figure I ought to have one, though, just in case. I usually make these as gifts. This one will be mine.

At least for now.

The two pieces, as we've seen in the last post, now fit together.

It just happens this opening is sized perfect for my hinge.
I had a nice, Spanish made brass butt hinge laying around, so I decided to use that. It was a coincidence that my cut was just the right depth for this hinge. I think I may have used it as a guide for the width, but I don't really remember.
Just a little of the one side needs to be removed to fit the hinge.
After marking where the hinge goes, I sawed to the line and split the wood to depth.
Just like splitting a tenon.
In short order, it fit.
Looks good from here...

and here...

but not so good here.
To get the hinge to close perfectly, I had to plug the screw holes with bamboo skewers, re-drill and try again.

Three times.

I finally got everything to fit and close nicely, and made a leather snap to keep the game closed.
The ugly screw is temporary.
Now that the mechanics of the cribbage board work, I turn my attention to laying out the holes. I don't like to use templates for this, as I make every cribbage board one at a time, and they are all unique. More often than not, I choose how the holes go in to fit the piece of scrap wood rather than trying to cut a piece of wood to fit a template.

To do this, I mark out the rows with a marking gauge, and step off the holes with two sets of dividers: one for the distance of the groups of five, and the other for the distance between individual holes. After the holes are drilled out, I plane the marks away.
I made six lines for the rows. It will be a three-handed board.

Next I step off the holes, and use a knife to mark all of the other points.
It took a lot of trial and error to get the steps to line up so the holes worked with the break in the board where the hinge is. It just happens to break in the middle of a group of five, but I didn't have to adjust the holes so it would look weird. I'll just have to be careful to drill the holes straight to avoid a blowout.

After the cross marks are made with a knife, I used an awl to dimple the point where the brad on my drill bit will start the hole. If I was careful with the layout, it will look very uniform.
The finished layout.
The next and final post for this project will show me drilling holes - nearly 200 on this board - and finishing. You'll be intrigued that I used spray paint and nail polish.

Really!

Stay tuned!

Check out the first post in this series HERE.

The Third Bi-Annual Danish Chair Building Extravaganza

Woohoo!

It's that time of every couple of years again.

Me 'n' Jonas
I'll be heading up to Denmark in two weeks to participate in the DCBE III. I'm really excited.

We've tried to make a tradition of getting together at Jonas' place every couple of years for a week or so of chairbuilding. Last time we built a bunch of Roorkee chairs, and it was a blast. The time before that was all about Welsh Stick Chairs.

This time is weird, in the fact that we haven't settled on what we want to build yet. Not really.

The idea of rocking chairs has come up, along with more Roorkees.

It could be that I'll have to wait until I see the wood we'll use and see what it tells me it wants to be.

However, I am leaning toward some kind of Welsh stick chair again. Perhaps something with a higher back than last time.

The only thing that Jonas and I have decided on for sure, is that we will make a run of tapered reamers.
My tapered reamer made by Elia Bizzarri.
My tapered reamer has been great. This one is set at six degrees, and I find it a very precise tool. Much more accurate than the twelve degree reamer sold by Lee Valley. That one is pretty good, but if you really want to dial in a leg to the nth degree, you should use this style of reamer.

I'm the only one I know who has one, so we thought it might be fun to build some for ourselves.

But that's just a side project.

I think the Welsh stick chair I built at the first DCBE was the first project I made with this tapered reamer, and I have been hooked on staked furniture with tapered mortises ever since (much to The Frau's chagrin).

Maybe a Welsh rocking chair.

This time I'm not driving up there, so I'll be able to take a lot less luggage. In the past, I've brought along lumber, a toolbox, lots of chairmaking books, German beer, and who knows what else.

This time I'll be limited to a checked bag and a carry on.

I'll probably bring the chairmaking tools I have here, including my reamer, my spokeshaves, a travisher and scorp, and perhaps a few other little goodies.

Unfortunately, I'll not be stopping in Munich first where I have the rest of my chairmaking tools and jigs, a hardboard template for a seat, chairmaking books like Peter Galbert's and Drew Langsner's (both of them have been invaluable in past DCBEs). Maybe someone else will have some of that stuff there, or perhaps it's time for us to jump off the deep end and build a chair the way it was meant: with whatever tools and knowledge you happen to have with you at the time.

Stay tuned, as Both Jonas and I will be posting about the DCBE III like mad. You can also follow the fun on Instagram. I'll be posting with the hashtag, #dcbeiii

In the meantime, you can review what we've done in past DCBEs by clicking on the tab at the top of my blog, where I've tried to collect links to everything that's happened before.

Friday, September 7, 2018

My Cribbage Board - Part I

I just went through my "Gallery" tab (found at the top of the page), and updated it. It has been a few months since I put any new pictures up. While I was there, I decided to embed links in the descriptions of each photo to the original post for each project. You know, just in case you have nothing better to do. If you have any interest, you can look at that post to see one photo of each of the pieces I've finished since I started this blog.

I realized while doing this that I finished another cribbage board, and only the folks on Instagram have seen it. I forgot to post about it's build.
Finished cribbage board.
If you have seen some of my posts on IG, you might be familiar with my magic dumpster. My magic dumpster is a garbage container near my house that over the last year I have rescued around 50 board/feet of stair material. Here in Spain, the species for stairs isn't oak, it is a reddish exotic that I think is some kind of mahogany, or more likely, sapele. Beautiful stuff that I probably couldn't afford in Munich.

I cut off a short length of stair rail for this.
I started by planing the edges off. There was a wide groove down the middle for the wooden handrail to secure to the metal handrail.
My plan was to make a four-square board, then cut it in half and install a hinge. After flattening everything, and squaring it up, I marked out a centerline and crosscut the board as accurately as I could. I left a litte of the roundover from the original handrail, with the thought that it would get planed away with a chamfer at some point.
Surprisingly, I did a fairly decent job on the crosscut.
There is some pretty grain to this wood, and my plan was that it would continue from one end to the other when the hinge was open.

Next was to make a rabbet around one side, and hollow out the other so they fit together.
I planed and chiseled a rabbet all around one piece.
For the hollow, I marked out the line of where I wanted the cuts, and started with a stopped cut on one side.
Stopped cut.
With the lines cut nearly to depth, it was just a matter of routing out the waste to depth. To start, I roughed the waste out with a gouge.
Roughing the hollow with a gouge.
This actually left an interesting and pretty surface. I'll have to explore this technique later. Notice I gouged perpendicular to the grain.
I tried to do it relatively even, so I could keep track of my progress.

Nearly at depth.
Now it's time to move to my new router. This could be done with a chisel if you don't have a router, but the router makes this job quick, easy, and accurate.
Getting to know my new vintage router.
As you can see, it's a matter of cutting a little at a time until the surface is even, then increase the depth of cut just a bit and do it again, until reaching the desired depth.
Now they fit together.
In the next post, I will install the hinge and layout the holes for the cribbage board.

Would you have done this process the same way?

Stay tuned!