Her: "What do you think of a cabinet that hangs on the wall?"
Me: "The last time I suggested that, you said you hated those."
Her: "I hate wall cabinets. That's different!"
Monday, March 30, 2015
Saturday, March 28, 2015
Filling the House with My Furniture
 |
| The apartment finally is starting to fill up. |
The Frau and I bought this holiday apartment three or four years ago, and I decided I was going to fill it with furniture I built myself. I finally feel like I turned the corner and now am on the downhill side of that goal. We still have a few empty spaces here, and there are still a few "temporary" pieces needing replacement, but now I no longer feel totally underwater with projects.
 |
| My contemporary Himmelbett. |
Using these pieces adds a dimension to my woodworking consisting of a layer of practicality of what works, not just the theory of what should work.
I still have a few pieces to go, including a couple of side chairs and a bench for the dining table, a coffee table, a telephone stand, and a bedside table. Better yet, I have a realistic plan for completing these pieces.
When I finish these projects, will I be "done" with the furnishing of this apartment?
I doubt it.
By then, I expect my taste and standards will have changed, and it will be time to start over, replacing these pieces one by one. I'm not sure that one can achieve perfection in woodworking, but the fun is all in the pursuit.
Tuesday, March 24, 2015
Welsh Stick Chair - Done
It's not every day you see me finishing two projects on the same day!
I painted the bits on the vitrine that I worked on yesterday. For more info on this build, check out the previous post. Essentially, it is a modern cabinet held together only with nails.
The exciting part, is I got finish on my Welsh stick chair! If you remember correctly, I went to Denmark last fall to build chairs with Jonas from Mulesaw. I viewed the build as a once-in-a-lifetime opportunity, as he had a couple of monster elm logs set aside for just such a purpose. Check out the build starting here.
I didn't quite get finished with my chair in the 4 1/2 days I was there. This project has been languishing in my shop, not because I didn't want to get it done, but because there always seems to be something that pushes it's way forward in the queue.
With a tip from Dyami to use epoxy to fill a couple of voids on the chair, there was some final clean up before finish. I smoothed it out with a block plane, a chisel, and/or a couple different scrapers. The West Systems epoxy I used on the recommendation of Aymeric worked easily and looks good.
OK, I'm not really done. I put the first coat of finish on today. But, in my book that gets the project off the bench and moves it past the "almost done" category. Using that logic, if we are past "almost done," we are done.
I chose to use a finish recipe that I haven't tried before: equal parts boiled linseed oil and pure tung oil. For this first coat, to thin the mixture a bit I added a glug or two of turpentine balsam. Although I hadn't tried this mixture before, I knew it would leave the chair a nice, warm color.
Perhaps the tung oil will give it a bit more strength, we'll see. I'll put a few more coats of this on over the next days, and in a month or two when it is completely cured, I will buff it out with some kind of past wax. Probably beeswax mixed with orange oil.
I am pleased with the results. The elm (Ulmus sp.) darkened up nicely, and the ash (Fraxinus exelsior) for the sticks and legs so far has kept a nice light color. I like the contrast. The Frau worries these woods won't match our walnut table, but I think it will look great.
While I had epoxy mixed up, I thought I would put some in the little pinhole knots on the seat to stabilize the wood, as well as a couple other places that needed filler. After scraping it off, you could still see where the epoxy was on the wood. I think the wood absorbs this epoxy. I worried a little bit that it would show, but so far I think it looks good.
Here are a few photos of the chair in different glamour poses.


Now that this chair is off my bench, I am excited to start another one. I have a couple more seat blanks, and this lonely chair will probably need something to keep it company.
 |
| Done today: Vitrine and chair. |
The exciting part, is I got finish on my Welsh stick chair! If you remember correctly, I went to Denmark last fall to build chairs with Jonas from Mulesaw. I viewed the build as a once-in-a-lifetime opportunity, as he had a couple of monster elm logs set aside for just such a purpose. Check out the build starting here.
I didn't quite get finished with my chair in the 4 1/2 days I was there. This project has been languishing in my shop, not because I didn't want to get it done, but because there always seems to be something that pushes it's way forward in the queue.
 |
| Well cured epoxy dribbled here to fill a void. |
 |
| Epoxy flakes in my block plane. |
 |
| In the white, ready for finish. |
Perhaps the tung oil will give it a bit more strength, we'll see. I'll put a few more coats of this on over the next days, and in a month or two when it is completely cured, I will buff it out with some kind of past wax. Probably beeswax mixed with orange oil.
 |
| Here is my new finish components. |
 |
| Finished chair. |
 |
| Some of the more interesting grain on the seat. |
 |
| Before photo. Couresty Mulesaw. |
 |
| The three-quarter arms were an attempt at making the design look a bit more modern to suit the taste of the Frau. Olav helped with designing these, and I think they turned out fantastic. |
 |
| Here is a good view of one of the bits filled with epoxy. |
 |
| The pair were both finished today. |
A Step Back to Move Forward - Vitrine
When I left my vitrine mock-up project the other day, I thought that for sure I would have to make new doors and trash the old ones. I really don't like to scrap part of a project. I much prefer to fix the errors in some fashion.
The good news, is I was able to salvage the doors, and this project is now almost finished!
The problem was that the doors wound up not being square, but more of a rhombus shape. I think the problem was introduced when I nailed up the door panels. There must have been enough inaccuracies introduced to really raise havoc. The rabbets for the glass need to be just perfect, as well as both doors have to be in the same plane so the glass panel fits.
It was kind of hard to show in a photograph, but the problem was essentially the same on the bottom of the cabinet:
What I should have done is make the door panel a little oversize, then trim it down and square it up to make an exact fit.
While evaluating the problem, I realized that if I lined the sides of the door panels up, the tops and bottoms could be flushed up without losing too much. The top door was a bit oversized in height, anyway, and I think the bottom door will be fine.
I am considering leaving the bottom wonky like that. If I plane it square, I might have to laminate a spacer there to compensate for the look. The Frau didn't notice it until I pointed it out, so we'll see if I can live with it or not.
A challenge was how to plane the parts of the doors with the rabbets so the glass would fit.
I set the doors up so one side of the rabbet was flush and needed no adjusting. The other side, I marked where it needed to end up. This means I need to taper this edge of the door until I meet the mark.
Next, the tapering commences. It only took a minute to reach my line.
Up to now, I was using only a mark on one end of the board to determine how far I needed to go. Marking out a taper with a gauge is impossible, and wasn't necessary for this.
Now that the top edge is square, I CAN use a marking gauge to re-define my rabbet. That will have to be re-cut.
How to cut this with the cross battens in the way? I tried to keep the number of tools down to a minimum when constructing this panel, but a rabbet plane won't work here.
I considered using my plow plane, but thought that running the fence against the paint on the show side of the door would create some problems for me down the line. What I did instead was to remove the fence entirely from my Veritas plow plane, and use it freehand. The rabbet was defined, after all. All I had to do was sink the rabbet a little farther until I reached the line from the marking gauge.
With just a little cleanup with a chisel, and I was back in business.
I did wind up buying some better cup hinges. I had bought the cheapest ones I could find before, and they were difficult to install and line up. I spent about 10 Euros per pair for the new ones. They came with a template to aid installation, and worked with absolutely no problems.
A comment on my last post had me thinking that I hadn't really done a proper job of explaining how this door goes together with the glass. Here are a couple of pics that hopefully explain better how the glass is captured in the rabbet by the batten.
The idea is that the glass is closer to the cabinet in this rabbet than it would be in a groove. It is an effort to eliminate any unsightly gap where the edges of the glass panels meet.
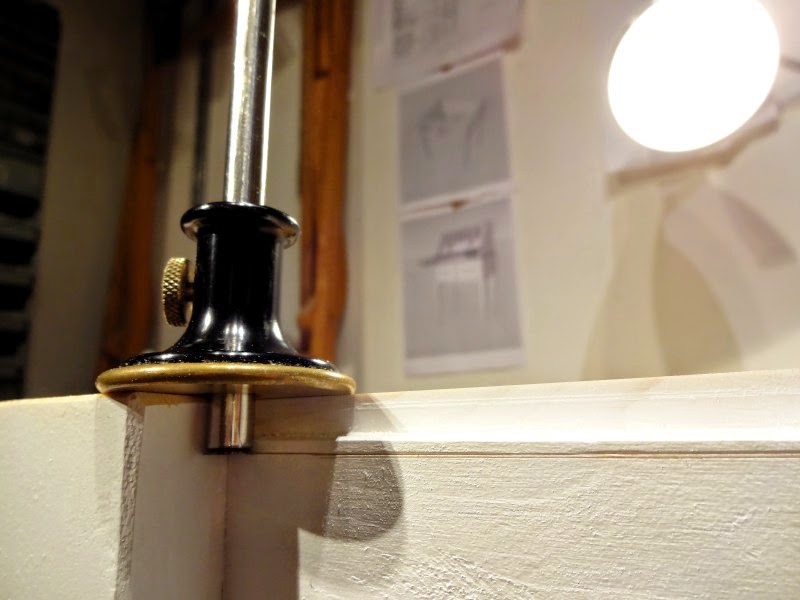
The next step is to install the lights. We found some really cool low-profile LED lights that were perfect for this project. The package came with three lights that plug into one socket. Very efficient, as the whole contraption only uses 7.5 watts!
I decided the interior of the glass cabinet looked best with two of the lights. I put the third on the top of the cabinet to shine on the ceiling.
I think it looks great with the tinted glass. Once we find an appropriate 'something' to display, it will look fantastic!
Well, we do have a silly bear sculpture.
The lights just stuck on with some double sided sticky tape. I tried to be as neat as possible with the wires, and chiselled a channel for them to escape out the back by the glass.
Today there is very little left to do for me to call it done: I need to bevel the inside of the corner of the door, as it doesn't fully open, and I need to touch up the paint where I had to remove some wood. And, probably take the stickers off the glass and polish that. I might also run some steel wool or fine sandpaper over the paint, and apply paste wax to make the cabinet nicer to the touch.
All in all, this mockup is a success so far. I learned some important lessons in construction of a cabinet like this, and spent relatively little money on it. The Frau was looking online for vitrines, and the ones she liked cost about ten times the price of this one.
Ironically, now that this cabinet is in the place we want the final piece to be, the Frau has decided a vitrine is not what she wants there. Perhaps a side table instead. I am really glad we didn't get stuck with an expensive store bought piece of furniture!
The good news, is I was able to salvage the doors, and this project is now almost finished!
 |
| As it stands now. Only a little a little adjusting to the doors and touching up of finish remains. |
It was kind of hard to show in a photograph, but the problem was essentially the same on the bottom of the cabinet:
 |
| When I lined up the sides of the door panel, the top and bottom were obviously out of square. |
While evaluating the problem, I realized that if I lined the sides of the door panels up, the tops and bottoms could be flushed up without losing too much. The top door was a bit oversized in height, anyway, and I think the bottom door will be fine.
I am considering leaving the bottom wonky like that. If I plane it square, I might have to laminate a spacer there to compensate for the look. The Frau didn't notice it until I pointed it out, so we'll see if I can live with it or not.
A challenge was how to plane the parts of the doors with the rabbets so the glass would fit.
I set the doors up so one side of the rabbet was flush and needed no adjusting. The other side, I marked where it needed to end up. This means I need to taper this edge of the door until I meet the mark.
 |
| The first step was to crosscut the batten. I think going right to the plane would just be asking for blow out. |
 |
| I used a dull card scraper to remove most of the paint. A few swipes with my jack plane and I am at my line. |
Now that the top edge is square, I CAN use a marking gauge to re-define my rabbet. That will have to be re-cut.
 |
| Marking where the rabbet now needs to be. |
I considered using my plow plane, but thought that running the fence against the paint on the show side of the door would create some problems for me down the line. What I did instead was to remove the fence entirely from my Veritas plow plane, and use it freehand. The rabbet was defined, after all. All I had to do was sink the rabbet a little farther until I reached the line from the marking gauge.
 |
| Fence-less plow worked a charm. |
 |
| Finished rabbet. You can see the wood that was removed, as there was paint on the rabbet before this step. |
 |
| Now, the glass panel fits and the doors line up. |
A comment on my last post had me thinking that I hadn't really done a proper job of explaining how this door goes together with the glass. Here are a couple of pics that hopefully explain better how the glass is captured in the rabbet by the batten.
 |
| Glass captured in the rabbet by a cross batten. |
The next step is to install the lights. We found some really cool low-profile LED lights that were perfect for this project. The package came with three lights that plug into one socket. Very efficient, as the whole contraption only uses 7.5 watts!
I decided the interior of the glass cabinet looked best with two of the lights. I put the third on the top of the cabinet to shine on the ceiling.
 |
| Lights! |
 |
| Here is the cabinet with the door open. |
 |
| I like the look. |
 |
| The bear is looking at my lighting job. |
All in all, this mockup is a success so far. I learned some important lessons in construction of a cabinet like this, and spent relatively little money on it. The Frau was looking online for vitrines, and the ones she liked cost about ten times the price of this one.
Ironically, now that this cabinet is in the place we want the final piece to be, the Frau has decided a vitrine is not what she wants there. Perhaps a side table instead. I am really glad we didn't get stuck with an expensive store bought piece of furniture!
Sunday, March 22, 2015
French Heavy Metal
When I got home today, there was a package sitting on my front door step. Yes, I fell off the wagon again and bought another old tool off of eBay.
Sometimes buying a tool on an online auction is a crapshoot, because in my experience sellers have no idea if a tool is really in good shape or not, nor what it is worth.
"Heck! If it would look good screwed to the wall at AppleBee's, then it should be worth it's weight in gold!"
I digress.
This time, it was French eBay. It turns out there are lots of neat old tools there that you really can't get in Germany, England, or the U.S., where I usually troll for old tools. I couldn't resist a traditional French holdfast.
I won this auction for about 15 Euros, plus shipping. The great part about a holdfast on an internet auction, is that there aren't too many moving parts, and nothing has to be sharp. It is, after all, a simple thing designed to be whacked with a hammer. How could I lose?
If you choose to troll French eBay for one of these, the term is, "valet d'établi," and as of this writing there were a couple still up for auction for less than what I paid.
I like the way this holdfast looks. There are just enough details in it to give it a bit of elegance.
Besides being comically bigger than the Gramercy holdfast, there is a little bit of a difference in the angle of the pad in relation to the stem. I have no idea how it will work, but I imagine it is at this angle for a reason.
I like my Gramercy holdfasts, but with my 5 1/2" thick oak top of my Roubo bench, I find I really have to whack them hard to get them to stick properly. I am hoping this one will hold with just a light tap. I feel like this holdfast was designed more for a French style bench with a thick top.
The only issue I have so far, is I must drill new holes in my bench to try it out. This enormous hunk of French metal will take a big hole. My Gramercy holdfasts have 3/4" holes on my bench, but it looks like this beheamouth will need a hole at least 1 1/8" in diameter.
I tried this holdfast out in one of my 1" dog holes, and it wouldn't even go in. Does anyone know if a 1 1/8" hole will be big enough for this holdfast in my bench? Perhaps I need to go a bit bigger? How about the best way with hand tools to enlarge an existing hole? I know I can't do it with my standard brace bits. I think it would be easier to just drill new holes and keep the 3/4" ones for the Gramercy holdfasts. There are only two holes in it now, anyway.
I look forward to getting to know this holdfast. If you want a giant French holdfast, but are reluctant to spend the money for a custom one from a blacksmith, a French internet auction might be the answer. Be careful bidding, especially if you don't understand French. Some sellers won't ship out of the country, and some of them will only take a check (I'm guessing not one from Minot, North Dakota). But, if you can navigate your way through the language barrier, you might get a bargain!
And thank you to Aymeric for the help.
Sometimes buying a tool on an online auction is a crapshoot, because in my experience sellers have no idea if a tool is really in good shape or not, nor what it is worth.
"Heck! If it would look good screwed to the wall at AppleBee's, then it should be worth it's weight in gold!"
I digress.
This time, it was French eBay. It turns out there are lots of neat old tools there that you really can't get in Germany, England, or the U.S., where I usually troll for old tools. I couldn't resist a traditional French holdfast.
 |
| Here it is. I knew it would be big, but jeez! |
 |
| For a little perspective, here it is next to a Gramercy holdfast. |
 |
| Detail of the complex working mechanism. |
 |
| If I decide to remove some of the surface rust, it will only be on this spot. It isn't needed anywhere else. |
 |
| Angles on the pads are different. I wonder how it will work? |
The only issue I have so far, is I must drill new holes in my bench to try it out. This enormous hunk of French metal will take a big hole. My Gramercy holdfasts have 3/4" holes on my bench, but it looks like this beheamouth will need a hole at least 1 1/8" in diameter.
 |
| Gramercy holdfast - .719" thick, according to this. |
 |
| French monster - 1.097" thick. This will need a big hole. |
And thank you to Aymeric for the help.
Friday, March 20, 2015
When a Mockup is Useful
I meant to just slap the doors on and be done with this vitrine mockup. Instead, construction of this piece continues to educate me. The lesson: there are better ways to ensure the doors are perfect.
One of the challenges with the design of this cabinet is the glass panel floats between the two doors. At least it does the way I am building it. This means the glass panel (which is dead square and can't easily be changed) fits only when the doors are hung dead-nuts-perfectly-square when hung.
These aren't.
I was hoping that the problems would be resolved when I tuned the hinges. The problems have to do with the fact that I didn't check ANYTHING for square when constructing this. I thought it would save a bit of time.
I was wrong.
The bottom door, the way it is hung now, has the left side hanging down a bit from where it should be. The rabbet I sunk in this door needs to be exactly even with the rabbet on the side, in order for the glass panel to fit and look right. If this door is rotated a bit so the rabbet is flush, the bottom left part of the door sticks out past the cabinet an unacceptable amount.
This theoretically wouldn't be a problem, as these European pocket hinges allow for lots of adjustment after installation. The deal breaker is that once they are sttraight on top, the bottom isn't straight.
I will fiddle with them a bit more, but I think I just need two new doors. Lucky thing they are nailed together with the cheapest material I could find!
It sounds like an opportunity for a blog post on the strength of panels constructed with clinched nails!
My plan is to build the door panels a little oversize. After I mount the door straight, I can then cut off the extras and sink the rabbet so it will fit the glass dead perfect.
The problem with this plan is that the cross battens on the door also serve to clamp the glass in place.
I could try making the batten a little shorter, and attaching some kind of block to capture the glass, but you'll notice I cut some notches in the shelves on the front of the cabinet to house the battens (see the first photo). This obviously isn't ideal, but I didn't realize I needed clearance for those battens until I was test mounting the doors.
So, I think the solution is to sink that rabbet with a plow plane.
Unless anyone else has a better idea, I'll probably get a chance to do this on Monday.
One of the challenges with the design of this cabinet is the glass panel floats between the two doors. At least it does the way I am building it. This means the glass panel (which is dead square and can't easily be changed) fits only when the doors are hung dead-nuts-perfectly-square when hung.
These aren't.
I was hoping that the problems would be resolved when I tuned the hinges. The problems have to do with the fact that I didn't check ANYTHING for square when constructing this. I thought it would save a bit of time.
I was wrong.
 |
| Not sure if you can tell from this angle, but the doors are not in a straight plane with each other. |
 |
| This part of the door hangs down, the hinge side is right on. |
 |
| For example, the top door. The rabbet is adjusted perfectly, but you can see the door is not straight on the cabinet. Pay no attention to the glob of paint that ran down the front and dried right in front of the camera lens! |
It sounds like an opportunity for a blog post on the strength of panels constructed with clinched nails!
My plan is to build the door panels a little oversize. After I mount the door straight, I can then cut off the extras and sink the rabbet so it will fit the glass dead perfect.
The problem with this plan is that the cross battens on the door also serve to clamp the glass in place.
 |
| It turns out I really didn't have a good picture of how the door captures the glass panel. This is the best I have. Notice the right side, there is a rabbet on the large panel, and the battens go right to the top of the door. The glass rests in the rabbet, and the battens just hold the glass. |
So, I think the solution is to sink that rabbet with a plow plane.
Unless anyone else has a better idea, I'll probably get a chance to do this on Monday.
Wednesday, March 18, 2015
Coffee and Cream Revisited
 |
| My cowhide and wenge Roorkee chair. |
I chose to make this chair as a Christmas present, because despite its refined look, it is a relatively simple build. A determined hand tool user could make all of the wooden parts for this project in one day. The other thing that makes this a great gift, is that this chair lends itself very well to modifications and creativity in design. There are lots of different options that have been done to this chair, and there are lots of ways to try out things that haven't been done before.
 |
| Another artsy close up of a detail. |
Wonder of wonders, this chair won the Best Overall Gift! You can see photos of all the winning projects here. I couldn't believe it, I have never won anything in a woodworking contest before. I was extatic!
 |
| The whole chair. |
 |
| A box from Gorilla Glue! |
 |
| The goodies inside. |
I would like to extend a big thank you to the MWA for hosting this fun contest, thank you to the judges for being so kind to my project, thank you to my sister Janet for giving me the impression she likes the chair, and especially thank you to Gorilla Glue for the box of goodies.
Tuesday, March 17, 2015
Vitrine Progress - Paint and Glass
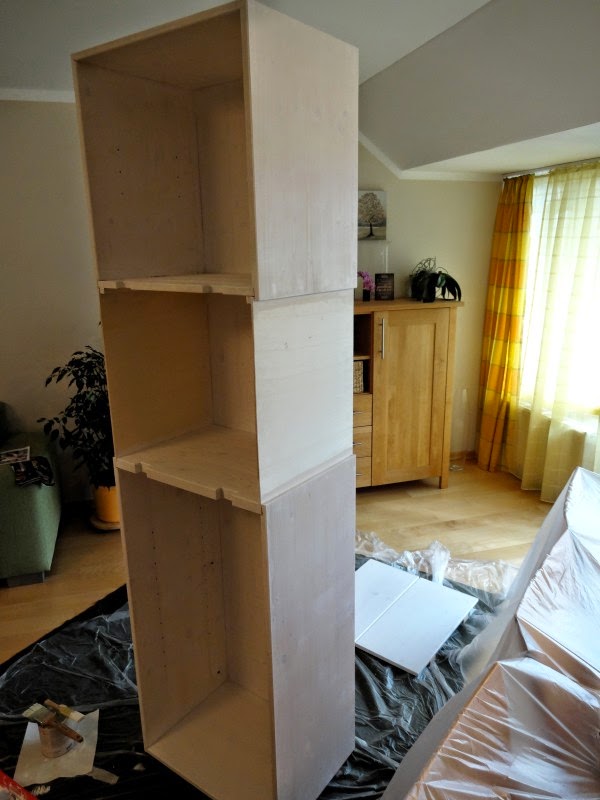
One can be forgiven if they haven't really been able to figure out what I am thinking with this nailed vitrine. Hopefully it is starting to look like a proper piece, now.
I picked up the glass from the glazer yesterday. The tint is a bit darker than I expected, but I think it will look fantastic when done.
Here is where I started after collecting the glass. I removed the doors and hardware for paint.
A coat of paint really is making this spruce look better. The only problem is that any defect in the wood shows through when you get close. Knots, resin pockets, and filled nail holes all stick out, but the over all effect is rather pleasant.
To install the glass, I had to remove the plywood spacers. Theoretically they slide out, but I first had to cut them free with a knife, as the paint had got them nice and stuck.
Interesting news is I finally got to use these clamps in spreading mode. Clamps always advertise this as a feature of versatility. I think in ten years of having these clamps, this is the first time I really needed to do this.
The final result is rather striking. I think the cabinet no longer looks like a cheap nailed piece, but a rather swanky looking piece.
The last bit to do is finish painting the doors and moveable shelves, and we are done.
A note about the stability of this piece: I can't imagine that this piece ever would be totally rock solid, unless the two cabinets were screwed directly to the wall. However, the back of this one is two shiplapped two-meter long boards, full 18mm (3/4") thick. I nailed them in from the back and the sides for strength. These boards give this cabinet the strength that it has. I imagine stronger than the original. The top cabinet is mostly held by the back, and it also rests on the glass.
I think that if this cabinet took a blow, the glass might break, but the glass stiffens the piece considerably over the plywood spacers. I think as long as one is careful, there is no reason to think the glass will ever break.
Well, there is only one way to find out!
I picked up the glass from the glazer yesterday. The tint is a bit darker than I expected, but I think it will look fantastic when done.
 |
| It looks even darker here, because all three glass plates are stacked on each other. |
 |
| Before. |
 |
| with a coat of paint. |
 |
| Trying to protect the paint with whatever was at hand. The clamps are there because once the plywood spacers come out, there is nothing supporting the front of the upper cabinet. |
The final result is rather striking. I think the cabinet no longer looks like a cheap nailed piece, but a rather swanky looking piece.
 |
| Now we are talking. |
A note about the stability of this piece: I can't imagine that this piece ever would be totally rock solid, unless the two cabinets were screwed directly to the wall. However, the back of this one is two shiplapped two-meter long boards, full 18mm (3/4") thick. I nailed them in from the back and the sides for strength. These boards give this cabinet the strength that it has. I imagine stronger than the original. The top cabinet is mostly held by the back, and it also rests on the glass.
I think that if this cabinet took a blow, the glass might break, but the glass stiffens the piece considerably over the plywood spacers. I think as long as one is careful, there is no reason to think the glass will ever break.
Well, there is only one way to find out!
Subscribe to:
Posts (Atom)