Friday, September 28, 2012

Use the Tools You Have

It is amazing to me how my mindset regarding tools has changed since I have started using handtools in woodworking.

More specifically, since I started paring down the number of tools I own and use to do my woodworking, along the lines described in the Anarchist's Tool Chest.

I used to have absolutely no problem in buying a new tool to accomplish a one-time task.  Recently I discovered in a box of tools I had rolling around a stethoscope for listening to a running motor, a brand-new impact driver, and a used-only-once motorcycle carburetor synchronizer capable of reading four carburetor's pressures at the same time.  You never know when I might need one of those again.

Today I was drilling some 5/16" holes in the leg of my bench to install the roller brackets for my leg vise.  Rather than use a brace for this task, I have been using a breast drill that was recently given to me.  Beautiful tool and perfect for holes just a little too big for my eggbeater.

This worked perfectly until I got to the holes on the back of the front leg, as the rear leg was now in the way of drilling straight holes with the breast drill, eggbeater, or any of my braces.

In the old days I would have gone out and purchased some attachment for my cordless drill that allows you to drill at a 90 degree angle, such as this one from Amazon for the sale price of $41.75.

You never know, this might come in handy some day!
So, more than forty bucks and a week or two for shipping and I could finish this job, right?

Instead I got out a #5 brace bit, and dropped a t-handle from my tap and die set (also found in the box of old, brand-new tools) over the end of the bit.

Voila!  A makeshift gimlet!

This resulted in holes just as perfect as were required.

Christopher Schwarz was right when in the ATC he says his list of tools has everything you need to build furniture.  Once I got away from fixating on the gizmos available to woodworkers and focused on a decent set of basic tools, my personal journey got a lot easier.

But, I think I'll still keep that carburetor synchronizer.  You never know...

Monday, September 24, 2012

Spruced-up Rabbet Plane - VIDEO

In my last post, I showed the beginning of a project where I began re-soling my old wooden rabbet plane with a nail in the sole.

I now have my camera and got a couple shots of it today after I honed the iron.


I did the best I could to preserve the patina on the old plane, but to get the new rosewood (?) sole planed nice and even to the plane body a little of the color had to come off.  In a hundred years I bet you won't be able to tell the difference.

The cool part about having done this is the arris on the sole is now very sharp, and very hard, and I suspect very durable.  It lies in a gauge line real nice.

I got a video of my first-ever by-hand rabbet with an unfenced rabbet plane.

Items of note:  the wood is a scrap of maple which in hindsight might not have been ideal testing stock.  I also had the iron set a bit too heavy, but it seemed to work even with the extra effort required.  I'll practice this more with a lighter cut.  Also, I gagued a line with my Veritas marking gague.  That is all that I have the edge of the plane riding in at first.

In an effort to avoid boring you to death, the speed on this is double.


Wednesday, September 19, 2012

"Mouldings in Practice" - A Non-Traditional Review

I couldn't stand it anymore.

Because of where I live, Media Mail from the USPS takes weeks and weeks for delivery.  So, even though I pre-ordered and I got a note from John at Lost Art Press that it shipped with everyone else's, I still have yet to take delivery.

So, I bought the e-book.

My review:  It was awesome.  You should read it.

I'm not sure what has interested me in hollows and rounds lately, because very little of my work requires moldings other than a chamfer here or there.  I bought Larry Williams' DVD not long ago, and have been fixated on making some.

While reading this book, it dawned on me that the first time I use a moulding plane may be with one that I made myself.  And, the first one I'll probably need is a rabbet plane.

There is an old rabbet plane in my tool chest.  Back when I was hoarding every tool without really knowing what to do with them I picked up a nice little 1 1/8" inch rabbet.  I always thought it was of low quality because I couldn't get it to do what I wanted.  Turns out what I was trying to do with it was make it work as a shoulder plane.  Also, while trying to flatten the sole at one point I tore up a freshly sharpened plane blade when I ran over a nail driven into the sole.

Long story short, this plane has been knocking about for some time without any intention of me using it.

So, I thought it must be time to re-evaluate and see what can be done with it.  The worst I could do is ruin it so it was worthless to use or collect.

No big loss, since that is pretty much the state it is in now.

The edges of this plane were rounded over just like the book says many old rebate planes.

So, I drilled a couple of 1/8" holes next to the nail so I could grab it with some needle nose pliers.  Don't ask me what a brad nail was doing in the sole of this plane.

I planed off about 3/32" from the sole to get to flat wood, and glued on a strip of some mystery tropical wood that I've had for more than ten years.  Probably rosewood.  It should be nice and hard and work will with tracking a gague line.

The only problem was that in my zeal to ensure the strip was even on the plane's width, I didn't notice that it is not overhanging the front like I intended.  It is just a shade short of the front, so I'll have to see what to do to make it look pretty.  This shouldn't affect it's use.


Once the glue dries, I'll plane the strip down to dimension with the intention of changing the dimensions of the plane as little as possible.  I'd rather not remove the patina, but if I do, no biggie.  This will be a user, and I think an hour or two of labor for a functioning tool is a good investment.

Sawing the mouth out should be fun, but with a couple of floats I should be able to get it to work.  With careful sawing, there should be only clean up.

But, this is me we're talking about.

Of course, you'll be the first to know my progress.  Hopefully you won't see this plane on eBay, and if you do, you'll know not to buy it.

Tuesday, September 18, 2012

Celebrity Deathmatch: Aldren Watson - 1, Charles Hayward - 0

I really like Charles Hayward.  I downloaded one of his books from the Toolemera website a while back and have thought the articles in there were all gems.

Until today.

Not having a drill press, I needed to drill some accurate 3/8" holes to finally finish off my leg vise install.  Looking through Hayward's book, I found a jig that does just that, "For Boring Accurate Holes."


Building this was fun.  I used walnut, maple, and mahogany scrap.  It took about two hours, and I learned a lot making it.  Especially the part of excavating a big square hole.

It worked, too! Sort of.

It takes a long time to set up just so, there is a lot of play, and you have to readjust it after drilling about 1/4".

After boring the first half of the four holes I needed, I gave up and went free style.

Thanks to the practice I did before ala Aldren Watson, I am now skilled at drilling holes freehand.

The result:  All of the holes I drilled were as perfect as they need to be.

The moral of the story:  Don't waste time building jigs to help you with operations that are basic skills.  I guarantee you if you practice boring straight holes as Aldren Watson says for the time you need to build this jig by Charles Hayward, you will have the skills you need for accurate boring on this project and all to come.

Kitchen Table Finished

You are probably thinking, "Holy cow!  This guy works fast and finishes projects like crazy!"

Things aren't always as they appear.

I have been working on this table for about a year.  It was interrupted by construction of the pencil post bed in the previous post, among some other projects. 

I normally don't like to do more than one project at a time.  It has been a long, long time since I got the gratification of finishing something, and now it seems I am finishing something every other day.

This is good, as now I can move on to other things.

This table my wife offered for me to build her parents when they had their new kitchen installed last year.  I readily agreed, because I have never built a large table before, and had just read Robert Wearing's book, "The Essential Woodworker," by Lost Art Press.  If you haven't read this yet, you should.  It is fantastic.

I also agreed because I wanted practice building a table before I do one for us.

That was smart, as I learned a couple painful lessons during this build.  Namely, just because the tenons fit perfectly one at a time does not mean they will fit all together after you glue up and drawbore.

Ouch.

This table has a couple gappy tennons that I tried to fix with some veneer spacers.  Not too noticable, but being my own worst critic, I see them first.

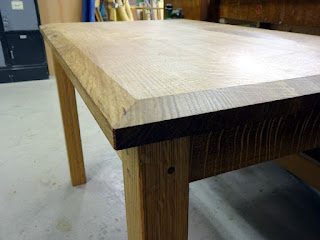
Anyway, the wood for this project is just beautiful.  I was able to pick out some perfectly quartersawn boards at my local lumber yard that were more than 40 mm thick.  I picked the best parts for the top, and laminated the legs with the rest. 

I covered the sides of the legs that showed the lamination and flat sawn grain with some quarter sawn veneer my cousin picked up for a song.  Being my first attempt at veneering, I was pleased.  I'll see if this works on my next table, too.

Anyway, enough words, more pictures:

The back-side of the table.  This will eventually go against the wall.

Close up of the top bevel.  This makes the table incredibly comfortable!

The end of the table showing veneered faces of the legs.

Just gorgeous wood.
The table is finished with boiled linseed oil.  I plan to also apply paste wax before it is delivered.

I was a bit worried about the veneer, as before it was finished there was an obvious color difference.  Also, the Frau seemed to think this was unnecessary and introduced some risk of ruining the project.

But, happily, it turned out just great.  The idea is to make it so no one notices.  If no one ever comments about the construction of the legs (other than woodworkers), I have succeeded.  I didn't want someone to say, "Oh, I see how you glued those two thinner boards together to make one thick leg.  How clever!"

Soon I will be starting a table a bit larger for our appartment.  It is walnut, and so far the lumber looks beautiful.

Monday, September 17, 2012

Toot my Own Horn


This blog is relatively new, and I finished this project before I started the blog, so some of you may not have seen it yet.

But, the other day I found out that the Army wide Arts and Crafts competition that I entered this bed into was recognized with an Honorable Mention!

Here are a couple pics of the project:

Completed bed in place.

Photo of project without mattress but with commercial bed slats.

Bed bolts and covers from Horton Brass.

At the Army woodshop.

Proof that I used hand tools!

Assembled at home.  We decided finishing it in place would make for a more even paint job.

Perspective.
 This project was a blast to do.  I made the posts out of laminated spruce posts I found at the home center.  Not the greatest wood, but I knew this project would be painted, and this was affordable and stable.  I ripped the tapers at yet another Army woodshop that had a table saw with a sliding table.  That took only about five minutes for all the posts.

The rails are made of scots pine.  I fell in love with this wood when I made my tool chest.  Easy to work, plentiful and cheap.

All the joinery is traditional with 1/2" mortice and tennons that I cut by hand.  The only thing that isn't quite traditional is I used kitchen counter fasteners to attach the headboard.

The Frau and I intended to paint the bed black, but for some reason when we went to buy paint, we really liked the anthracite gray.  After a coat of primer, it went on really nice with a small roller, followed by paste wax.

Friday, September 14, 2012

Upcoming Project - Hollows and Rounds from Pear!

You asked for it, you got it!  Photos of the pear wood I recently acquired.

A couple posts back I mentioned I bought some pear wood from the local lumber yard, but had no pictures.  I roughed out a piece from this 7' x 16" 8/4 board about two feet long and 3 1/2 inches wide, enough for two plane blanks:


This is the first time I've worked with pear, and it seems to be beautiful stuff.  I cross-cut a bit off the end with my hand saw, and took it to the woodshop on the Army post where I work.  I roughed out the shape with a band saw and a table saw, and cleaned it up with my new jointer.

I chose pear because a) they had it at the lumber yard, and b) I thought it was so much prettier than beech.

It is long enough for two blanks, with a bit extra to cut the unstable part at the end off.

I got a board directly from the center of the tree, so it is nicely quartersawn.


Unfortunately, the pith goes through the middle of the 16" wide board, so I will get a lot of waste.  But, I think this is one of those things where doing crazy things to try to preserve wood may not be so smart.  I tried to cut this one so the grain goes as straight as possible, parallel to the sole.  This way I should get six blanks just like this out of this board.  That is 12 8/4 blanks.

If I sold these planes for $100 each (which I won't - the plan is to put them in my tool chest and work with them), I would generate $1200 from a $65 piece of wood.  Looked at that way, the cost and the waste isn't too bad.  Ten years from now I won't regret the waste, but I will regret it if there is a giant knot or some crazy grain in the plane I'm trying to use that warps itself out of true.

Now I need to resaw this piece.  That means an appointment at yet another woodshop, as the bandsaw in the Army shop I go to isn't capable of a decent resaw.  Look out, Peter!  Peter's bandsaw did a beautiful job resawing the blank I used for the Krenov style jointer I recently built.

If all works out, I might be able to use the cutoff for another pair of narrow planes., say #2's or so.  The intention is to make a #10 hollow and round pair using the method in Larry Williams' DVD.

Depending on how that goes (I'm nervous about heat treating the irons), I hope to get the following pairs from this board:  #1, 2, 3, 4, 6, 8, 10, 12, 13, 14.  Perhaps a rabbet or a pair of snipes bills instead of some of the bigger ones, we'll see.  It also depends if the cut offs will be usable for the narrower planes.

That should keep me busy a while.

Tuesday, September 11, 2012

Big Jointer

Maple and Mahogany Jointer

If you think that it is a long time between posts where I actually finish something, you are right.  However, lately I have been doing more woodworking than blogging.  Hopefully soon you will get to see the completed kitchen table that has been in a state of "almost done" for months now.

I needed to use a nice jointer to flatten the top of my new Roubo style bench that I built in a class by Christopher Schwarz.  (That is another project that is coming along nice and slow.)  I had a nice jointer, a Lee Valley bevel up jointer.  However, I noticed I had not used this tool all that much.  I have been doing the majority of all my planing with the bevel up jack from the same company.  So, I had the opportunity to let it go to a good woodworking friend from Denmark and sold it to him.  I got a sweet bowsaw out of the deal that I used on this project since I don't have a bandsaw.

I had been meaning to build another Krenov style plane, as the couple I have were such fun projects.  On a side note, I highly recommend the book and DVD by David Finck.

Knowing I wanted a jointer, I started scouring the internet for a good piece of wood for a blank.  I settled on a big chunk of maple from tablelegs.com.  If you use this source, read the fine print as a few of the species of wood they sell will be laminated for a blank this big.  I wasn't expecting much, but the piece that came in the mail was stunning, a perfect potential hand plane.

Besides using a bandsaw to saw the cheeks from the blank at a local woodshop here in Munich (thanks Peter!), this plane was done entirely by hand.  Not only that, but I used my new bench for the whole thing.

A flat bench top really would be nicer.

The specs on this plane include a whopping 28" length (74 cm or so), thanks to the standard size of table legs.  The wedge and cross pin are from some scrap mahogany I had laying around, and the finish is boiled linseed oil (soon to have a topcoat of wax).  The iron is a 1 1/2" Hock blade with chipbreaker.  I've had good luck with these and recommend them.

The bed on this baby is precisely 47 1/2 degrees, and the front is a perfect 62 degrees.

The other planes I have made all have had a bed angle of somewhere around 45 degrees.  I meant for them to be 45, but it turned out however it turned out.

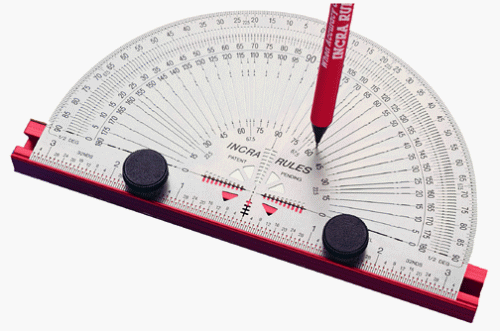
Not so for this one.  I got a new protractor for this project and it worked amazingly to a half of a degree.  I thought a bit higher than 45 for this plane, but not too much as it is a jointer after all.  So, using the Incra protractor I got from Amazon for about 20 bucks, I laid out and made those cuts to perfection.


What you really want to know is how it works.

This thing is frickin' sweet!  I set it up to take shavings a bit thicker than a smoother, but those shavings left a glass-smooth surface on a piece of test maple I had laying around.  I had so much fun jointing it, that I made it into a straight edge.  A little BLO and it went straight in my toolchest.

I thought it might be a bit unwieldy with the length, but my initial impression is that it handles well.  The extra length gives it more mass, which is good.  But, being wooden it isn't too heavy to use in lengthy jointing sessions.

I'm not sure what I did, but this plane works better than any Krenov-style plane I have made yet.

Stay tuned, as soon I will be tackling the bench top flattening with this plane.