Monday, March 14, 2016

Henning Norgaard Couch Table Part III and Another Squirrel!

Continuing with the couch table. I'm afraid there is not much going on here, I'm still roughing out the parts. The problem is that roughing out parts like this in a hand tool-only shop does take a little longer. So far I cheated a little in getting a local cabinetmaker to run my oak planks for the top through his thickness planer.

I want to prep the rest of the parts for the base in my shop, but after spending half of the whole day ripping 9 out of an eventual 12 sticks out of a board, I might just run those sticks through a thickness planer, too.

A lot of people seem to me to be afraid to do their stock prep with hand tools. For the most part, I am forced to as I have none. I find that it is neither difficult nor inaccurate, and for the most part it is not slow.

When it really starts to show as a weakness for me, is when there are big parts, or lots of parts that need special cuts.

My task today was cutting 12 sticks out of an ash (Fraxinus excelsior) board. The sticks need to be about 28 inches long and one inch square or so.

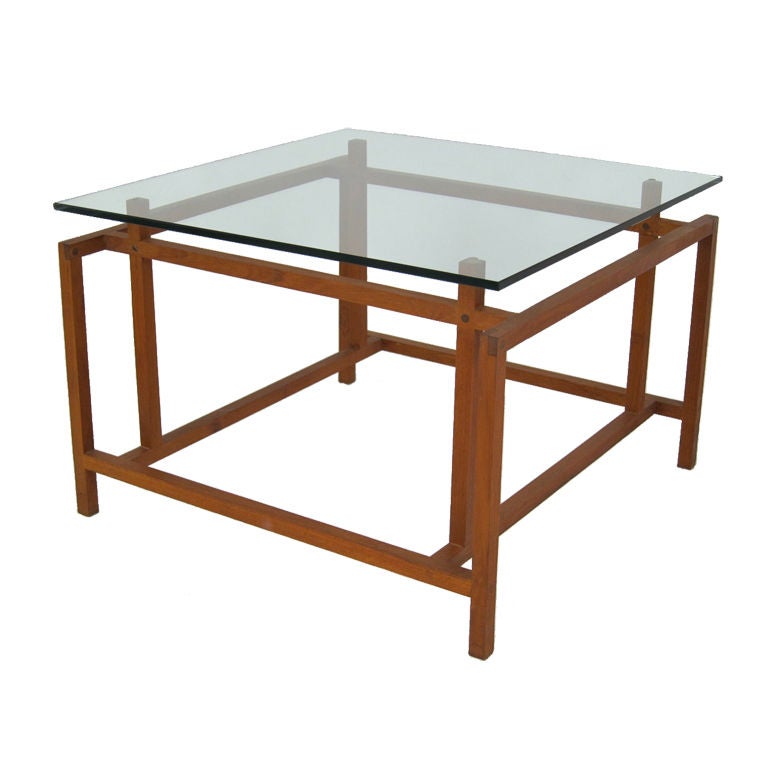
The great part about doing this with a rip saw is I am given the freedom to cut this board any way I want. I decided this table's base would look best with the annular rings of each stick being more or less at a 45 degree angle to the stick. I've always called this rift-sawn, but I have also heard the term "bastard grain." The advantage is the grain looks the same on all four faces, rather than showing quarter sawn grain next to flat sawn grain. For this piece, it would look odd. I want the focus to be on the top when you are looking at this piece, so anything that sticks out or draws the eye to the base isn't going to work here.

Perhaps a photo so show what I am talking about.
Bastard!
There's really not much more to see as far as progress on the table. Ripping is really a pretty boring thing to blog about.

Tomorrow I should be able to get those last three sticks ripped out relatively quickly, then I will decide if I want to run them over to a shop with a thickness planer (likely), or square up the parts by hand (my arms hurt thinking about it).

For a bit of interest, and in line with my latest tendency toward ADD woodworking, I started another new project. Well, I also rehabbed a couple of bench planes today, but more on that later.

Jonas, the author of the blog Mulesaw, is making a couple of backsaws this trip on board his ship. He and I were chatting about the project one day, and somehow I was able to talk him into bending a piece of copper for the spine of a backsaw for me. I'm excited to see how his ship-board saws will come out. I think it would be bad manners if I didn't finish the saw. I guess I'll get started early.

I actually started to make a dovetail saw a few years back, but for some reason abandoned the project. I got as far as roughing out the shape of the handle on a piece of flatsawn walnut. I might take this opportunity to finish that saw, too.

I ordered another folded brass back from TGIAG along with a pair of sawplates punched with 14tpi teeth at 10 degrees of rake. I figured I would do a comparison of a "proper" manufactured folded brass back with Jonas' copper version. To do a proper comparison, I will make two identical saws based on the carcase saw from Smith's Key.  The dovetail saw has a milled brass back from Ron Bontz.

I have a nice piece of elm that I brought back from Jonas' place in Denmark that will make a gorgeous saw handle. It will be perfect to pair this with the copper back that Jonas will provide, for a saw whose parts mostly came from Denmark. Well, Denmark and somewhere in the middle of the North Sea. The second saw will have a pear handle, I think. Let's get started on the elm:

I printed out a template from Blackburn Tools. I like this one as it looks just like the image in Smith's Key, plus there are separate files for different sizes of grips. Next I cut out an appropriate sized blank and flattened one face.
I really like working with elm. I have a bit more if I screw this one up.
With one face flat, I marked around the blank at one inch in order to prepare for resawing.
Resawing is a lot like cutting tenons.
I sawed a kerf with my ripsaw all around, then started working my way to the middle.
Kind of like Connect the Dots.
I used to really suck at this. Now, I can get a surface from the saw that doesn't take too much effort to clean up. All I can say is, the only way to get better at this is to keep doing it. Eventually you get a feel for what the saw wants to do and you let the saw do it.
Too bad I'm not making a book-matched panel.
After everything is flat and square, I spray-glued the template to one side of the elm block being careful to line up the wood grain with the direction of cut.

Now to start shaping. To start, I will drill out some holes. No drill press here, just bore a straight hole! As long as it is more or less close, I can straighten things and make adjustments with a rasp later.
I had a one inch Irwin pattern auger bit.
Some of the holes on this pattern were bigger than an inch, and in odd sizes. I was going to bore those with my one inch bit, too, until I remembered I had some Wood Owl bits I used once and put away. They were a bit closer in size to what I needed.
This one left a bit of a ragged hole.
It turns out they both work fine in a regular brace.
This Ultra Smooth bit left a very nice hole.
I did have one mishap here. I was careful to let the lead screw pop through on the far side, then flip it over to finish the cut from the far side. That prevents blow-out. Unfortunately, there was a small crack in this wood and a chip popped out of where the top horn will be. I think I will be able to work around it. If not, I have more wood, I suppose I'll just start over.
The blank with holes.
I did the saw cuts I could with my Ryoba Dick saw. The other curvy bits gave me an opportunity to use my bow saw.
Incidentally, the frame of my bowsaw is elm.
Here is where I left off yesterday. Next I will clean up the ragged bits with a rasp or whatever, then I will start shaping the handle. Maybe by the time Jonas' copper back arrives, this handle will be ready for it.
Not quite ready yet.
The other handle in the above photo is the walnut handle from the backsaw project. I had forgotten about this. It is based on a scan from my Spears & Jackson dovetail saw. It looks like it is ready to start shaping and will be good to go. The only problem I see with it is it is flat sawn, rather than quater sawn. I suppose I'll use this opportunity to find out why sawmakers don't normally do it this way.


Tuesday, March 8, 2016

Squirrel Handle and Henning Norgaard Inspired Table Part II

You'll remember in my last post I indulged in a bit of ADD Woodworking, I started to rehandle a mortise chisel shortly after starting a major project.

The good news is I finished it.
My handle next to a Gramercy Ray Isles mortise chisel.

You'll remember I left off with this photo:
Started.
Unfortunately I didn't think to take many pictures of the hard parts of this project. The tang of the chisel was rectangular in shape, which was a bigger challenge than previous chisels I've done with square tangs. I found a planemaker's edge float was helpful.

The other part of this project that was important was layout. I started with an oversize block of beech. Once the chisel was mostly seated, I drew new layout marks on the blank consisting of centerlines based on the blade of the chisel, since it was expectedly off-center now.

With that done, I marked the shape of the handle from the center points. This handle is essentially square and tapers in both directions from small at the bolster to bigger at the end.

Once that was marked, I used my Dick Saw (a Ryoba Japanese pull saw from Dictum's line of tools labeled "Dick") to cut on my lines for the rough shape of the handle.

From there it was just a matter of cleaning everything up. I had the best luck with my block plane, although I did chew up the blade pretty well by the time it was done. I suppose I knicked the metal bolster a time or two, and a scraper.

Once the general shape felt good in my hand, I did no more measuring. I figured I could have chased my tail all night getting everything perfect. In the end, the tool should work, even if it isn't millimeter perfect.
Cleaning up the ratty bits with my block plane...

...and my card scraper.
Having smoothed the square bits, I did the chamfers, continuing the pattern from the bolster. In the end it looks more square than octagonal.
I might re-do the chamfers on the end to make them much bigger.
I even decided I should practice with my maker's stamp.
On the other hand, it doesn't look so bad.
I'm pleased, and now have a 3/4" pigsticker that can be used.
Whether or not I ever have a project that needs it is another story.
I also will need to sharpen it someday, as it is as blunt as could possibly be.


It is quite comfortable to hold.
As far as the table goes, I bought some ash (Fraxinus excelsior) for the base. This is beautiful, straight grained stuff. To make the table extra special, I will cut the pieces out so the grain runs at a 45 degree angle, making each face look the same rather than have quarter sawn on one face and flat sawn on the other.
To do this requires a bit of creative sawing. This is actually quite easy to do with a hand saw.
Here is one finished stick. 15 more and I'll be able to start the joinery!
A fellow Munich woodworker let me borrow him and his shop long enough to run my oak tops through his jointer/planer. That saved me quite a bit of time.
A preview of the top of the table.
The table top will be about 28 inches square.
Resting.
I will have a few days before I get any more shop time, so I will let these oak pieces acclimate a few days before I do anything else with them. Clamping them up will hopefully prevent them from turning into potato chips.

Next time I will glue up the panel, plane the bottom flat and install some cross battens to keep the panel flat over time.

Wednesday, March 2, 2016

Henning Norgaard Table - Part I

I got an opportunity to get back in the shop today - the first proper shop time this year. My how time flies.

I didn't really get much done, but getting started on a new project is always fun. For this project, I have the perfect piece of leftover oak - the rest of a wide plank that I bought to make the staked desk.
Here's a glimpse of my tiny shop. To plane a long board, I have to keep the door open and start the planing stroke in the hall!
The inspiration for this coffee table will be a table designed by Danish designer Henning Norgaard. A quick internet search yielded very little about this designer, possibly one of you knows a bit more.
photo courtesy 1stdibs.com

First is some boring work making the top. Notice in the original the top is glass. I like glass, and have made a glass topped table before. Glass is a lot more expensive than a piece of wood I already have, so a wooden top it will be.  Besides, I think it will look cool.
One jointed edge.
I started by jointing an edge. Actually, I started by determining how big the table top will be using this one board. It turns out, I can make it 28 inches square by cutting this board in half and edge gluing the two pieces.

With a jointed edge, I was able to accurately mark out the board lengths and cut them out.
I always cut a wide board in the middle with a little regret.
It's been 20 minutes since I've started a project, so I figure now is as good a time as any to start another one.
Why can't I ever only work on one project at a time?
This giant 3/4" French mortise chisel needs a new handle, so why not? After I get it to this point of almost done, it is time to go back to work on the table.
This is exciting because I get to use my panel gauge. I love using this thing.
I'll always treasure the above photo of my beloved panel gauge, because it is the last picture ever of it before I lost the tiny ebony wedge that holds the blade in place. While I was putting this gauge away, the wedge popped out and I suspect is under my bench somewhere. It might not sound so bad, but you see the picture above of my bench, right?
Ripping. Exciting.
I actually am really starting to enjoy breaking down stock by hand. At least the sawing, anyway. With only a little practice, one can saw very close to the line. It really doesn't take that long, either.

Planing, on the other hand, does take some calories.
This is the table's top.
This oak is nice, and shouldn't be too difficult to plane. There is, however, about 3/16" to take off on either side to make them flat. I haven't decided yet if I'll borrow someone's machine or do it with pizza power. I have a couple days to think about it before I get more time in the shop.

The design of this table will evolve using my normal method, which isn't using a SketchUp model. I will finish the top, then build the base using the top's dimensions to guide the design. I envision my table being a little lower than the original in the photo, but I don't know exactly any of the dimensions yet. One reason being I have to buy some more lumber for the base. It will probably be oak or ash, whatever I can find with straight grain.

I still haven't made up my mind on the joinery, either. I am leaning toward the lap joints like the photo, and probably some double-wedged mortise and tenons that aren't in this photo (that I can see).

I also haven't decided on how to keep the panel flat. It will need some cross bracing, probably some sliding dovetails. It's also not to late to decide on breadboard ends. Or maybe my standby of screwed battens.

Any suggestions?