Thursday, May 25, 2017

Home-Made Tapered Bit for Pilot Holes

My latest piece, the "One Day Storage Cabinet," was built with nails. I used nails from Dictum, but these nails can be had from several places including Lie-Nielsen.

What makes them good to use for furniture is they are square in profile, and tapered. That is, they are thicker at the top than at the bottom. These nails, unlike cut nails, are tapered in both directions, so the profile is square no matter where on the nail you look.
Tapered nails hold like crazy.
The square profile, and their tapered nature makes them very strong. These particular nails also have a large decorative head.

When using these nails in a softwood, I find a tapered drill bit that is just a bit undersized works just great for a pilot hole. With the tapered wedging action of this nail, a pilot hole is pretty much mandatory to avoid splitting the wood.

I did run into some problems when clenching the nails for the cross-battens on the door panels. I used a hard wood for the cross battens, and the nail didn't react as expected with the undersized pilot hole. That means I need a different drill bit.

To clench the nails I first marked out on the spruce panel with a pencil the line where I wanted the nails to go. I then stepped off the distances for the nails with a pair of dividers. Once I had the spacing, I used a regular brad point drill bit for the holes. This is essentially just to mark on the painted side where the pilot holes should go, avoiding marking up the show face of the panel.
2mm brad point bit to mark pilot locations.
The show face now has marks for pilot holes.
I next used my undersized tapered drill bit to start the pilot holes from the show face of the door panel. This made it simple to clamp the batten in place and mark batten from the panel where the pilot holes go. I then used the tapered bit to start the pilot holes on the hard wood batten.
Batten clamped in place for marking it's pilot holes.
Up until now we really haven't needed a tapered bit. I used what I had, but a regular brad point bit that is the diameter of the smallest part of the nail would work, too.

When I tried to drive the tapered nail into these undersized pilot holes, I could not really get them to go in far enough. The pilot hole was just not big enough, and the hard wood (sycamore in this case) would just not give enough to allow the nail to be driven home. In other words, I needed a bigger tapered drill bit.

Instead of buying one, I decided to make one out of one of the nails I would actually use.

I had a bit of luck with modifying a nail. I cut off the head of the nail with a pair of wire cutters, and then sharpened the edges using a coars diamond plate. I lapped each face of the nail until there was a nice clean, silvery edge on each of the four faces of the nail.

Then, I used a carbon steel burnisher (mine is the cheap Shinwa version, it works great) to turn a hook on each face so the hook faced the direction of travel.

The last step for me was rounding over the square bit on the end of the nail that would be held by the drill chuck. I didn't spend more than a minute or two on this, and it held in the chuck just fine.
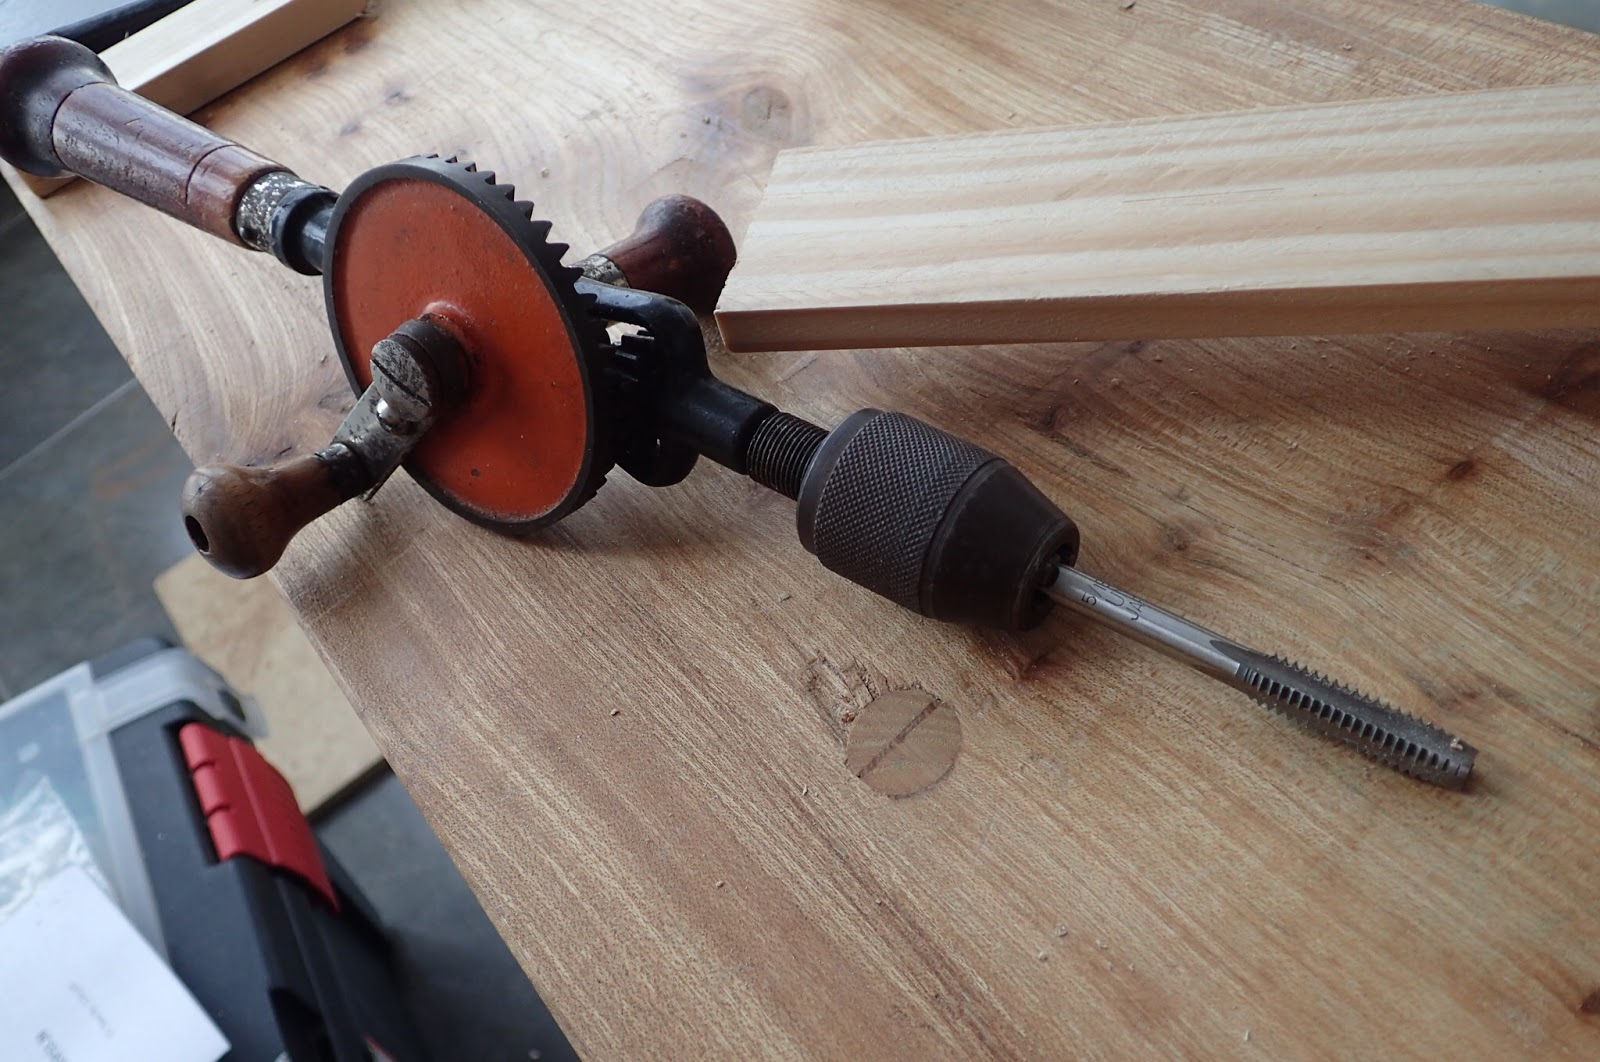
The sharpened nail/tapered drill bit.
This worked perfectly. With everything clamped in place, I ran the drill until the nail went through with about the same amount sticking up on either side of the board with batten.
Using the nail/tapered drill bit.
At this point, I bent over the nail tips to start the clenching process, then finished driving the nails the rest of the way through with a hammer until the heads of the nails were firmly seated. From this point it is just a matter of driving the bent nail tips back into the wood until there is what looks like a nice staple from one side.
Completed clenched nails.
It is necessary that you use no glue for attaching a cross batten, no matter how it affixed. Nails bend a tiny bit, and while the clenched nails hold the two boards firmly together, there is enough give to allow the panel to expand and contract with the seasons.
The front side of the doors with the nails in place.
Also shown is my entry in Instagram's #planestackingolympics.
I suppose the moral of this story is that a store-bought tool isn't necessarily always the best tool. In this case I was able to keep working and wound up with a bit that had the perfect taper for the nails I was using.

Do you use tapered pilot holes when using tapered nails?

Saturday, May 20, 2017

It's Time for my Annual June Chair Build!

Yes, I still am doing the annual June Chair Build, and I humbly invite you to build a chair along with me.

Last year's June Chair build was an resounding international success, thanks to Aymeric, the only person I know who finished his chair.

Beautiful chair, Aymeric!

I never got past gluing up my seat blanks last year, and those are still in Munich. That means June 2016's chairs for me are yet to be built.

But, that won't stop me from making something else this year. I'm considering making something along the lines of a Bavarian country chair to use at my desk.
Inspiration
My chair likely won't be so rustic, but I think it is something I can easily do with my toolset.

Join in the fun this year! If you need a good excuse to get in gear and finally build that chair, here it is!

Let me know what you are doing, and I'll post your pictures. Over the last couple years, some really great chairs have been born due to this build, and nearly all of them took too long. It's all part of the fun!

Wednesday, May 17, 2017

The One-Day Storage Cabinet - Part II: Complete

Mostly complete.

This cabinet was a lot of fun to build. It did wind up going a tiny bit over my budgeted time allowance of one day, but that was expected. Wasn't it?

Monday I started early and was excited to get this quick and dirty project over with. I spent some well-used time laying out everything to decide the dimensions of the cabinet. The board I had for the top, which came from the store at supposedly 800mm x 500mm x 28mm needed to be squared up. Once that was done, I had the width dimension for my cabinet.

After lunch, I wound up taking a quick power nap that wound up lasting about three hours. Ooops! I suppose I shouldn't have lain awake half the night thinking about this project.

Due to this delay, I didn't finish on time. By dinner time, I had cut the dadoes and fit the two shelves.
End of Day 1

The positive part of all that thinking was I decided to screw together the carcass with only enough fasteners to hold it together until it was painted. I could then knock the nails in without doing anything too weird to clean the nail heads off.

Next up was dovetailing a rail in the front and sliding a rail cut into a groove into the back. These two boards seem overly wide for their purpose, but I figured I would save time ripping them to width. I forgot that later on I needed one of these boards for something else, but too late now!

I was careful to lay out where the nails would go at this point. I drilled tapered pilot holes for the nails everywhere they would go, but I only put in a few temporary screws to hold everything together until later.
End of Day 2
Day three was about the back. I spent a bit of time sharpening the blade on a vintage French side-bead molder I've been lugging around. I'm not sure I like it, but it will be fine for this project. I used my home-made plane with a nailed on fence and a chisel for a blade to cut these ship laps. It was then just a matter of drilling pilot holes and nailing them to the shelves. I chose to clench the nails for fastening to the rear rail. I wasn't sure of a better way to do that.
End of Day 3
I finished the carcass and painted it with some commercial chalk paint I found at a store nearby. The color is graphite. After painting over the screws and all, I drove nails into the holes that had no fasteners before backing out the screws and replacing them with nails. The screws I used were only about an inch and a half long, and the nails almost three inches. This seemed to work perfectly.
End of Day 4
The next day I hung the door panels to the carcass. I wasn't sure the best way to fit and adjust everything. With pocket hinges there are all kinds of adjustments you can make to ensure the door hangs right, but with barrel hinges you only get one chance. It dawned on me that since my door panels were a little oversize, I could hang them as is, then trim to size and everything should look perfect. Lucky me, it worked!
End of Day 5
Now I have to attach battens to the doors to ensure they stay flat over time. This was what I needed one of those wider boards for that I used earlier for the front and rear rails! I decided instead to use some air dried sycamore that I have. It required that I cut it to length, then I resaw it for pieces about 7/8" thick. Clenching nails always makes so much noise, I feel sorry for the neighbors. I did one door, then decided to leave the other one for Monday when I could blame the noise on the contractors in another apartment.
End of Day 6
Finally, it is done. Mostly. The doors have battens attached with clenched nails, and the top has a nice chamfer and the decision was made to leave it a natural wood finish rather than painted. This little cabinet really dominates a room since it is so dark in color. The thought was the top would lighten it up a bit. I finished the top with a coat of BLO, then applied some home-made paste wax over the entire cabinet. I really like the look.
End of Day 7
I'm still thinking about knobs for the door handles. Nails wound up in exactly the place that I wanted to put the knobs, and the cabinet is a bit too rustic for the modern knobs we bought. I'm thinking some old-fashioned porcelain knobs would be just the thing to finish it off.

I'm happy with the result, even though it did go past my deadline a bit.

Saturday, May 6, 2017

The One-Day Storage Cabinet - Part I: the Plan

Today the Frau mentioned we should get another small storage cabinet for the office.

Groan......

This means one of two things: Either she wants to buy a crappy disposable cabinet made of termite poop, or I get nagged at until I come up with something.

Fortunately, I would like to build a piece like this using some of the techniques in The Anarchist's Design Book by Christopher Schwarz. That means I just move it up in the queue and get it over with.

It's not often that the Frau asks me to build anything that we need anymore. She learned long ago that it could take months, and in the meantime what she wants to store in it lays on the floor driving her nuts. It would be a nice surprise if this was complete by the time she got home from work on Monday.

In order to make this happen, I am going to cheat. I know, I can here you: "There is no cheating in woodworking." Well, there is if you use Leimholz.

She said it doesn't need to be any kind of fine furniture. I even suggested adding a mahogany top, but she thankfully said, "No." Just a plain-Jane basic bookshelf with doors.

I thought out the design in my head in about seven seconds, and did something I rarely do: I drew the cabinet and wrote down a cut list!

Sacrelidge!

So here is my plan:

Get to the Borg on Monday as soon as they open at 9:00 a.m. (Early for Spain), buy everything I need and rush home with the materials in my carrito de la abuelita and knock it together.
High capacity lumber transport.
To give myself a head start, I am going to use only nails and rabbets for construction. Maybe some screws to secure the top panel. I also plan on using the plastic-wrapped laminated wood panels in the final dimensions, so there shouldn't be much in the way of dimensioning the wood.
Front view.
Click on the photos for a better view.
Side view.
Yeah, I know I drew it wrong, it should show the right hand view. I almost never make drawings before I build anything.

It turns out I have some leftover laminated wood already laying around, so I'll use that. There should be no problem with getting the rest home on the bus.

The idea is that the doors will cover the front of the cabinet, coming even with the top. I haven't decided yet if I will add any molding profiles other than just a small chamfer or roundover to soften the sharp corners. What do you think? Any suggestions?

The Frau said she wants this piece painted, and SHE gets to pick the color. I gues that means no experiments with home made milk paint (thank God!). My plan is for the cabinet to be complete except for paint after one day.

Now that I think about it, I might have time to run to the Borg now, so I can start right away on Monday.

One big question I have for you: How should I go about painting the cabinet while keeping the black nailheads from the Roman nails clean? With milkpaint it was easy to remove the paint with a wet Q-tip, but if I use something store-bought, I don't know.

Thursday, May 4, 2017

Veritas Small Spoke Shave Kit

I spent a couple days making this neat little project.
The finished spokeshave.
This project turned out to be pretty easy to make. I was a bit apprehensive because there are plenty of "how-to" videos and instructions out there and I wasn't able to find anyone who built the whole thing without a single power tool. Pretty much the consensus is that you need a drill press for this project.

Me being me, I took it as a challenge to see how this project works without one.

Since there is plenty of instructions out there, including the instructions that come with the Veritas kit, I'll try to be brief with this post and focus on the parts that I did by hand that often are done another way.

The first thing I did was get an apropriate blank of wood for the body of the spokeshave. I had some blocks of air dried sycamore that were perfect for this. Sycamore has a beautiful pattern when it is perfectly quartersawn.

While a table saw is great for sizing a blank of wood like this in a few seconds, I like to do this by hand as I find it easier to get a perfectly quartersawn piece out of any blank of wood. This one happened to be almost two inches square, and riftsawn.

I planed a couple of quick chamfers on the edges in order to clamp it to my sawbench. Laying out and ripping to the required angle was simple.
Making quartersawn wood from riftsawn.
I would recomend spending this kind of time on a small project like this, especially with a wood species that has a particular look when quartersawn.

The next bit was drilling holes for the posts that hold the blade. It requires two different sizes of holes for this particular kit, as the adjusters are tapped into the wood.

This needs to be done precisely, and it is highly recommended to use a drill press if you have one.

But, it isn't absolutely necessary.

I find that I can drill fairly accurately with just a little practice. Also, it always helps to keep your chin or your forhead on the back end of the drill, whether it is an eggbeater like this, a brace, or even a hand held electric drill.

To increase accuracy even further, I accurately marked both sides of the blank, and went in half way from either side, meeting in the middle.
I try to keep everything as stable as possible, and put my chin on the handle of the eggbeater.
It could be that it isn't as perfect as a drill press would be, but it is plenty accurate enough.
Drilled holes.
The kit came with the correct tap, but I did not have a tap handle laying around anywhere. After trying a couple things, I realized it fit in my eggbeater. As long as I went slow, there were no problems.
This worked, but I would rather use a tap handle next time.
I decided to just super glue the brass wear plate rather than inset it with dovetails and screw it to the base. Time will tell if this will hold up or not.

Unfortunately, I didn't have a hacksaw, either.

To solve this, I had a serrated all-purpose Chinese knife that I found in the kitchen. It took a while, but it eventually did the job.
I marked the brass, clamped it to a piece of wood to use as a guide.
Needless to say, the cut with the kitchen knife wasn't glass smooth, so to smooth it out I cut a notch in a block of wood that was square to the base.
End-smoothing jig.
Then it was just a matter of holding the brass in the block and rubbing it back and forth over a diamond stone to polish it up a bit.
This worked great.
Once the wear strip was in, the tool was nearly complete. I just sawed out the profile with a bowsaw.
This was quick and easy.
Now it is shaping up to look like a spokeshave.
After that, it was just a matter of smoothing the sawmarks with another spokeshave and a rasp, round over the handles to my taste, and finish.
Front view. I really like the look of QS sycamore.
I finished it just with a coat of BLO. Once it cures, I'll add a coat of beeswax.
The bottom. There are some gaps that are cosmetic flaws because I could only get a metric drill bit rather than the required 5/16" bit recommended in the instructions.
This was a fun and easy project. I happen to have the Veritas large spoke shave kit, and also the Hock large spoke shave kit. I can see a couple more of these in my future.
I even picked up some cool wood for the large ones: leopard wood and goncalo alves.