Monday, June 22, 2015

June Chair Build - Day 1

OK, this is kind of embarrassing.  I thought it would be a great idea to organize a group build for June, and here I am getting started on June 22nd.  On the other hand, this kind of has no rules, so if I say the 22nd is a good day to start this build, then there you have it! 

C'est la vie, life gets in the way, blah, blah, blah.

It still is fun, though.

I scrapped the idea of building a pair of chairs, because I think doubling the work here is just begging for not one, but two unfinished projects.  Instead, I am going for a single Welsh stick chair, but as a side chair this time.  There doesn't seem to be too many of those on the internet out there, so here's mine.

The first thing I did was choose which piece of elm to use.  I wound up using the smallest one, because I liked the grain on this one.  I figure a side chair can be a little narrower than the arm chair was, so this one will have the grain going fore and aft just like my last chair.
Look!  A piece of wood.
I used a template from Drew Langsner's book, but only for the size and rough layout.  I tweaked it from there, and decided to use my own design for the shape of the chair, as well as the rake and splay of the legs.
The rake angle of the back legs on my other chair look a bit weak to my eye.
I started today by trying to make one surface of this board flat.  It has dried a bit over the last months, and cupped a bit.  I decided to use the part of the board that is on the inside of the tree as the show surface on this chair, and that surface had a huge hump down the middle.

I decided to start this with my scrub plane, taking heavy shavings across the grain in the center of the board to start.

Scrubbing across the grain.
After getting some of that hump down, I moved to my BU Jack plane.  I used this across the grain, with the grain, and diagonal to the grain.  This started to get things flat-ish.
My beloved Veritas BU jack.
I also used my home-made jointer plane.  This tool is a bit fussy, but I think it helped.  Plus, I feel like a badass when I use it.
My badass Krenov style jointer.

As an aside, I followed Drew Langsner's instructions on the last chair, including the angles for rake and splay, and found the angles a tad on the conservative side.  The back legs especially didn't have enough rake for my taste, so I decided to go radical on this chair.  This chair's rake and splay will look extremely rustic.  I can't wait to see if it looks good or not.

I spent a little time here laying out my idea for a chair seat.
Starting the layout.
Next, I put my geometry to work.  Actually, I used Peter Galbert's geometry.  His sight-angle-figurer-outer is a neat trick. 
Layout done, ready to drill some holes!
I think this method makes things easy.  I tried to get the angles as perfect as I could, but I know if they are off a bit I will be able to dial those angles in perfectly when I ream the tapered mortice.
Look ma!  I'm drilling a hole!
The rest of the day I spent at the shop at Dictum.  In the hour that I had there, I cut the shape to the front of my chair seat on the band saw, ran a big board of smoked oak through the jointer and planer, fretted a bit about the cracks in the oak, cut some legs and some sticks from that oak for the rest of the parts of the chair.  Sorry, no photos of that process.  Many electrons were abused.

A word about this smoked oak:  it is cool.  I paid a bit extra at the lumber yard for this, but figured it was worth it as opposed to fuming the oak myself.  It was a little less than 8/4 rough, and is dark the whole way through.  The guy at the yard said they do it with some kind of vacuum process.  I'm impressed.  It reminds me of working with wenge.  This should make for a fairly un-traditional look.

Unless I get a unexpected session in the shop tonight, that will do it for today.
Here is today's progress.
The plan for tomorrow is to drill some more holes for the back sticks (I plan on using seven), saddle the seat, taper the legs and octagonalize them, round the sticks into dowels of some sort, shape the crest, drill holes in it, bang it all together and slap a coat of finish on.

Easy, right?

I almost forgot!  If you have been building a chair this month, or intend to, send me some pics or a link to your website.  Life happens, and several of the folks who let me know they wanted to build this month haven't been able to for one reason or another.  That's OK, though, because Ray Schwanenberger is well on his way to making us all look bad with his build.  He started this project with a big cast on his foot, and looks to know what he is doing.
Ray has been steam bending.
Check out his build on his blog, Rivings And Shavings.  Let him know what you think of his chair build.

Wednesday, June 17, 2015

Me 'n' Her - #2

Her:  I think I would like to buy a basket or something to put those cushions in.

Me:  How about I make a nice wooden box instead?

Her:  I suppose.  ... But it has to look nice!

Me:  What is that supposed to mean?!

Her:  Well...

Sunday, June 14, 2015

Plate 19 Moulders - Finished!

Finally finished!
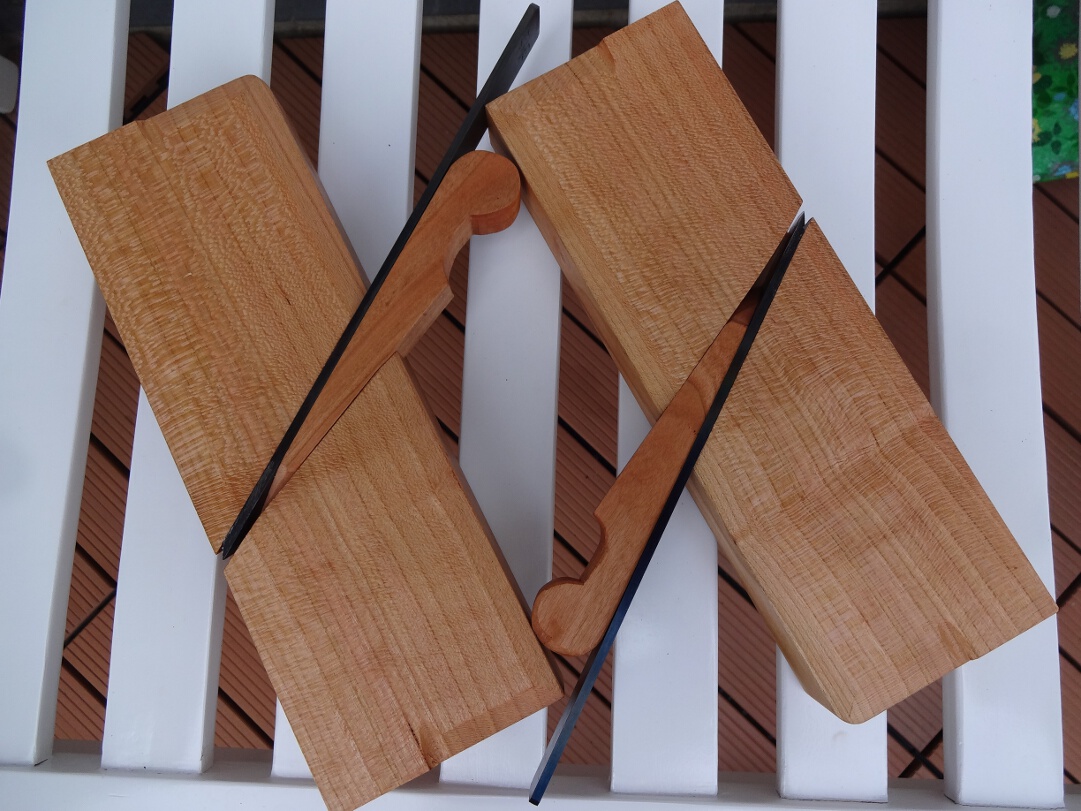
Plate 19 hollow and round planes in cherry.

I should be posting about chairs, as it was my idea to do a community chair build in June.  I still have time, don't I?  Sometimes life gets in the way of well thought out plans, and things don't seem to work out.

I do, however, have some lumber for the chairs.  I have some elm seat blanks for some Welsh stick chairs, and I went to the lumber yard the other day and bought some "smoked" oak.  This stuff is cool, it looks black all the way through.  It should make some neat leg and stick stock.

Ray Schwaneberger has been dutifully building a child's Windsor chair for the June build, so if you would like to see someone talented building a chair, you can start at his blog, Rivings and Shavings.

Anyway, before I can start my chair, I had to finish an old project that has been languishing on my bench.  Sadly, this isn't the only one.  The good news, is this project was really close to being complete, and I just had to know if these would work out.

Here they are, enjoy a few shots of tool porn:

The main feature of these is the open mortice.

I chose to give them English finishing touches, rather than French.


I called these #12 in size, as they describe a circle with a 3/4" radius.

They are a little tricky to set up, as the irons and wedges should be resting as far to the left as possible.


The question is, Do they work?

Yes, they do!  At least the round does.  I still have to sharpen the hollow and fiddle with the wedge for ejecting shavings.
I still haven't figured out the perfect geometry for the wedge to assist with ejecting shavings.  It might be that the mouth may need some carving in the French style to ensure the best ejection.
Here is an example of an escapement from a modern French moulding plane I recently got.
This is how modern French planes solve the problem. 

The big advantage of this style of plane, is that it is far simpler and cheaper to construct.  Although I started some moulding planes a while back, I never finished them after I blew out the blind side trying to sink the mortice. 

I used stock that was about 1 1/2" thick for the 3/4" iron.  That was roughly what it looked like in Roubo's plate 19.  I think this is plenty stout, and probably would work if it was a little thinner.

I have some ideas for features to add to this style of plane which will improve functionality and further simplify construction.  In other words, stay tuned as I try building a few more sets of these to fill out my plane till.

That is, as soon as I finish a chair.

Tuesday, June 2, 2015

Crashing the Party II

At my favorite Munich beer garden, the Hofbraeu Keller Biergarten.
Although I am not enrolled in the class this week at Dictum with Tom Fidgen and his bowsaw, I found out where they were after I got home from work tonight and imposed myself.

From left to right in the photo is a cool guy from Darmstadt whose Roubo bench is in a shop even smaller than mine, Tom Fidgen, a really nice guy from the Netherlands and the world famous Austrian Alex.

Sorry I forgot your names already, guys.  I'm really bad that way.  Perhaps you could help me out in the comments.

What I really should be writing about is building chairs, now that it is June.

I still fully intend to build a pair of chairs this month, and invite anyone else who wants to build one to let me know.  I'll post pictures, links to your blog, Instagram, whatever.  I think that this might be a fun way to build a chair, along with a hoard of internet builders.  I especially would like to post your photos of your build if this is your first chair ever.

Happy June!

Saturday, May 30, 2015

Sharp

Yesterday's barbecuing experiment seems to have been a success.  At least, the iron is shiny and it has an edge that will draw blood.

Don't ask me how I know this.

The big question now is if it will hold that edge.  To find out, I have a little more woodworking to do to finish up the planes.  The round needs the mouth opened, they both need the wedges trimmed and shaped, I have to clean up the bodies of the planes, cut them to length and put whatever edge treatments I decide on to them.

Then, they get a workout.

Here are some pics of the round iron.  This only took about ten minutes for me to sharpen up freehand.  I suspect the hollow will take a little longer when I get around to it.
Here's the round that is now sharp. 
It looks like it perhaps it needs a bit more polishing in this close-up.
Only the very edge is polished.  I don't think there is a benefit to polishing the whole thing.


Another glamour shot of the whole thing.

I tried punching my last name in these irons when they were still soft.  It looks like I need a bit more practice to do that.

It looks nice, but will it cut?  That is the question.

Friday, May 29, 2015

BBQ'd Plane Irons

Tonight was the night for heat treating my plane irons.  I figured it would only take about a half hour, and I wasn't too far off.

I think I was worrying too much about this step, and it put me off.  I needn't have worried, this was relatively easy.  At least, I accomplished what I meant to.  We'll see if it gives me good steel or not once I sharpen them up.

My plan was to use my barbecue on the balcony for a platform for doing the heat treating.  This was a really good idea, as my set up didn't need to be anything crazy.
My heat-treating forge.
I bought three fire bricks at the big box store yesterday.  I also picked up a special teflon-infused fire glove.  This turned out to also be a good idea, because it kept me from burning my hand while still being able to use my fingers, unlike using an oven mitt.
The rest of my heat-treating set up.
I bought an old pot today at the thrift shop.  It was only $2, and almost too nice to use.  I think it is cast iron with an enamel coating.  Plus, there was a lid which I thought was a bonus.  Handy for when the oil catches fire.  Outside of this picture was a fire extinguisher, just in case.

I hadn't done this before, so wasn't quite sure the best way to go about this.  I set the fire bricks up this way in order to best hold the heat in the spot where it counts most.

I think this was a good idea in theory, but the torch used up all of the oxygen in that corner and wouldn't burn properly.
How I started.  Note that I am holding the iron with a big pair of pliers, using my hand in the fire glove.
I asked the Frau to take photos of this whole process, and when I looked for her while I had the torch going, she was no where to be seen.  As a result, you'll have to paint the picture using only my words.

It took a little while to figure out the best configuration, but I finally got the torch working best when it was shooting the flame at a bit of an upward angle.  It was plenty enough to get the iron hot if I held the iron as flat as I could against one of the side fire bricks.

It turns out the fire bricks hold heat for a long time, so next time I will pre-heat the iron while it is laying flat (to get that nice dark color), then lift it up so the business end of the iron is flat against the side brick and I can torch the crap out of it in that position.

Once it got red enough, and the little pools of iron float to the surface, quench.

Next time I bet this only will take five minutes for the two irons, after everything gets warmed up.

I think I wound up with a couple of decent irons.
Finished.
Now all that is left is tempering.  I haven't told the Frau I am using her oven for this yet.  Wish me luck!
Edit:  Success!!!

Thursday, May 28, 2015

Some More New Tools!

OK, so I spent some more money today that I meant not to.

Since the guy with the welding torch certification is on leave for the next couple weeks, I am unable to heat treat the irons for my new moulding planes.

Or am I?

Larry Williams shows in his DVD heat treating some plane irons using a regular propane torch that you could get anywhere.  While I was at the big box store today, I was looking at those.  For a lot more money, though, I could get a MAPP torch which essentially is butane.  This particular torch gets much hotter than a wimpy propane torch, more than 2300 degrees centigrade!

This ought to heat treat the crap out of my plane irons!

I decided it might also be a good idea to get a new fire extinguisher.
My plan is now to do the heat treating on my balcony using my barbecue as a platform.  I have a couple of fire bricks to help direct the heat, and a gallon of peanut oil to quench.  All I need now is an appropriate old pot as I think the Frau will frown on me heat treating plane irons and quenching them in our best pasta pot.

I think I'm all ready to go now:  I spent my lunch hour the other day at the Army's woodshop grinding the untreated irons on their powered grinder, and finished the shaping today with a file.  I think I have them pretty close.  My guess is shaping them with a file is much easier than doing it after they are hardened.
The round,

And the hollow.  The iron is a bit overly proud here as I thought that would make a better photo.
While I was taking these photos, I found the setting on my camera that takes microscope pictures.
Here is the endgrain of the cherry plane blank.
Technically everything is ready to go.  After heat treating the irons, they can be sharpened and put to work in these planes.  However, there still are lots of cosmetic details that need to be done to these babies before I'll call them done.
A little closer every day.