Yesterday I had a little bit of time in the shop. Instead of working on these, I spent the time getting my new Stanley Type 10 #3 smoother sharpened and working. That plane is awesome. I can't wait to write about it. It went so well, I rehabbed a few chisels, too. No time for these moulders.
Skip to today, and I was able to sneak in the shop for about an hour and a half. I think once I get a couple of these built, it will go a lot faster, as it always takes a bit to learn something new.
Today I spent some time belatedly fitting the wedges and bedding the irons. It turns out the irons bed a lot easier if the wedges are dead-nuts perfect. I didn't bother shaping my wedges yet. I'll probably regret that later.
In this photo you can see where I was in the process when I left off last time. One wedge is roughly fit, and the other is way out.
 |
| You can see from here one wedge is way off. You can also see my chisel-rehabbing mess from yesterday. |
A bit of time fitting the wedges. This open mortise makes it easy to see everything that is going on with the wedge. I have no idea if the wedge is square or not, but it fits the mortise. I then used the dry erase marker to determine where to remove wood on the bed to seat the iron as best as I could (as per Larry Williams).
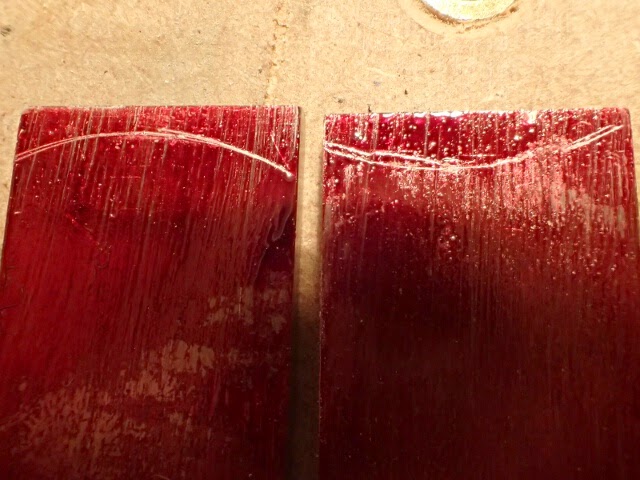
 |
| The pair with fine tuned wedges. |
I forgot I had a singleton #12 hollow in my tool chest. This is the exact size I am making here, so I used it as a mother plane after touching up the blade. It worked a treat. If you are going to make planes, it might be beneficial to make friends with someone who has a plane or two the size you need.
 |
| I found a mother plane in my tool chest. |
For the hollow, I used my plow to set the depth I wanted for this profile, then used 80 grit sandpaper wrapped around my new round body to establish the profile.
 |
| Don't tell anyone I used sandpaper! |
Here are a couple of pics of the completed profiles. I like this first photo because it shows a little more clearly that the blade is full width the whole way.
 |
| I admire people who keep their shop and bench clean while they work. I don't |
Here's a close-up of the profiles including what the irons look like peeking out of the bottom. Obviously they aren't shaped yet.
The last thing I did was use some machinist layout fluid and a shop knife to mark out the profiles on the irons. These are the lines I need to grind to.
 |
| I think I need to try a different brand of fluid. Although it looks like you can see the line well enough. |
Unfortunately, My shop isn't set up well for grinding and metal work. I will go to the Army woodshop to do the grinding. I then will go to the Army's do-it-yourself Auto Crafts shop. They have a welding torch that I will use to heat treat these irons. I figure that's quicker and easier than mucking about with fire bricks and propane torches. At least, that's what I'm about to find out.
For a bonus, here are a couple photos of what I did yesterday:
 |
| Here's my new Stanley smoother. I planed the wrong way on this walnut board, and there was no tear out. |
I also got a little re-habbing in. The two smaller chisels are now sharper than they probably ever were, and the big one and the Mora knife are grinding projects in-progress.
 |
| I hate lapping, so I'll do it until I get sick of it, and I will come back to it next time. Sooner or later they will all be done. |


Hi Brian,
ReplyDeleteNice progress on the H+R planes. I was pretty sure you were going to like that Stanley 3 when you showed it to me at Amana. From a good era for Stanley!
Regards,
Mike
Hi Mike, Thanks for the nice comment!
DeleteI enjoyed our chat in Amana. And, of course, I look forward to getting to know the #3!
Hi Brian.
ReplyDeleteThe H&R's look really fine.
I still have your Larry Williams DVD, just in case you need to check on how to sharpen profiled hand tools.
The No 3 looks super. I am amazed that you could plane against the grain!.
Brgds
Jonas
Hi Jonas, I forgot you had that one! The #3 works great. I am just worried a bit that the chipbreaker doesn't fit perfectly. I guess I have a little more fiddling with it to do.
DeleteNice work. This makes me itch more to work on my concepts some more... Well I guess I need to at least post where I'm at on it to keep up...
ReplyDeleteThanks, Jeremy. I think your new kitchen will need some moulding profiles here and there...
Delete