Friday, April 29, 2016

The Great No. 2 Knock Off Showdown - Part I - Introduction and Totes

At HandWorks last year, I bought a type 9 Stanley #3. I was on the lookout for a small smoother. That plane turned out great, but I really wanted something like a #2 - the only problem being they are a lot more expensive. I think the reason for this is they are cute, resulting in them being collectible.

I was discussing this dilemma with Jonas one day and we both decided that we were determined to get one. I got lucky a coupla months back and found on eBay a Sargent VBM 407. Then last week I found two more that were affordable - both Fulton 3708s. One is going to Jonas on the condition that I get to do this review first.
The two on the left are Fultons, the two on the right, Sargents. The right one is a 409, the size of a #4 included for scale.
It is always amazing to me how two planes made by the same company can looks so different.
Another view. The top one is the number 4 sized plane.
Stanley #2s can go for insane amounts on eBay. Even in poor shape with obvious rust and broken or missing parts. I decided to broaden my search to include planes that looked like Stanley #2s, which is how I wound up with these.

The Contenders

For the sake of full disclosure, I will divulge how much I paid and in what condition these planes came.

Sargent #409

This is a #4 sized plane, not a little #2. I am using it in this test as the control - something on which to base the other planes.
Sargent 409 right after rehab.
This is the shape it was in when it arrived.
It is now tuned and works freaking awesome.

I got this on eBay last year in a group of planes. I wanted one of the others, and this was in the group. It probably only cost a few dollars. I decided to use this plane as the control because it is reasonable a quality plane could be made to work this good.

Sargent VBM 407.

Sargent VBM 407 - I think it was built between 1910-1918 - type 4 body with type 3 blade.
This plane showed up on eBay "Buy It Now" listing for $100. I jumped on it right away. This plane was in good condition. I suspect someone cleaned it up for me, but you can't have everything. All I did to this was sharpen the blade and it now takes very fine shavings.

Fulton 3708 BB

The 3708 BB is on the right.
Like the VBM, this one came in great condition. I won the auction on this one for $117 including shipping. Unless the frog reveals that it needs work, I will do nothing to this one other than sharpen the blade.

Fulton  3708 BL

This one arrived a hot mess.
I'm happy with how it cleaned up.
This plane I won for $62. I think it was priced less than the others because it looked like it had been half laying in a puddle of water for who-knows-how-long.

Competitor In Absentia: Lie-Nielsen #2
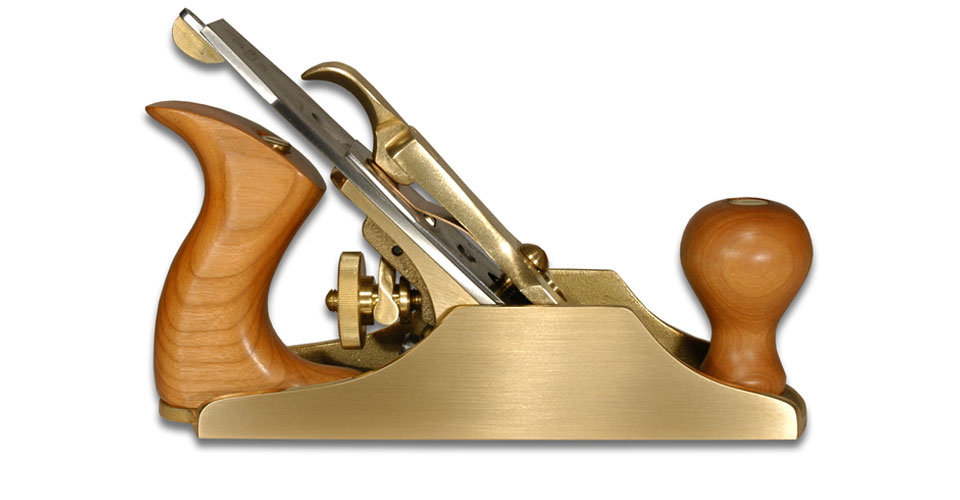
Photo courtesy Lie-Nielsen ToolWorks.
I don't have one of these, so it is not really fair that I include it. I did see one recently at the Dictum shop, and I had a few impressions of it based on the few minutes I held it in my hands. Where appropriate, I will mention it. Brand new from Lie Nielsen they are $275. It's weird to me that if you want a Stanley user, you could easily pay the same as for a new LN.

What Little I Know About Fulton Planes

I've done a bit of online research. Fuller planes were made for Sears by proper plane making companies. It let Sears sell their own brand of tool (of quality) for a lower price. 

Sears (if you don't know) was a huge American retailer that did a lot of sales with a big-ass catalog. I remember looking through it when I was a kid to make out my Christmas list. Anyway, it looks like most of these planes were made by Sargent, but some of them were made by Millers Falls.
From what I can tell, BL is a Sargent made version, while BB denotes manufacture by Millers Falls. Of this I am 99.95763% certain. 

One guy on a forum said the handle on the BB is the only one made that fits an adult hand, and indeed, it is a bit taller and roomier than my Sargent VBM. 

Other differences between the BB, BL, and Sargent VBM are the casting is a bit more substantial and even on the BB than on the BL. Everything is nice and tight.
The BB and BL both have nice big, flat frog beds, and laminated blades (at least the BL does, I haven't yet investigated the BB). 

I think once they are both fettled, they should both work great.

I have found that some people on some of the forums (fori?) really do not think highly of Fulton planes. I think this is because the later models of these planes (which are bright red) were designed for economy above all else, by looking at them. I haven't seen one of these in person, so I will not comment about those, but these older versions, probably pre-1950, seem to be quality tools so far.

If you come across one of these older Fultons, realize that you are really looking at a Sargent, Millers Falls, or perhaps a Union plane.

Totes

All lined up.
Strangely, I am starting this review on a part I don't have many photos of. We'll work with what we've got.

I was surprised when I was given a Lie-Nielsen to hold. The handle is shaped such that an adult can't really get fingers around the grip. The only way to hold it (for me) was to wrap my fingers along the casting, similar to how I would hold a coffin smoother. I felt this a bit awkward and uncomfortable for a tool in which every other aspect looked perfect.

The first of this size that I got to hold was the VBM.
Well, I found this picture of the VBM's handle.
The handle is well shaped and allows you to put your fingers around the handle like the #4 sized 409. Only this one is just a tad undersized for my large hands.

The Fulton 3708 BL (Sargent) has a handle that feels nearly the same.
This one still has the sticker!
The 3708 BB (Millers Falls) has the world's most perfect shaped #2-sized handle. It is just a little bigger than the others, and my mitt fits around this handle like a glove. I was so impressed with it, I removed it and scanned it for your use. If you don't like the handle on your #2, print this out to scale and use it as a template to make your own. The orange pipe cleaner shows the angle of the threaded rod, so you may need to make adjustments for it to fit your plane.
It is 4" x 2 3/4".
If the most important part of a #2 user plane to you is how it feels in your hand, I think you will be happiest with the Millers Falls made Fulton 3708 BB.

Next up: Castings and Frogs

Friday, April 22, 2016

How to Learn to Sharpen Saws

Note that I did not title this post, "How to Sharpen Saws." I am not going to write about that. I am not anywhere near an expert. Instead, I'm here today to point you to some resources and methods that will have your saws tuned up in no time.

I went on a saw-filing binge last week.
If you are like me, when reading about rake, fleam and slope you'll get about halfway down the first page before you start to nod off. Saw filing texts for the uninitiated are the perfect cure for insomnia.

There is a reason for that. It is, you might not be ready for that yet. Take it step-by-step.

Saw filing has a few fundamentals and a plethora of brainiac minutia that can get in the way of a beginner. There are a million different theories on saw tooth geometry, but you first must get in the swing of things and learn the mechanics of "how" a saw is sharpened.

Think about it this way: I guarantee you that a professional saw sharpener will do a better job at sharpening saws than you will, but I also guarantee that you will make your saw cut better after sharpening than it did before.

With that in mind,

  1. Get an overview of what it's all about. Watching it done is best for this. I highly recommend Paul Sellers' recent YouTube video on sharpening a crosscut saw.
  2. Sharpen some saws. Don't skip this step. Get your butt in the shop and do it. The next step will not make sense otherwise.
  3. Learn some more by reading up about it. The Vintage Saws website is a great place to start. 
  4. Go back to Step 2 and repeat until you know it all.
This works in your brain by giving you a few of the basics that you will remember when you are in the shop, cementing what you just saw, and giving you a foundation upon which to build. I would expect you to have more questions after sharpening one saw than you did before. This is good. it means you are ready to learn something else.

All you really need is a saw to practice on and a file of the right size. You will need something to hold your saw tight while you sharpen, so either buy a saw vice, or make the dead simple one in Paul Sellers' video. One should be able to do that even with a dull saw!

If you don't want to wreck your favorite user saws, many saws are out there for cheap that will be good practice for you. Vintage Saws even sells saw filing kits, which include a beater saw with freshly punched but not sharp teeth, and the correct saw file. This can be a good way to build your confidence before tackling your favorite user.
Here is a pile of freshly sharpened saws. Some turned out great, one didn't cut the way I expected. That's a good lesson, too!
Here are some free resources that might help. If you know of others, please leave a note in the comments as I want to learn, too!
  • YouTube - Paul Sellers has another excellent video on sharpening a rip filed backsaw that is excellent, plus there are a zillion others. Some good, some not so much.
  • Wiktor Kuc's excellent site. Lots of excellent saw stuff there. Start with one of the articles by Mike Hagemyer.

Wednesday, April 20, 2016

2nd Annual June Chair Build

Last year's June Chair Build was a world-wide, resounding success. I finished my chair sometime in August, and the other two guys who built June chairs barely beat me to it.

With such an overwhelming outpouring of artistic effort, I think it is time to start thinking about the 2nd Annual June Chair Build!

For motivation, I have collected some photos of my chairs for you.
This is Stoolerable. Not all my chairs have names, but this one does. It might look funny, but it is perfect as a shop stool in my tiny shop.
The idea is simple, really. Use this as an excuse to build a chair.

Any chair.
This is the first Roorkee chair I did. Pear and black leather.
My suggestion is to quit waiting until you have the perfect piece of wood, all the right tools, a six month sabbatical, or whatever excuse has been preventing you from building a chair and just do it.
This amazing chair I helped my dad build. The material of choice for his hobby is diamond willow.
I feared building a chairs for the longest time. I always thought I didn't know enough about woodworking for the crazy angles, green wood, or who knows what. It turns out there is probably some kind of chair out there you can build with the tools and skills you already have.
Coffee 'n Cream. Hair-on cowhide and wenge, which was intended for an abandoned project.
If you have always wanted to build a chair, my suggestion is don't wait. Just go ahead and start with whatever you happen to have. You'll figure it out as you go along. There are some great resources online, as well as some fantastic books which you'll surely come across.
The Viking Throne. Elm and ash. I made this at the Danish Chair Building Extravaganza at Jonas' (Mulesaw) two years ago.
If you are a little unsure of yourself, cooperate with someone nearby. Even if they aren't an expert, you'll have fun and learn something.
Modern Welsh Side Chair. Elm and fumed oak. This was the chair I built last June. Except it wasn't finished until August. Ahem.
Don't worry too much if your spouse isn't crazy about what it is you plan to build. If she doesn't like it, you can always give it away as a gift. Someone will get an amazing present, and you'll learn a lot about chairs that you can use on your next chair!
SatanSantaPope Chair. Leather and ash with a charred finish. This chair was made without a lathe.
I love to see chairs by experienced chair builders, but I would REALLY love to see someone's first chair.

Who's with me?

Just let me know in the comments, by InstaGram, or by email that you would like to participate, and send an occasional photo or two. I would love to see them, and I'll most likely post them here.

Saturday, April 2, 2016

Some Shop Maintinence

One of the things I did on the current table build (more on that later) was to fill the knot holes with black epoxy.  Whenever I mix epoxy, I use the leftovers to fill some of the cracks in my bench top.  There are a lot of cracks, because the top is four beams of French oak laminated together, and the beams all contain the pith.

I think the top is stable, and would recommend if you build a bench not to turn up your nose at wood with the pith in. Just be warned that there will be cracks. The cracks are not a problem unless you drop something small like finishing brads on your bench top. They will get lost in there, but structurally they make no difference to the bench.

I figure that while I have extra epoxy, I can just dump it in these cracks, and someday I will have a bench top with no cracks in it.
Here is my bench top after I poured extra epoxy into some of the cracks.
Not too long ago I went to a flea market and found a cool hand cranked grinder, an American Champion made by American Hydraulics. I think it is the bee's knees. I like it so much, that when I found two more on eBay, I bought them. Now I have three awesome grinders.
Why three? I'll let you know as soon as I figure it out.
There wasn't much to getting these new two running. One of them worked perfectly, the other felt like there was bubble gum wrapped around the axle. A little WD-40, and it works perfectly, too.

There was a surprise, in that one of them had a one inch arbor. That means it will fit a modern grinding wheel out of the box. The second one had a 5/8" arbor, and it fit a modern grinding wheel using the plastic bushings that came with it. In the past, I have found hand cranked gridners (including the first of this trio I found) have a 3/8" arbor, and need some real fiddling to make work. I had both of these running new wheels in five minutes flat.
Lucky me, a one inch arbor.
I took a recommendation from Larry Williams' InstaGram feed, and bought from Victor Machinery, a 24 grit 6"x1" Meda grinding wheel. The good news is it was less than ten bucks, but there is a minimum to order. I bought two of these wheels and a bunch of wet/dry sanding paper from them.
24 grit seems awfully course, but Larry knows his stuff.
The six inch wheel fit perfectly on the blue grinder, and surprisingly I found out the green one would take a seven inch wheel. Next time I'll order a bigger one for that grinder.
Everything installed in no time flat.
I have a brace of new Ohio Tools bench planes that all need rehabbing, so I thought I would try out this new wheel grinding a plane blade, one of my least favorite pastimes.

This Meda wheel, I have to say, is pretty awesome. The blade never got very hot, and the grinding went very quickly. Definitely an upgrade from my brown Norton wheel (80 grit, I think - maybe 40). The only thing is the grit seems to come off quickly. But, for the price, I think it would be worth burning through these wheels twice as fast.
Here's my grinding set up using my saw bench.
Enough of that, back to the bench. I haven't flattened it since the first time in 2012. Over that time, the top has settled quite a bit. There was a dip in the center I would estimate at about 3/16" deep in the center.
Before
I learned in this time that I can work just fine 99.5% of the time with a bench that isn't perfect and doesn't look like the cover of a Fine Woodworking article. As long as the bench stays still while I'm planing, I can make many other deficiencies work.

With this in mind, I decided to make it flat, but not to waste time making it too smooth.

This was over before I really got a chance to photograph the progress.

I took a big wooden jointer set with a heavy cut, took passes front to back evenly across the grain for the whole length of the bench. Next I took shavings at a 45 degree angle across the top. Last, I went with the grain using a medium cut with my BU jack plane.

Done.
After
It has made a big difference in looks, but I really needed it to be flat to plane the couch table's top. I would say about 20 minutes of work, probably less, from start to finish.
Here is a close up of a crack that has been filled with black epoxy, then planed.
The bench is great. I built it in a class with Christopher Schwarz in 2012. What I like is it is heavy and stable.

So far I have yet to put finish on it, and I think I probably never will. Someday I might put a shelf on the bottom. The only thing it really needs is the sliding deadman, which I need about twice a year for the kind of work I do. So far I have gotten away without it. The bench is about 18" deep, maybe a little more, and a little over six feet long. I have upgrades still awaiting for the tail vice, and I have a nicer piece of elm waiting to be installed as a face vice, along with a Benchcrafted CrissCross.

Monday, March 14, 2016

Henning Norgaard Couch Table Part III and Another Squirrel!

Continuing with the couch table. I'm afraid there is not much going on here, I'm still roughing out the parts. The problem is that roughing out parts like this in a hand tool-only shop does take a little longer. So far I cheated a little in getting a local cabinetmaker to run my oak planks for the top through his thickness planer.

I want to prep the rest of the parts for the base in my shop, but after spending half of the whole day ripping 9 out of an eventual 12 sticks out of a board, I might just run those sticks through a thickness planer, too.

A lot of people seem to me to be afraid to do their stock prep with hand tools. For the most part, I am forced to as I have none. I find that it is neither difficult nor inaccurate, and for the most part it is not slow.

When it really starts to show as a weakness for me, is when there are big parts, or lots of parts that need special cuts.

My task today was cutting 12 sticks out of an ash (Fraxinus excelsior) board. The sticks need to be about 28 inches long and one inch square or so.

The great part about doing this with a rip saw is I am given the freedom to cut this board any way I want. I decided this table's base would look best with the annular rings of each stick being more or less at a 45 degree angle to the stick. I've always called this rift-sawn, but I have also heard the term "bastard grain." The advantage is the grain looks the same on all four faces, rather than showing quarter sawn grain next to flat sawn grain. For this piece, it would look odd. I want the focus to be on the top when you are looking at this piece, so anything that sticks out or draws the eye to the base isn't going to work here.

Perhaps a photo so show what I am talking about.
Bastard!
There's really not much more to see as far as progress on the table. Ripping is really a pretty boring thing to blog about.

Tomorrow I should be able to get those last three sticks ripped out relatively quickly, then I will decide if I want to run them over to a shop with a thickness planer (likely), or square up the parts by hand (my arms hurt thinking about it).

For a bit of interest, and in line with my latest tendency toward ADD woodworking, I started another new project. Well, I also rehabbed a couple of bench planes today, but more on that later.

Jonas, the author of the blog Mulesaw, is making a couple of backsaws this trip on board his ship. He and I were chatting about the project one day, and somehow I was able to talk him into bending a piece of copper for the spine of a backsaw for me. I'm excited to see how his ship-board saws will come out. I think it would be bad manners if I didn't finish the saw. I guess I'll get started early.

I actually started to make a dovetail saw a few years back, but for some reason abandoned the project. I got as far as roughing out the shape of the handle on a piece of flatsawn walnut. I might take this opportunity to finish that saw, too.

I ordered another folded brass back from TGIAG along with a pair of sawplates punched with 14tpi teeth at 10 degrees of rake. I figured I would do a comparison of a "proper" manufactured folded brass back with Jonas' copper version. To do a proper comparison, I will make two identical saws based on the carcase saw from Smith's Key.  The dovetail saw has a milled brass back from Ron Bontz.

I have a nice piece of elm that I brought back from Jonas' place in Denmark that will make a gorgeous saw handle. It will be perfect to pair this with the copper back that Jonas will provide, for a saw whose parts mostly came from Denmark. Well, Denmark and somewhere in the middle of the North Sea. The second saw will have a pear handle, I think. Let's get started on the elm:

I printed out a template from Blackburn Tools. I like this one as it looks just like the image in Smith's Key, plus there are separate files for different sizes of grips. Next I cut out an appropriate sized blank and flattened one face.
I really like working with elm. I have a bit more if I screw this one up.
With one face flat, I marked around the blank at one inch in order to prepare for resawing.
Resawing is a lot like cutting tenons.
I sawed a kerf with my ripsaw all around, then started working my way to the middle.
Kind of like Connect the Dots.
I used to really suck at this. Now, I can get a surface from the saw that doesn't take too much effort to clean up. All I can say is, the only way to get better at this is to keep doing it. Eventually you get a feel for what the saw wants to do and you let the saw do it.
Too bad I'm not making a book-matched panel.
After everything is flat and square, I spray-glued the template to one side of the elm block being careful to line up the wood grain with the direction of cut.

Now to start shaping. To start, I will drill out some holes. No drill press here, just bore a straight hole! As long as it is more or less close, I can straighten things and make adjustments with a rasp later.
I had a one inch Irwin pattern auger bit.
Some of the holes on this pattern were bigger than an inch, and in odd sizes. I was going to bore those with my one inch bit, too, until I remembered I had some Wood Owl bits I used once and put away. They were a bit closer in size to what I needed.
This one left a bit of a ragged hole.
It turns out they both work fine in a regular brace.
This Ultra Smooth bit left a very nice hole.
I did have one mishap here. I was careful to let the lead screw pop through on the far side, then flip it over to finish the cut from the far side. That prevents blow-out. Unfortunately, there was a small crack in this wood and a chip popped out of where the top horn will be. I think I will be able to work around it. If not, I have more wood, I suppose I'll just start over.
The blank with holes.
I did the saw cuts I could with my Ryoba Dick saw. The other curvy bits gave me an opportunity to use my bow saw.
Incidentally, the frame of my bowsaw is elm.
Here is where I left off yesterday. Next I will clean up the ragged bits with a rasp or whatever, then I will start shaping the handle. Maybe by the time Jonas' copper back arrives, this handle will be ready for it.
Not quite ready yet.
The other handle in the above photo is the walnut handle from the backsaw project. I had forgotten about this. It is based on a scan from my Spears & Jackson dovetail saw. It looks like it is ready to start shaping and will be good to go. The only problem I see with it is it is flat sawn, rather than quater sawn. I suppose I'll use this opportunity to find out why sawmakers don't normally do it this way.


Tuesday, March 8, 2016

Squirrel Handle and Henning Norgaard Inspired Table Part II

You'll remember in my last post I indulged in a bit of ADD Woodworking, I started to rehandle a mortise chisel shortly after starting a major project.

The good news is I finished it.
My handle next to a Gramercy Ray Isles mortise chisel.

You'll remember I left off with this photo:
Started.
Unfortunately I didn't think to take many pictures of the hard parts of this project. The tang of the chisel was rectangular in shape, which was a bigger challenge than previous chisels I've done with square tangs. I found a planemaker's edge float was helpful.

The other part of this project that was important was layout. I started with an oversize block of beech. Once the chisel was mostly seated, I drew new layout marks on the blank consisting of centerlines based on the blade of the chisel, since it was expectedly off-center now.

With that done, I marked the shape of the handle from the center points. This handle is essentially square and tapers in both directions from small at the bolster to bigger at the end.

Once that was marked, I used my Dick Saw (a Ryoba Japanese pull saw from Dictum's line of tools labeled "Dick") to cut on my lines for the rough shape of the handle.

From there it was just a matter of cleaning everything up. I had the best luck with my block plane, although I did chew up the blade pretty well by the time it was done. I suppose I knicked the metal bolster a time or two, and a scraper.

Once the general shape felt good in my hand, I did no more measuring. I figured I could have chased my tail all night getting everything perfect. In the end, the tool should work, even if it isn't millimeter perfect.
Cleaning up the ratty bits with my block plane...

...and my card scraper.
Having smoothed the square bits, I did the chamfers, continuing the pattern from the bolster. In the end it looks more square than octagonal.
I might re-do the chamfers on the end to make them much bigger.
I even decided I should practice with my maker's stamp.
On the other hand, it doesn't look so bad.
I'm pleased, and now have a 3/4" pigsticker that can be used.
Whether or not I ever have a project that needs it is another story.
I also will need to sharpen it someday, as it is as blunt as could possibly be.


It is quite comfortable to hold.
As far as the table goes, I bought some ash (Fraxinus excelsior) for the base. This is beautiful, straight grained stuff. To make the table extra special, I will cut the pieces out so the grain runs at a 45 degree angle, making each face look the same rather than have quarter sawn on one face and flat sawn on the other.
To do this requires a bit of creative sawing. This is actually quite easy to do with a hand saw.
Here is one finished stick. 15 more and I'll be able to start the joinery!
A fellow Munich woodworker let me borrow him and his shop long enough to run my oak tops through his jointer/planer. That saved me quite a bit of time.
A preview of the top of the table.
The table top will be about 28 inches square.
Resting.
I will have a few days before I get any more shop time, so I will let these oak pieces acclimate a few days before I do anything else with them. Clamping them up will hopefully prevent them from turning into potato chips.

Next time I will glue up the panel, plane the bottom flat and install some cross battens to keep the panel flat over time.