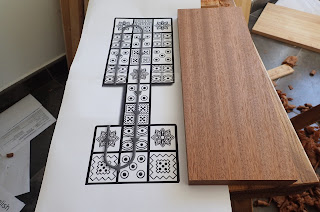
Yes, I am still working on this simple project. No, I haven't gotten anywhere in the last week or two on it. Yes, this post is about work that I did weeks ago, but no, I haven't blogged about it yet.
I blame the Chinese.
Actually, the Chinese have been good to me. I started a new job teaching English online to Chinese kids. The kids are great, and I am having good fun. The only problem is it is interfering with this project.
Perhaps writing a bit about it will get me back in gear.
ACTUAL WOODWORKING CONTENT STARTS HERE:
I am using a piece of mahogany that used to be a drawer front. I rescued it from a dumpster, and this particular piece is very nice. It yielded two boards of appropriate size for this project. Perhaps if I ever finish the first one, I'll make a second.
I printed out a paper gameboard about the same size, and instantly decided that I didn't want to copy it. I want to use the board I have just as it is. To do that, I'll need to lay out the squares on this board.
 |
| Two mahogany blanks and a paper template that I won't use. |
The chisel I have is about 3/16" or so, so that is what I'll use for measurements.I set my marking gauge at 3/8", enough for the chamfer and the outside border of the game, and ran the gauge all around the outside.
The boxes must fit inside this border.
The trick for laying this out perfectly now lies with the use of dividers. I did not measure a single thing. I used dividers first to divide the width of the target area into three, then I divided the length into eight equal parts.
I just had to make sure I also allowed for the width of the border to be added to the size of the intended square.
 |
| It took a couple tries to get the perfect measurement from the dividers. It was smart to mark the points in an area that will get removed later. |
 |
| It is turning out just like I planned. Don't screw up the crosscuts! |
 |
| This is where this project sits now. |
Next up, I will try chip carving for the first time to define the designs on the board.
Looking really nice. I am amazed by the look of your rabbets. They are very crisp.
ReplyDeleteBrgds
Jonas
They aren't perfect, but I'm happy with them. I think making nice, deep marks with a gauge or a knife help keep it looking clean.
DeleteLooking good Brian. I like the raised square effect. Looking forward to seeing your chip carving.
ReplyDeleteThanks, Greg. It turned out better than I expected. I hope I don't wreck it!
DeleteMan thats awesome! Can you imagine that in ebony! I can't wait to see the chip carving. Its on my longterm list to learn, I wimped out on board because I didn't think I could do the carving of the squares. I'm also interested in the knife you use. It all seems so confusing to me on what knives do what. Thanks for sharing. Take Care - Chris
ReplyDeleteI hear you, brother. I first thought I would try it using my marking knife, but while I was back in Germany I stopped at Dictum and got their cheapest chip carving knife.
DeleteI'm most worried that mahogany probably isn't the ideal wood to learn on, as everyone on YouTube uses only basswood. I think there are probably other ways to do this, such as reverse-printing from a printer then transferring the image onto the board, but I'm always one to try something new.
What's the worst that could happen? :o)
You're a trendsetter, Brian, one of the guys that everyone else is following. Me, I'd rather learn from someone else's mistakes than from my own (of which there are still plenty). :)
ReplyDeleteI tell my wife that everytime she says, "You're going out in THAT?" :)
DeleteThanks for the kind words. There's plenty of mistakes on this blog to learn from.
Ha ha Brian, i heard that “your’re going out in That?” So many times from Heather... Jean has not yet, but im sure that will come too ... 😜
ReplyDeleteBob, about to go out in public...
Maybe Jean has recognized you are a trendsetter too!
DeleteI blame the Chinese, too, more often the parents and not their kids though.
ReplyDelete