I got an opportunity to get back in the shop today - the first proper shop time this year. My how time flies.
I didn't really get much done, but getting started on a new project is always fun. For this project, I have the perfect piece of leftover oak - the rest of a wide plank that I bought to make the
staked desk.
 |
| Here's a glimpse of my tiny shop. To plane a long board, I have to keep the door open and start the planing stroke in the hall! |
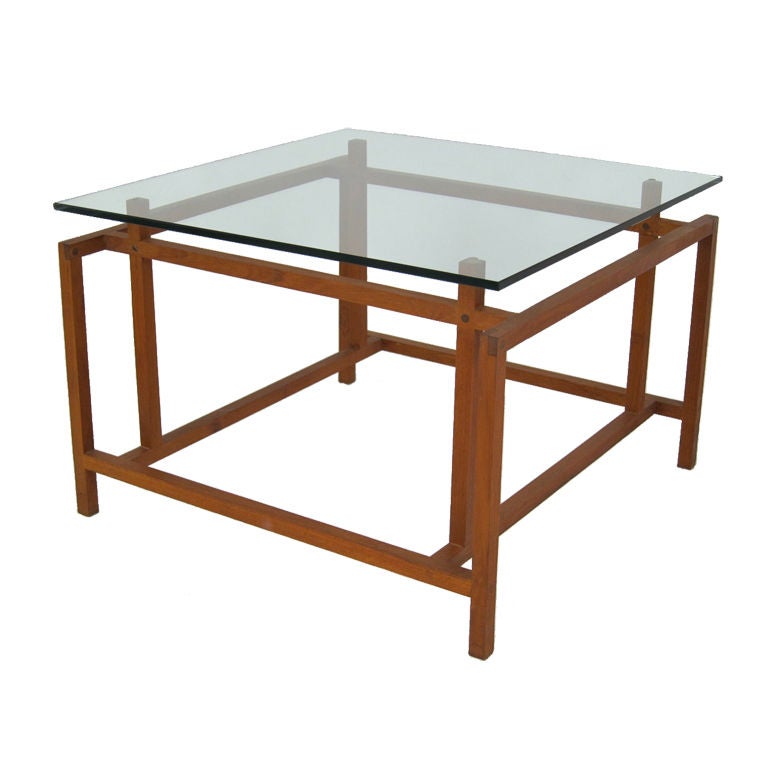
The inspiration for this coffee table will be a table designed by
Danish designer Henning Norgaard. A quick internet search yielded very little about this designer, possibly one of you knows a bit more.
First is some boring work making the top. Notice in the original the top is glass. I like glass, and have made a glass topped table before. Glass is a lot more expensive than a piece of wood I already have, so a wooden top it will be. Besides, I think it will look cool.
 |
| One jointed edge. |
I started by jointing an edge. Actually, I started by determining how big the table top will be using this one board. It turns out, I can make it 28 inches square by cutting this board in half and edge gluing the two pieces.
With a jointed edge, I was able to accurately mark out the board lengths and cut them out.
 |
| I always cut a wide board in the middle with a little regret. |
It's been 20 minutes since I've started a project, so I figure now is as good a time as any to start another one.
 |
| Why can't I ever only work on one project at a time? |
This giant 3/4" French mortise chisel needs a new handle, so why not? After I get it to this point of almost done, it is time to go back to work on the table.
 |
| This is exciting because I get to use my panel gauge. I love using this thing. |
I'll always treasure the above photo of my beloved panel gauge, because it is the last picture ever of it before I lost the tiny ebony wedge that holds the blade in place. While I was putting this gauge away, the wedge popped out and I suspect is under my bench somewhere. It might not sound so bad, but you see the picture above of my bench, right?
 |
| Ripping. Exciting. |
I actually am really starting to enjoy breaking down stock by hand. At least the sawing, anyway. With only a little practice, one can saw very close to the line. It really doesn't take that long, either.
Planing, on the other hand, does take some calories.
 |
| This is the table's top. |
This oak is nice, and shouldn't be too difficult to plane. There is, however, about 3/16" to take off on either side to make them flat. I haven't decided yet if I'll borrow someone's machine or do it with pizza power. I have a couple days to think about it before I get more time in the shop.
The design of this table will evolve using my normal method, which isn't using a SketchUp model. I will finish the top, then build the base using the top's dimensions to guide the design. I envision my table being a little lower than the original in the photo, but I don't know exactly any of the dimensions yet. One reason being I have to buy some more lumber for the base. It will probably be oak or ash, whatever I can find with straight grain.
I still haven't made up my mind on the joinery, either. I am leaning toward the lap joints like the photo, and probably some double-wedged mortise and tenons that aren't in this photo (that I can see).
I also haven't decided on how to keep the panel flat. It will need some cross bracing, probably some sliding dovetails. It's also not to late to decide on breadboard ends. Or maybe my standby of screwed battens.
Any suggestions?


Breadboards would be out of place with this design. I would do something underneath that isn't visible. A dovetail keyed batten that doesn't extend out to the edges.
ReplyDeleteHi Ralph, I think I'm with you on the breadboards. It probably would pay not to overthink the battens.
Deleteinteresting project! will follow with attention! on a side note, I have never been able to saw vertically, either with a western saw or a ryoba, always wondering how you guys do it....
ReplyDeleteDo you mean how I do it in the face vise? I agree it's more ergonomic and easier to start using a saw bench, but the shape of my shop makes this quicker and easier over all. If I start going off of my line I turn the board around or flip it in the vise.
DeleteBrian, I saw on a close up of a Norgaard original table that he used some kind of screws to assemble some joints. Hopefully you won't do that!
DeleteHmmm. I did once buy a pocket hole jig at Lidl, and have yet to use it...
Delete:o)
Hi Brian,
ReplyDeletenice to read about your new project.
Seems to be an interesting one and I like it already because of the Mid-Century style.
Even if I had a lot of research work regarding Mid-Century furniture this winter, I haven't read about Norgaard except that he was working for Komfort furniture.
BTW your workshop space looks pretty familiar to me.
Cheers,
Stefan
Hi Stefan, thanks for the effort.
DeleteI'm finding out that a lot of guys work in tiny spaces like this. It makes me feel better for having quit complaining about it.
Glad you are not going with a glass top, such a pain to keep looking clean :-)
ReplyDeleteIf using Oak for the under frame, it would probably look better if quartersawn.
After moving around the country and using various spaces as a shop, I can tell you that it is always amazing in whatever space you can put a shop in. I long dream of large expanse, but now feel better in a smaller shop, especially if you go hand tools.
Bob, the shop re-re-re-organiser
That's an interesting thought about QS oak for the base. I fully intended to use rift sawn wood, so the grain will look the same no matter what. If I use quarter sawn for those pieces, just as much flat sawn wood would be seen. However, I have in the past overcome this on table builds by veneering QS oak on the flatsawn sides. It works a treat. I wonder if that would be worth it here?
DeleteYou might change your blog title to, "Toolera... oh look! A squirrel!"
ReplyDeleteGood idea. Stay tuned!
DeleteNoooooo, how can you even think that Brian is easily distracted? :-)
DeleteIt is the best suggestion I have read for a long time. Thumbs up to Ethan.