The videos are not highly edited, but that is part of the charm. He just turns his camera on and lets it go. I find it adds an air of reality when he takes a minute to run across the shop to root around in a drawer for a tool that he wants to show.
 |
| My practice bit of pine. Looks like I need more practice, but this is promising. |
Recently, he did a video about making your own maker's stamp "on the cheap." Here is his video if you want to watch:
The biggest special tool for this was a set of 3/32" reverse letter punches. I bit the bullet and ordered a whole set. Used ones go on eBay every once in a while, and Young Brothers actually sells them individually, if you don't want to spring for the whole set. You just have to find a retailer who will work with you.
Brass is another story. David says not to go buy some especially for this project, because it is expensive. However, I did find some 360 brass at McMaster-Carr that was less than $20. It is 1/4" thick, two inches wide, and six inches long. I should be able to get three or four stamps out of this, at least.
 |
| Raw material. |
 |
| Filed one edge clean. |
 |
| This photo sponsored by Right Guard. |
 |
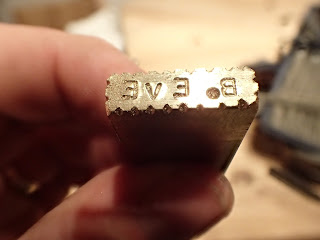
| It's supposed to say "B. EVE," not "Bo EVE." A little less heavy handed next time. |
 |
| It's backwards, because it is a stamp. Hopefully, it will spell what I want it to when I bash it on a piece of wood. |
 |
| Ugly, but functional. |
The wood I used to try this out on was some scrap pine I have around. I found out that it is a lot harder to get a good stamp in hardwood. For the most part, however, I am happy. It only took about 20 minutes, beginning to end, so there is no reason I couldn't make a prettier one now that I've done a rough one. I could saw the letters off of this one and use the same blank if I want to redo it, or I could make another one that says, "Munich," to use in conjunction with this one.
I think over time the brass will mushroom and distort on the end that meets the hammer, but I expect this stamp should last many years. Plus, it was such a simple thing to make.
The hardest part is figuring out the best way to make a nice, clear stamp, as there are no do-overs on a completed plane!
That's really cool.
ReplyDeleteAre you going to mark all your wooden tools with the stamp? Or just the ones that you have made yourself?
Cheers
Jonas
I think this stamp, or one like it, will only be for tools I make.
DeleteCool. I've been in the same boat. I had been thinking a dremel tool and an old cold chisel, but have procrastinated since I want to update my mark a bit. (and am unsure how steady my hand is.
ReplyDeleteDon't forget that you can get a do-over on a plane, it just means you'll have a slightly shorter toe. ;)
I think it will take some confidence!
DeleteWell done. Thanks for sharing.
ReplyDeleteThanks for the comment, Stefan!
DeleteI suppose there are two schools of process here, Brian. One, followed by the likes of Chris S., is to only stamp your work at the very end, once the project has been completed.
ReplyDeleteThe other, something that Phil Edwards does, is to stamp the end much earlier in the process. Phil still puts out no plane that doesn't meet his approval, but he ensures that he doesn't mess up the final product with an errant hammer blow when trying to stamp it.
The third option is to invest in an arbor press. Then you aren't impressing the wood with a hammer blow, but with direct sustained, controlled pressure. I'm looking for an arbor press for that very reason.
But the stamp I had made up is a little more difficult to stamp. There is a lot of void space, which means you need a lot of pressure to produce the impression. I apparently don't have the balls to swing a 5lb sledge at my hand that hard; I keep chickening out. So I'm going to give the arbor press a try.
You have to avoid letting your skirt blow up in your face!
Delete(Sorry, I couldn't resist. Lucky thing I'm on another continent).
But seriously, I really didn't want't to spend a whole bunch of money on something I might not use that often. Who knows, maybe someday when I become a professional planemaker, but for now something like this will have to do for my own till.
I love "B. Eve". Debbie's is "Beleve". Funny, Huh.
ReplyDelete