Thursday, April 25, 2019

No. 4 Plane Review: Part III - Record

Here's my third Number 4 smoothing plane. A Record made in England during the late '60s or early '70s. I'm not really too knowledgeable about this brand of plane.
Here's what it looked like when I got it.
As you can see, it arrived with in pretty good shape. I think the seller tried to clean it up some, and also tried to make the handles look better. You can see in the above picture that the stain was sanded away in one spot on the base of the tote.
This was my first look at the frog.
I used to not have a good opinion about frogs that had cavities like this in them. I thought it was the manufacturer trying to cut corners. After my experience with the English Stanley, I have a bit more open mind. What I don't like is it looks pretty rusty.
The blade and chipbreaker.
The blade and chipbreaker didn't come in very good shape. I think they were superficially cleaned, but they weren't sharp or tuned at all. I didn't even try to make a cut with it yet.
The front knob. At least it's wood. Notice the front of the casting.
The finishing touches on this casting have a little to be desired. I thought I'd give it due diligence, however. I did have to run the casting and the frog on sandpaper on a glass plate.
The casting. I don't like there being Japanning on the parts that touch the frog, but I left it for now.
One thing I really did like was the design of the chipbreaker. Below is a picture of the blade assembly from the Stanley as well as this one.
Blade assemblies: English Stanley on the top, Record on the bottom.
The chipbreaker on this Record is much beefier than any stock chipbreaker I've seen in the past. Experience tells me that a solid chipbreaker is a fantastic upgrade to any plane. This one came from the factory with a chipbreaker that I would say is an upgrade over the Stanley design.

To tune this up I ran the edge on my stones until I had a nice flat all the way across,
Then I rounded and polished the front of the chipbreaker to make it easy for the shavings to glide past it.
Perfect!
I decided to give the same shiney-up treatment to the brass on this plane as I did the Stanley. This time, I started by letting the brass sit in some salted vinegar for a minute. This was a good time saver. Most of the gunk and "patina" just wiped off. It was then an easy job to polish the brass with toothpaste. This step saved a lot of time over starting with the toothpaste.
Left - after the vinegar and salt treatment, right - before.

The blade adjustment wheel shined up nice, too.
The handles were pretty easy. They were in decent shape. I just sanded them down to a fine grit, then I waxed them with my homemade wax, and I finished up with a coat of shellac. It's the first time in years that I've used shellac, and I think it is perfect for this job.
Shellac looks nice.
After the shellac dried, I went over it with a maroon scrubby and gave it another coat of my soft wax.
Here is how it turned out.
It isn't the most beautiful plane I've ever seen, but it does have a nice character to it.
The other side. The blue Japanning is growing on me.
Enough of the rehab. How does it work?
Wispy shavings.
Wow!

I have to say it again.

WOW!

This plane really surprised me. It works fantastic.

I expected it to work well after my experience with the Stanley. But I was expecting the blade to be of lesser quality, or for it to chatter or something.

None of that.

I was a bit worried about the blade being in bad enough shape that shavings would get under the chipbreaker. I did have to resort to using the ruler trick to avoid spending two days lapping the back. That didn't happen, however. It is as good of a blade assembly as any I have.

This next part might sound a bit snooty and wonkish, but if you use oilstones to sharpen you will know what I mean:

The steel in the blade is superb. A lot of what I base that on is how it "feels" on the stone, as well as the sound it makes. Both when sharpening and when planing wood. This is one reason I don't like A2 steel and waterstones. Not because they don't work well, but that "feel" isn't there.

The Stanley blade feels course. Even on my finest stone. And when I plane wood, it gives a raspy, hollow sound. It works great while it is sharp, but it must be sharpened often.

The Ray Iles blade I have is superb O2 steel, and it sharpens up very nice. It sits very solid in the plane and the noise it makes is very satisfying. I must say that I didn't try this blade in the Record yet.

The Record blade has a really nice, slick feel on the stones. It sharpens up to a razor edge in no time, and it seems to stay sharp a long time. I would guess longer than the Ray Iles blade. It's amazing! And paired with that beefy stock chipbreaker the blade assembly is fantastic. The sound the plane makes when cutting wood is very satisfying.

I used this plane to get to know it exclusively during my humidor build. After that I finished a shelf and started another project. I've had my choice of three No. 4 smoothers to use for these projects, and I found myself reaching for the Record every time.
Stanley type 12, English Stanley, Record.

I'll certainly have to do some more playing around with these planes to see which one winds up permanently in my tool chest. But I wouldn't be surprised if it was this Record.

I'd love to hear what you think of your Record plane, or any plane for that matter.

I've looked at three planes so far, and you can find my thoughts on the Stanley USA type 12, and a Stanley made in England.

Will there be more?

Perhaps.

Wednesday, April 24, 2019

Easy Tool Rack - Part II

In the last post I wrote about the joinery I used for this tool rack. Now that all the parts are ready, I choose to finish it before nailing it together.
I found a new kind of milk paint from the Czech Republic.
I want to finish it before knocking it together. I think it will be easier to paint some parts while leaving the parts that see sharp tools natural with a coat of wax.

This will leave future repairs to (hopefully) the bits that just will need some wax.
The first coat of milk paint is always scary.
The reason I chose milk paint is mostly due to the fact that I would like to try this black over red finish that Curtis Buchanan uses on his Windsor chairs on my rocking chair. I find it always beneficial to practice on a piece of shop furniture before committing to a new finish.

I watched all of Curtis' YouTube videos on the subject a couple times. The idea is to put a really nice undercoat of a color on, with two or three coats. Then, a couple coats of a thinned out black wash, followed by a thorough rubbing down with steel wool to bring up a nice sheen.
The undercoats went on beautifully in the end. The black wash is started in this pic.
I'm not sure if my technique was bad, or if it is the different brand of milk paint, but my results were remarkably different than what I was going for.  I was hoping the piece would be black with a hint of green underneath, and maybe some stronger green on the edges and places where the black wore down a bit more.

Instead, as soon as I started with the steel wool, the black started to completely disintegrate. In fact, the green would have, too, if I hadn't had stopped.

I wound up just lightly going over the black with the steel wool, trying my best not to obliterate all of the paint that I had spent so much time putting on.

Once that was done, I added some of my special linseed oil followed by my home-made soft wax. Even though the finish isn't what I expected, I think it is kind of cool. Especially for a piece like this.
The top shelf after rubbing down, oil and wax.
Curtis explains in his video with the black that you really need to rub hard with 000 steel wool. The effect the video shows is a real burnishing of the paint, with just a tinge of his red undercoat showing through. When his chair is finished, you would definitely say it is black with a little red.

I think mine came out more like a green with a bit of antiquing to it. I'll definitely have to experiment with this finish some more. I really liked this brand of milk paint, but perhaps using the same brand that Curtis uses will be a big help.

Moving on...

I used some long 60mm Roman nails to attach everything. Before I started, I made a test joint to see how big of a pilot hole I would need in order to avoid splitting the wood, being that it is now only 1/2" thick in those places and very close to the edges. I found out that the top board gets a 4mm pilot hole followed by a tapered pilot hole in the endgrain to be joined.
4mm pilot holes.
I drilled the holes so the nails are at different angles in one direction. This will hopefully add a bit of strength. Not that I'll need it, the Roman nails hold like no other fastener I've ever used, being square and tapered in both directions.
Roman toe nails.
I thought that workholding for this assembly would be difficult with my limited clamping ability, but my joints were tight and held themselves which allowed me to get the nails in and driven home with no problems.
Funky workholding, but there were no problems.

The pilot holes even prevented splitting this close to the edges!
All in all, I'm really pleased with my Easy Tool Rack. It was easy, even though I made it a bit more complicated. Thanks to Christopher Schwarz and Popular Woodworking for the idea.
Tool rack on the wall.

Another artistic photo of my completed project.

A view of what looks like a shrine to Christopher Schwarz. You can see at least four (maybe five) of his projects in this shot.

Tuesday, April 23, 2019

Easy Tool Rack - Part I

Yesterday was a banner day for me. I finished two projects on the same day! To celebrate, I am sharing this project only on this blog. I've hinted at it on Instagram recently, but if you follow me on Instagram, you really haven't seen this project yet.
The Easy Tool Rack.
This is a fantastic project that Christopher Schwarz came up with a while back for Popular Woodworking's I Can Do That series. It looks good, is a useful piece of shop furniture, and is dead-simple to make if you follow Chris' instructions.

Of course I need to do this, and of course I need to make it unnecessarily complicated.
First, let's go get some wood. On the bus.
This is a good-sized project that will test the work holding I have available to me. Plus, I don't have a pocket-hole jig, and I am using only my set of hand tools.

I think I want to cut a notch in the back of the side pieces and nail the back board directly onto the sides from the back, and I want a through, wedged mortise and tenon for the front rail. I'll think about how to attach the top later.
My bowsaw does a good enough job roughing out the shape of the sides.
The string on my bowsaw broke as I was getting ready to make this cut, so I had to run to the 2 Euro store to get some more string. I came home with some nylon cord that seems to work just fine. It's yellow with red in it. You know, because Spain.

In the hope of keeping these posts from getting too annoyingly long, I have figured out how to make GIF images, so hopefully you can see a little mini-slideshow of what I'm doing.

Once the shape was roughed out for the side pieces, I wanted to make them as close to perfectly the same as possible. I figured the easiest way to do that was to clamp them together and use spokeshaves to bring them down. My flat spokeshaves did a great job on the flat and convex parts, and I had to bring out a front-to-back curved spokeshave for the concave part.

I finished off the very bottom of the supports by marking the roundover with a coin, cutting a 45 degree piece off with my saw, and rasping it to final shape.

Once they were the same, I used a side-to-side curved spokeshave to put a gentle profile on it. Unfortunately this spokshave wouldn't touch the concave parts, but I do have a scraper I made a while back that happens to have the same profile.
A mini-slideshow showing the shaping of the side supports.
I really liked the feel of this slight roundover. It is gently enough of a curve that you really don't notice it from a distance, but it really feels nice to the touch. I liked it so much, I decided to do this treatment to all of the exposed edges on this piece, except the flat parts of the tool holders.
After adding a chamfer to the top shelf, I added the roundover to the edge.
Next it's time to work on the front tool support.
I ripped the tool support to width.
There was a problem when I crosscut to length. A cavity, similar to something you might run into with plywood!
There's really no way to prevent this.
This edge was going to be exposed, as it was intended to be the end of a through tenon. I decided that since I didn't know how much I would lose when I cut it shorter, that I would change the design instead. Rather than doing a through mortise and tenon, I would do a 1/4" stopped mortise and tenon, and use Roman nails to secure them.

I had a bit of a difficult time planing the faces of these boards, but it was easy to get them smooth with a card scraper.
This pine scraped smooth just fine.
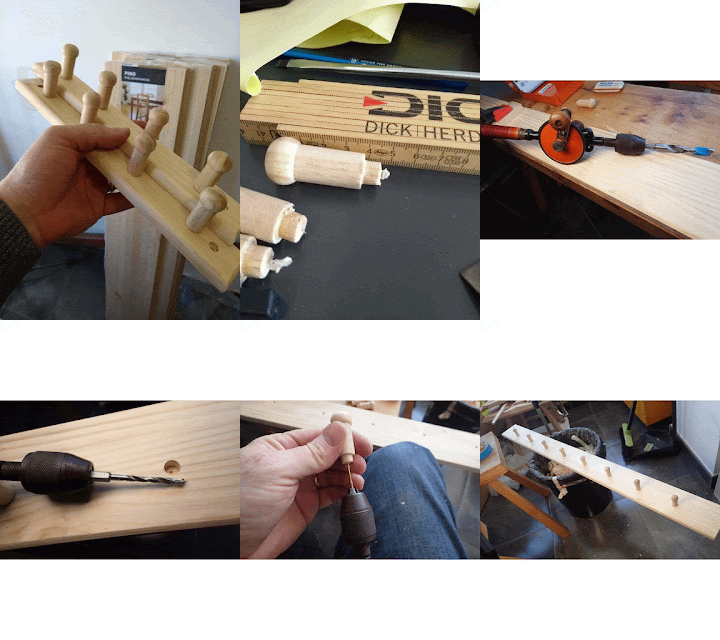
Christopher Schwarz used store-bought Shaker pegs for his rack, so I figured I would do the same. I couldn't really find anything I liked, but I did find some super cheap coat racks that had nice-enough looking pegs on them. I bought two and hoped I would get something I could use.

Luckily, they were just sloppily glued in place. All eight pegs came out with just a little bit of twisting with my hands. I feel sorry for whoever buys these things expecting to use them to actually hold something. I'm sure the pegs would pop out after a short time of light use.

It was a quick matter to clean them up by scraping the PVA glue off of them. They were unfinished, so they only needed some sanding.

To mount them to my rack I drilled a stopped 10mm hole in the parts I had marked with a pair of dividers. After that, I used a smaller bit to go all the way through. A little hide glue and a screw from the back hold these pegs securely. And I mean, securely. These pegs aren't coming off without destroying something on this piece.
Here's another mini-slideshow documenting the mounting of the pegs.
After that it was time to move my attention to the stopped mortises. It's not so much a mortise and tenon as I housed the ends of the boards. I did try something new on this one: Charles Hayward said a good way to rough out stopped rabbets is with a gouge. I figured I'd try it, and it worked great. There was only a little to remove with the routing plane using this technique.
Yet another GIF showing the routing of the mortises.
That's about it. It's really starting to look like a shelf now.
Mocked up, it is looking good.
Overall, I would have to say the lesson here is that it's OK to change the plan for your joinery to suit your tool set, as well as the materials you have to work with.

Next up, milk paint.

Japanese Toolbox-Style Humidor - Part III: The Cigar Till

I actually like making dovetails. I wonder why I don't do it more often? I can't think of the last project I used this joint. I suppose it's time.
Sawing tails first.
Now that my Japanese toolbox-style humidor has a Spanish cedar lining, I turn my attention to the till. I need a box that sits on top of the lining I just installed, and that also permits airflow above and below the cigars that live in it. I chose to make what is essentially a small open box with strips of cedar going diagonally glued to the bottom.

I set my marking gauge so the width of the side pieces would go from the top of the lining to just under where the lid of the box winds up. With that measurement, I ripped some pieces from the bits of Spanish cedar that I resawed earlier, and cut the pieces to length.
Cute little buggers.
With that done, it was just a matter of marking out the dovetails and cutting them.

Easy, right?

I found this to be a real challenge in such small dimensions. Also, I didn't have a proper dovetail saw here. For some reason I took my new dovetail saw to Germany and left it there.
Work holding for cutting the pins using my Dick saw.
With a little patience, a lot of pairing and a lot more time than I thought I'd need, they were done.
Joints are ready to glue up.
First I thought I'd drill some holes in the end pieces to make the till easier to grab and lift out. Plus I think they look cool. That was relatively straight forward, except that one of the end pieces split in half when I started boring the hole. A little glue and I can't even tell where the crack was.
I'm happy with the dovetails.
This next picture is perhaps a better explanation of what I am doing. This box will sit directly on top of the short lining. If I had run the lining all the way up, then the till would have had to be even narrower in order to sit inside of this lining.
This way, I get a little extra capacity in the till for longer cigars.
All that is left is to glue on some diagonal strips to the bottom of this box and I'm done.

WRONG!!!

I forgot to include the thickness of the applied bottom. If I do it this way, the lid of the box won't be able to go in.

I can't cut the box down, as the dovetails are already done and I'll compromise the strength of the dovetails if I do that.

The option I decided to go with was to lap the strips into the bottom of the drawer.
I know, this looks like I'm going to wreck my box.
It was a bit scary cutting into my box like this, but at the least I figured I'd learn something.

Mostly I learned that I need to think my plan out to the end before starting.
Close up of the cut I'm making.
It was fairly easy to measure out and mark the cuts. I did my best to be accurate with these.
All of the cuts made and coped out.
I cleared the waste with my fret saw and a paring chisel. Once I was sure everything fit, I glued it up.
Now it's starting to look right.
All of the pieces I glued in were a bit oversize. My plan was to plane them down to size after glue up so they would slide smoothly on the track. To see where I was, I just dropped the till into the box upside down.
Seeing how much needs to come off of the bottom pieces.

It was then just a matter of planing them to the desired length.
Almost done. I just chamfered all of the sharp edges.
Done.
I did have some leftover strips that I was able to make into moveable tray dividers. They are a friction fit. They fit in either the till or in the main compartment of the box.
Till in place with moveable dividers.
Let's load this sucker up!
I put a few cigars in the bottom compartment. The space on the left is for my hygrometer until I decide exactly how I want to mount it.
There's more than plenty of room in this box for lots of cigars. I estimate three to four boxes of cigars would fit in this box easily.
Room for lots of cigars, and keeping them organized.
Overall I'd say this is one of the most enjoyable projects I've done. It's weird that the inside of the humidor took longer than constructing the actual box, but that was part of the fun.

I kind of want to make another one.

If you haven't read the first two parts of this build, you can find them here:

Part I
Part II