Tuesday, June 27, 2017

It's Going to Be a Long Month

Not much has been happening on the chair building front. Hogueras is pretty much over, all except the fireworks every night at midnight for the rest of the week. All the pretty statues have been torched.
This particular one was down by the harbor on a barge, so they just towed it out a bit for safety.
I think I could get my chairs done, except I am preparing for an audition for a trombone playing job. I haven't auditioned for anything in years, and now I remember how terrifying it is.

Next week, I should be able to get the chairs done. Probably by June 37th or so.

One of the great woodworkers from Instagram, @a.from.b, sent me some wood out of the blue.
Wood in the mail!
It is 8/4 quartersawn oak. And, when I say quartersawn, I mean it is perfect. It is clear, flat and stable. My plan is to make a coffee table out of it, but it is so gorgeous, I might have to think about it while it aclimatizes to our Spanish weather.

What would you do with this wood?

Monday, June 19, 2017

Fogueres 2017

Being new in Spain, we are learning about the Fogueres festival that is held here in Alicante every year. Mostly it looks like everyone in Spain comes here to party for the whole month of June.

One really great thing they do for this festival is a competition. Local artists build these gargantuan paper maché sculptures. See my photos, these people take this competition seriously. I took these photos tonight when the Frau and I went for a walk to see them. Most of them were still under construction, but they still are beautiful. One thing I noticed is near every big one, there was a smaller one for the kids.

The winner of the competition gets to have their sculpture displayed in the local Fogueres museum, and the rest of them get burnt at midnight this coming Saturday.Im

Perhaps we should use this model for next year's June Chair Build?


This one is directly in front of our building.

Here is a view of it from our living room.
For a proper explanation of the Fogueres festival in Alicante, check out the official website.

Friday, June 16, 2017

3rd Annual June Chair Build - IV - The Seat Blank

I now have one seat blank that is pretty much ready. The main problem I see is my battens might be a bit too narrow for what I intended, but that wood is what I had to work with. I think I have an idea that will solve the problem.
One seat blank done.
I know, it doesn't look like much, yet. I've joined the two boards together with a slight gap between them. Hopefully this will mitigate any thought this chair will have for splitting after I install the legs. There should still be some room for wood movement this way.

Jeff gave me a comment on an Instagram photo I posted that he would like to see how I do the sliding dovetail with the toolset that I have. I have done a few sliding dovetails before, and I think I would probably do them the same even if I had more tools, except that a router plane sure would make this easier.

I don't have photos of how I made the battens. I made them with a 10 degree slope on each side. This is pretty easy to be accurate on. If you can plane a square edge on a board, you can also plane any angle on the edge you want. It is the same process.


Since I don't have one, I make do with a chisel instead. Here's a visual tutorial:
First mark where the batten will go.

I then clamp the batten upside down as a saw guide.

The batten holds the saw at the perfect angle.
I removed the handle from my Ryoba as it is in the way, but I think you could do this with about any saw. I once did it with a crosscut panel saw.

Here's a short video of how this works:

Sneak up on the line, then repeat for the other side of the batten.
One note here: I'm not doing tapered battens here. If I were, I could just cut to the lines I marked, then push the batten in a bit farther to tighten it up. With straight battens like these, I had to come it a bit on my second cut, or the dovetail would be sloppy and loose, as I measured from the widest part of the batten. I'm not sure of a good way to measure this, but a little guesstimation got me there in the end.
Here I'm starting to chop out the waste. I want a nice crisp edge, so I start by chopping out half the waste, then half of that until I can't go halfsies anymore.

Half of the waste...

until I get to the line. Then clean it up a bit and come in from the other side of the board.

With the edges done, I go bevel down to remove most of the waste.

I'm not too worried about how it looks yet, just don't get too aggressive.
If I had a router plane, I would pretty much start using it at this point. I might have used it to take the last couple of shavings at the edges of the board, but I also might not have. It depends on my mood.

Also, it is important to take a moment here and sharpen the chisel and/or router plane. A new edge will make this easier and more accurate.
Now I start taking down the high spots until it starts to look nice.

It is starting to look nice, but I need to check that the depth is enough not to get in the way of the batten.

I check that with both my marking gauge,

and some kind of straight edge. You can see here I have a ways to go still.

That's better.

Done! Does it fit?

Yes! First try.
I have to say I enjoy doing these with only a chisel and a saw, but with these two chairs there are a total of eight of these excavations that need to be done. A router would come in handy. But even if I had money burning a hole in my pocket to buy a new one, I still could probably get these all knocked out this way before the mailman would show up with a new tool.

Speaking of new tools, I need to get a brace or a new drill to drill the holes for the legs in the next post. The cheap Chinese corded one I have does not have enough torque to drive my 3/4" bit through pine. Unbelievable!

Tuesday, June 13, 2017

3rd Annual June Chair Build - III

We have another June Chair Build entry completed. Greg did a great interpretation of three legged Moravian back stools made from plywood. Congratulations, Greg! For a prize, you get to sit in two brand-new chairs!
Greg's chairs are already finished!
Bob has joined us and is making posts from his blog, The Valley Woodworker, too. Being that he started his project on the 11th of June makes me think he is a bit more in to the true spirit of what we are trying to achieve here (I think I finished my first June chair on June 39th of the first year, or somewhere along those lines).

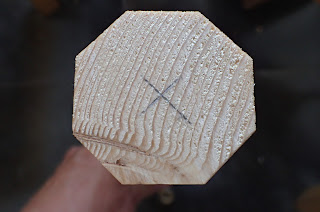
Me? Well, I've been plugging along. I finally finished up the legs today. I think these ones turned out better than any I have done to date. I did my best to be as precise as possible. It could make a difference. I think that chair legs do not have to be perfect, but have to look octagonal. These aren't perfect, but they are much more uniform than any octagonal legs I have made previously.
Eight legs looking for some chairs.
I really spent some time making the tapers four square and truly square, then ensure the octagonal bits were as square as I could. Normally the octagonal part I just do by eye until they look pretty much all right. Once the chairs are done, we'll find out if the extra effort was worth it.

Here is how I made the legs octagonal:

First, I made an octagonizer according to Greg's instructions on his blog, except instead of a scratch pin I made a hole for a pencil. This gauge is nearly the same as the one Olav the Great gave me a couple years back. Overall I would say Greg's tool is easier to make than it looks, and perhaps easier to make than Olav's. However, Olav's works better with a pencil. You can see in the photo below how short the pencil had to be.
My interpretation of Greg's octagon tool.
With the pencil tip having to be so short, the pencil mark left is fat. This is OK, as I treat these lines as a guide to get close to until it looks right.

I've also started using a jointer and a smoother since I have them in my tool chest. I could have done these all with the BU jack, but I wanted to try out the Course, Medium, Fine technique.

This was great! I was able to leave all my planes at one setting. Also, with the jointer and smoother both having cap irons, I was able to eliminate all tear out, even on the spots with crazy grain and over knots.
Course
Medium (Yes, the #8 is overkill)
Fine
If there was a spot with crazy grain and tear out after using the jack plane, I would start the jointer a little sooner and take a few more swipes with it. Then, the smoother just had to come in for a swipe or two for a nice glassy surface. These legs are now ready for finish.

Here is how the shape of the octagon came out on the last leg that I did.
Not perfect, but pretty good.
You may note that there are a few knots in my pine chair legs. Chair legs should be made of the strongest stuff you can get. That's what I've done here.

My point was to make chairs out of home center materials, and the home center here doesn't really have an economical alternative to these. They started life as 2x2 eight footer construction lumber. I cut them up the best I could to mitigate weak spots with knots. Most of the visible knots are at a glancing angle to the chair leg, so I think those knots are not that structurally damaging. Only one has a knot that goes straight through. I tried to put that knot in a part of the leg that was thick, hoping the extra mass there will survive the Tony test.

In a way, these legs are an experiment to see if they will hold up over time. It's not best practice, but there are plenty of chairs in the world with legs made of MDF, so I predict they will sit. At least for a while.

Next up is to make the seats from 18mm laminated pine. You know, the stuff wrapped in plastic!

There's still plenty of time left in June for you to build your chair. Let me know what you are working on!

Friday, June 9, 2017

Un-Asked-For Advice For "Sven"

I am lucky in that I often get to chat with Jonas from Mulesaw when he is at work. He is chief engineer on the starship "Enterprise," and basically is sent to work for a month on his ship and then gets a month off at home where you and I rarely get to hear from him.

Jonas mentioned to me yesterday that one of the officers on his ship is interested in getting started in woodworking. I don't know this officer's name, but Jonas said he lives in Stockholm, so I'll call him "Sven."

Sven is single (aka: no one to keep him from spending all his money on Lie-Nielsen tools), and started by buying a set of Narex chisels and joined a woodworking club where he can go to use power tools like table saws, jointers, planers, etc.

I thought it might be an interesting mental exercise to recommend to him what tools he should consider.

Especially since I wasn't asked for my opinion.

This is fun because everyone is different, and there are lots of opinions out on the internet (including on this blog) of what a hypothetical "beginner" should buy to do woodworking. This case is a little different, because we know something about him.

Shannon Rogers recently put a video up on his blog, the Renaissance Woodworker, his opinion of what a beginner should put in his kit first, and it looks an awful lot like what I recommend. Since we know that he already has a set of chisels and access to some woodworking machinery, I'll tweak my recommendation especially for Sven.
A great first project could be saw benches.

Chisels


First, I'll recommend putting all of your new chisels away in the box and not using them, except for the smallest one, a medium one like a 10mm, and a wide one like a 25mm.
Photo credit: workshopheaven.com
This might seem sacrilegious, focusing on fewer chisels will allow you to keep them in better shape and assist you greatly in your sharpening skills.

I find I very rarely need a chisel that is a specific size, and I have gotten by just fine by using a small number of chisels like this for a few years now.

If you don't believe me, remember I said so when in six months you reach for a chisel out of your nice graduated set and choose one not because it is the exact size you need, but because that one is the least dull of all of them. Keeping seventeen chisels razor sharp and perfectly tuned is much more difficult than keeping three that you use all the time that way.

After you get used to these three chisels, you can then add another one or two into your working set when you have a reason to do so.

Planes


I still need to stick with my recommendation of a jack plane being your first plane. If you choose a Lie-Nielsen #5, it will work perfectly right out of the box. Take a close look at a bevel up jack, too. This could be the answer for you. I really like mine and use it to do an awful lot. Stick with one blade for now (It's easy to get caught up in buying three different blades that you don't need). If you get the Veritas, you have the option of the A2 blade (like the Lie-Nielsen), O2, or PM-V11, Lee Valley's proprietary powdered metal blade. I would go for the O2, or maybe the PM-V11 if you want to spend a bit more. You'll also get excellent results out of an A2 blade. At this point, you don't know what you prefer yet, so it probably doesn't matter.

Another option would be to get a good vintage plane. Bailey style planes were made for a long time in Sweden, and those are awesome because they come with a blade made by one of the most fantastic tool steel blade makers of all time, such as E.A. Berg. The plane bodies themselves are of widely varying qualities, in my experience, so if you go this route you would benefit picking out your prospective vintage Swedish plane with the help of an experienced hand tool junkie. I'm sure Bengt would love to help.

I would recommend using this one plane for a while to get the hang of it, and if you think you need more planes, get a smoother (probably a #4, or maybe a #3 if you like that better), and then a #7 jointer (or a #8, if you can find one).
My vintage Sargent planes. A #4 size and a #8 size. They work every bit as good as a Lie-Nielsen now that I've tuned them up.
Jonas said he recommended to you one of Veritas' moving filetster planes. I hadn't really thought of this as a plane for beginners, as they are pretty expensive, and they are not absolutely necessary. If there is money burning a hole in your pocket, you could do worse. This plane works like crazy right out of the box. Adding it to your kit sooner rather than later will have it's biggest reward when doing dovetail joints. Of course dovetails are possible without it, but this plane will make the inside corner of your joint look like you've been making dovetails for decades.

Other Tools


Check out my series of posts about hand saws, sharpening equipment and layout tools. I still stand by those.

Except that I've moved to oil stones. I suppose I need a blog post about those, now.

What else should Sven spend his hard earned Starfleet pay on? I know there are about 50 million more opinions out there. Let's here some in the comments!