Friday, November 29, 2013

Building a Panel Gauge Part II - Beam Me Up! - SLIDESHOW

While all you fine Americans were busy watching football, eating turkey, and enjoying a holiday, I got to spend the whole day in my shop. While both my wife and I are employees of the federal government, we are not employed by the same government. She had to go to work.

This was good for my project, because getting the beam set up on this panel gauge was something I wasn't sure how to do before I started. After having messed up the beam insert once (documented in the first post of the series), I was running out of scrap ebony and didn't want to goof up again. It had to be right this time.

I made the insert a bit longer than the original because the blade I am using on this project requires a wedge to secure it. Check out the video to see what I did.


Give Me Lots Of Sugar (Bliss Blood & Al Street) / CC BY-NC-ND 3.0

Geek alert:

I finally found a slideshow creator for linux that I am happy with. It took a little to get used to, but it seems to work. It is called Imagination and is even in the Linux Mint repositories, so there is nothing weird involved to install it. At one point I was downloading pictures from my camera to my Linux machine, editing them on my Mac, and using Windows to do the slideshow thingie. This is way better.

Monday, November 25, 2013

Building a Panel Gauge - Part I

A while back I made a post about a panel gauge I got on eBay.  I really like the way it looks, and it even seems to work.

A neat vintage panel gauge.
I have never seen a panel gauge like this before, but was surprised to see practically the same one on the Full Chisel Blog.  Stephen said it was in Salaman's Dictionary of Woodworking Tools.  I didn't have this book, so I picked it up (worth it).  Sure enough, it was in there:

Interesting form.  It even has the oval shaped beam.
As soon as I unwrapped the box with this gauge in it, I knew I wanted to build one similar.  The only real weakness with this gauge is that some yahoo replaced the original cutter with a nail, and while driving the nail they cracked the boxwood insert.
The cutter leaves a bit to be desired.
Today I decided to get started.  I was given a cutting gauge replacement blade for an Asian style gauge (thanks Jonathan!) It has a single bevel and should leave a nice, crisp line once installed in a good panel gauge.  It will need to be secured with a wedge, which I haven't completely worked out yet.

I decided to start with a test piece to see if a wedge will hold this blade tight in a little piece of beech.  Luckily, I have a 1/10" chisel that worked perfect.

This will work fine.  The wedge is a template for a H&R project.
Since that sort of worked out, I went through my pile of what I now consider to be scrap to find something I can make this project from.

I say scrap because years ago I bought a whole bunch of neat figured pieces, but have yet to find a project to use them on.  I found out that if I consider this wood to be scrap, I am more likely to use it.  It was just very expensive scrap.  I found a really nice pair of bookmatched figured maple boards.  I haven't built anything that needed this bookmatched pair yet, so I guess I never will.  One of them is going to sacrifice itself to this project.

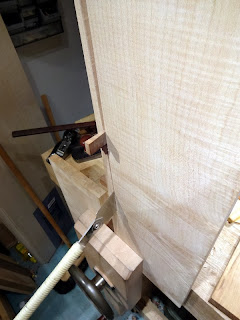
I wanted the grain for the beam to be as straight as possible, so I layed out a line that followed the grain as best I could and cut out the beam.


This should work out beautifully.

My saw bench is on a job site, so I'll use my 'plan B' Ryoba saw.
Once I had the beam out, I spent a few minutes squaring it up.  As an aside here, I am learning that squaring stock up perfectly (this piece needs to be dead nuts perfect) is not nearly as hard as I used to think it was.  It is just a matter of marking it out and planing to the line.  I only measured this thing because it will need to precisely fit the hole in the stock.  It is about 7/16" tall and 28" long, which is about four inches longer than the original.  Plenty if I goof up and have to cut some off.

The next stop is to join the boxing insert at the cutting end. I don't have any more boxwood, but I do have a couple of tiny offcuts of ebony that should make a nice insert and wedges. After careful consideration, I decided to disassemble the old one to see how this sliding dovetail was done. It also made it easier to transfer measurements from the original.

disassembled I discovered the shoulder was angled.
 
Having disassembled the original, it was an easy matter to transfer the measurements and begin fitting the insert.  It starts very much like cutting a tenon.

Fitting the insert was much simplified by doing it while the beam was still square.  After some fiddling, I got it to fit, although a bit sloppy.


A decent fit, it will look good.
Then as the last move for the day, I thought I would trim it to fit.  I turned it over on the bench hook, and cut the extra bit off.

The only problem:  it must have slid out a bit when I turned it over.
the options now are to start over making a new insert, or (strangely enough) make a panel gauge with the original configuration of the nail as the blade.  This insert now is the same size as the original.  I intended for it to be a bit longer than the original due to the blade I have needing a wedge (and consequently more room).

What would you do to recover from this mistake?

Tuesday, November 19, 2013

Another Cribbage Board


Pear and maple, that I made yesterday, next to walnut and pine from today.
This time a three-handed version.  If you think you could use practice drilling a couple hundred holes, this is a good project.

Drill, baby, drill.
This is a bit of an update to my post from yesterday about finishing with wax.  Today I tried something new, pure beeswax.

Following the instructions Don Williams sent along with the polissoir, I rubbed a block of beeswax directly on the wood.  Then I went to town with the polissoir.  Walnut has some open grain, and he says this beeswax can actually fill the grain.  I think I need a bit more practice with the grain filling, but overall the effect was very good, as you can see from the photos.

I'll have to do some more side by side comparisons, but I might switch to this method for open grain woods, and stick with the Dick wax for closed grain.  The beeswax takes a little more elbow grease to apply.

Today I met someone who commented on my cribbage board, in that he had no idea what in the heck it was.  It looks like a stick with a bunch of holes in it.  I guess I didn't properly describe what a cribbage board is.

Cribbage is a card game and the board is used to keep score.

I always wondered why on a traditional cribbage board you make two laps to get to 121 points, rather than there just being a bigger board with one lap.  After having drilled a zillion holes by hand, now I know.

Here is a quick AAR for these boards:
  • making a cribbage board is a great way to use up some awkward scraps that you think are too big and nice to throw out.
  • a project like this is perfect for practicing basic skills, like squaring stock by hand.  In reality it doesn't need to be perfect, but if it is you will be happier.
  • Drilling 186 1/8" holes by hand takes a lot longer than you want it to.  I would love to find a hand tool that can drill sixty holes at once.  I wonder if the suicide rate among professional cribbage board makers is as high as for dentists.  It should be.
  • This is a brilliant way to practice and test finishes.  I have some more projects coming up with these woods, including a walnut dining table, and am seriously considering beeswax as a finish.
  • Having done lots of practice previously making chamfers by hand, this project is way easier than I think it would be with machines.
  • Hindsight is a great thing.  It dawned on me with the pear board, that the maple plug for the space to store the pins could split the entire board if someone inserted it following with a hard rap to seat it.  For the walnut board I used a pine plug, hoping that being softer it will seat more firmly with less pressure.  Cork probably would be a smarter idea.


Monday, November 18, 2013

My Three Favorite Easy Finishes - Part III: Wax

I think wax gets a bad wrap.

If you are learning all of your woodworking from reading magazines or the internet (I'll admit I am), then you will undoubtedly hear that wax is not very strong as a finish and tends to let the wood get dinged up.

Newsflash! If you abuse your furniture, it will get dinged up.

Plain old furniture wax is a fine finish, and has been used for hundreds of years.  Indeed our dining table, which we bought new, is finished only with wax.  We take good care of our furniture and this table has looked great for years.

There are some very good reasons why, in my opinion wax is one of my favorite finishes. In no particular order, here they are:
  1. Easy to apply.
  2. Looks (and feels) fabulous.
  3. Easy to maintain.
  4. Easy to repair.
  5. It is cheap and plentiful.
  6. Can be used on top of practically any other finish.
  7. It won't kill you.
 Let's go through these one by one.
  1. Ease of application
My wax of choice at the moment is Dick wax, from the company Dictum.  My second favorite is antique wax from PNZ, and if I was in the US I would use Johnson's paste wax.  These waxes are pretty much based on beeswax, probably with some kind of thinner in it to make it softer.

You'll also need a clean(ish) cloth.  Here I am using part of an old sheet.

Everything I use for applying wax.
I like to put the cloth over my hand, and grab a little scoop of wax out of the middle of the container.

I rarely use more than this.  When it runs out, get some more.  Using a bigger scoop of wax only tends to make things messy.
I wrap this ball of wax in the cloth so it looks like this:

A ball of wax wrapped in cloth.
Now I scrub the surface that needs to be finished with this little bit of wax wrapped in cloth.  This becomes a nice little applicator.  The friction of the applicator on the wood generates just enough heat to melt the wax and spread it thinly and evenly on the surface to be waxed.

Apply away.  Don't worry about being too perfect with everything, it will get buffed out later.
If you haven't burnished the surface yet, you can do it now.  Or both before and now, like I am doing here.  This little trick really makes the finish something special.  Of course, if you don't have one, do the best you can.

Ancient Chinese Secret.  I mean, French!
Once wax is slathered all over the project and you are happy, let it set for 10 to 15 minutes.  It is ready to buff when the wax turns to a hazy film.

Freshly applied.  Wait about 10 more minutes.
Buff away.  For this small piece I just wiped on it like crazy with a clean cloth.  A bigger piece I would use a wadded up cloth and buff in circles.  Every little while undo the cloth, re-wad it up to expose clean cloth and keep buffing.  It won't take long and you'll have wiped away everything that will wipe away.

Buffing Dick wax.
If you feel the need, you can repeat until you are happy.

Done.  I find I can't keep my hands off of it!
2.  Looks and feels fabulous.

I love this finish because it imparts a finish on the wood that people seem to want to touch all the time.  That's what it's all about.

3.  Easy to maintain.

My waxed furniture tends to get a bit dingy after a while.  So, once a year or so, I'll repeat the process.  The new wax will dissolve the old, so it doesn't really build up.  If it gets scratches on it, new wax will wipe them away.

4.  Easy to repair.

If the scratches go deeper than the finish, such as when the aforementioned abuse, the area can be fixed using any method you choose.  Wax can then be applied over the repair, and it will blend in with the rest.  The entire piece does not need to be stripped and refinished.

5.  It's cheap and plentiful.

You can get a fairly decent furniture paste wax at any big box store.  For years I used wax from the local borg, until Dictum opened a store nearby.  Who could resist Dick wax?  It turns out it is really nice stuff. One can of paste wax lasts a long, long time.

6.  It can be used on top of nearly any finish.

Even if you use another finish, I would recommend topping it off in this manner.  I did it to a bed that I painted with gray lacquer.  The wax gave it a little bit of a shine that it was missing, and feels much better when you touch it.

7.  It won't kill you.

I like to apply it in my shop, which is basically a 100 square foot closet.  There are no toxic fumes, and once I wipe it down I can bring it upstairs to our living space to cure.   Can't do that with very many other finishes.

I'm sure there are other benefits to wax, but these are the main ones that vault wax to my list of top three easy finishes.

If you enjoyed this post, check out the rest of this series.  Next up on my list:  boiled linseed oil.


Quick and Dirty Gift Project - Cribbage Board

Pear and maple scraps
This time of year is stressful for me because I am probably the world's worst procrastinator when it comes to holiday gift giving.  This year I intended for things to be different, and instead of me shopping on Amazon on December 23rd, I wanted to send out some wooden stuff I made.

Great in theory, but now things need to get in the mail if they are to have any hope of getting to the intended recipients on time.  A project that can be finished in one session is called for.

I came up with a brilliant concept to help me out with this - a cribbage board.

What could be simpler?  It's just a board with a bunch of holes drilled in it.

I found a clever design while googling for ideas.  I wish I could take credit for it, as it is a neat little cribbage board.  It is intended to be a travelling board, as it it easily transported.  OK, a regular cribbage board is easily transported, too, but this one has a more unique look.

I started by looking in my scrap bin for a nice hunk of something, and came up with an offcut of pear.

Don't ask me for measurements on this piece, I don't know.  It's about "yea" long because that's how long my scrap was.  It is "yea" thick because that is the biggest this stick would be after planing everything flat.
I know, it doesn't look like much.

Projects like this are a great opportunity to practice hand tool fundamentals.  There is no reason this project needs a board that is perfectly square, but I marked it out and planed it down to perfection just because I can.

That, and I think the more one practices this skill the more accurate and faster one becomes.

After that, I marked a line on two faces, and planed down to the line to establish the big chamfer which will become the bottom.  It only takes a minute with a course plane.

With small pieces I sometimes clamp the plane up and push the stock over the blade.
 With that done, it is time to mark out lines for the holes.  I didn't bother finding the center.  I layed it flat on my bench, pushed a piece of particle board next to it that looked about half as thick and drew a line.  It looked good, so I took a thin piece of plywood and set it on top of the particle board to draw the outside lines.

No need to make this rocket-surgery.
I used dividers for the layout.  I eyeballed about how far I wanted the first hole to be, and marked that off of each end.  I transferred those marks to a story stick, and stepped off six equal measurements.  From here, I stepped off a distance that I thought would look good for the holes to be apart, leaving some space traditionally used to make counting easier.

An easier way would be to buy a store bought template.
All in all, accurately marking off the holes wasn't too bad.  It took only a little less time that actually drilling them out.

I used my eggbeater Miller's Falls #5 to drill the holes.  A drill press might be nice for this, but I don't have one.  I don't think it would have been any faster, as I am only drilling 1/8" holes about half an inch deep or so.

If I didn't have an eggbeater, I would probably use a cordless drill.  Just be carefull not to go too far.  I used masking tape here for a depth stop.

Do yourself a favor and buy some of those nice drill bits from Lee Valley.  They made this job a snap.
 After all the holes are drilled, I cleaned up the faces with a fine set plane.

I have to say, these are really cool shavings.
The only thing left is a space to store the pegs while not in use.  I used a 5/16" bit in a breast drill to make a cavity in one end.  Turns out it isn't centered too good, but that adds to the "hand-made" charm.  I made a plug for it out of a scrap of maple.

Hopefully, someone doesn't bang it in too hard and split the pear wood.

This tool is great for bits that are too big for the MF#5.
That's it!  All that is left is a nice finish that I'll blog about in a separate post.

And a deck of cards.

In case you are wondering, I am using store bought pegs from Lee Valley.


Sunday, November 10, 2013

My Three Favorite Easy Finishes - Part II: Surface Prep

This almost sounds like a mean trick. After the first post, the introduction to this series, perhaps I should have named this one "Part II: Second Introduction."

I would not consider myself an authority on finishing, but I have a blog and can talk about whatever I want, so here it is.

But this is no trick. One thing I have learned is that the surface doesn't get any better when you apply finish, no matter how bad you want it to. In fact, it is quite the opposite; finish will accentuate any defect in the wood as a result of being in a hurry.

That being said, I don't go nutso polishing every completed surface down to a half-micron. It kind of depends on the wood you are using combined with the intended finish and look you are going for.

Ninety-nine percent of all the finishing I do goes on directly after smoothing with a plane, with the exception of one step I recently started.


Burnishing. My current surface prep regimen now ends with a polissoir. I think you should, too.  Don Williams sells these, but I think it could be easily made with some broom straw.

Almost every piece I make now gets burnished with this thing before the final finish goes on.  All you have to do is wrap your fist around it and scrub like crazy more or less in line with the grain.  The burnishing effect this imparts makes the wood smooth and shiny.

If you are using a wax finish, you can charge the polissoir with molten wax, but I often use a dry one first whether or not the piece gets wax.

I find that this step, more than anything else I do, really makes the finish sing.

I almost never use sandpaper to smooth.  I go straight from a smoothing plane to the polissoir, to finish.  If I have some plane tracks, I remove them with a scraper, and only use sandpaper for some little parts where it just takes a minute.

The very first piece I built (a bookshelf from home center fir) the instructor had me glue and assemble before he gave me a random orbit sander.  I wouldn't think of this anymore.  Definitely plane each piece smooth, burnish the parts that show, and finish to suit.

Next in the series:  wax.

If you enjoyed this post, check out the first post:  Introduction.

Wednesday, November 6, 2013

Cocobolo Box

Like a doofus, I didn't have my camera with me in the shop today. I was relegated to taking this photo with my phone.

Cocobolo, walnut and maple.
This box is cocobolo, with walnut panels and maple keys. The light strip that is holding the lid on is just part of the cocobolo board. It is so light and creamy in color because it is sapwood.

Strangely, the walnut I used for the floor of the box is a nice, rich, dark color that matches the box well. The top one is much lighter.

I hope it darkens up with time.

It is finished only with wax, which I will talk about in a future post.

Monday, November 4, 2013

My Three Favorite Easy Finishes - Part I: Introduction

There is a lot of chatter on the woodworking blogosphere at the moment regarding finishing. I might as well toss in my two cents.

First, a little bit of my personal history so you can see where I am going with this. A couple years ago I got a masters degree in adult education and training. Yay for me!

January 2011

What I learned was that adults learn different than children. School children may learn in a classroom and accept what the teacher is telling them because the teacher is an adult and should know.

Us adults like to learn things on our own. When we are ready for a certain piece of information, chances are we will seek out the information and figure it out. Good instructors of adults make it easy for adults to draw the information out on their own, as opposed to attempting to impart their wisdom on empty brains.

What's the moral, you ask?

Well, don't take my word that you will have the same favorite finishes after reading this. Give it a try and choose for yourself.

If you are frustrated with finishing, perhaps you are ready for what I will reveal in this series.

My favorite three finishes are, wax, boiled linseed oil, and spar varnish.

These are the finishes I use most. I heeded some advice a while back, probably from one of the folks at Popular Woodworking, that you should get really good at a couple of finishes. I think this is good advice because there are so many out there, that one can flounder getting crappy results with every next thing that he tries.

The next few posts in this series will be about what I do with these materials for finishing. Hopefully, if you do what I do, you'll get the same results.

What I would really like to see, is if you haven't tried one of these finishes, give it a go and see what happens. When you read what I have to write about it, you'll find that you've already discovered most of it on your own, and perhaps there is a little nugget of info in here that you might be able to take and apply to your work.

Perhaps you will discover something that you would like to share that I don't discuss.

More than likely, you already have a finish or two that you use and like.

Regardless, do yourself a favor and learn something in the shop today. Not from reading my blog, but by trying something that you want to learn.

Sunday, November 3, 2013

This Project Seems to be Taking Forever!

OK, it IS taking forever.

Short version:  I am working on a small box that I started years ago.  It should be done soon.

Loooong:

Let me go through this from the beginning:

I need a couple of gifts coming up, and I thought it would be great to make something. It would be even better if I could actually finish these projects before they are late.

To help speed things up, why not pull out an old project that has been sitting unfinished? Why, what a great idea! I have just the thing.

Around the turn of the millenium, way back when I was hard core into machines and thought handtools were for weirdos, I discovered that you could buy lumber from eBay. Shipping was cheap in those days, and fancy exotics are available.

I got some nice little bits of claro walnut, figured maple, a pile of exotic offcuts, some cocobolo, and some stunning figured curly ebony. I thought it would be fun to make a bunch of humidors.

The ebony arrived, and was so gorgeous, I called the guy and ordered all of the ebony he had left. I wound up with six or seven nice one inch boards that are between three and six inches wide and about two feet long.

Those were expensive.

I figured I would get a plain piece of ebony, too. That way, I could practice up and when I got good enough, I would attempt something with that fancy ebony.

So there it still sits.

In the meantime, my career and my personal life made woodworking less practical, and here I am more than ten years later with a bunch of fancy, expensive scrap.

I guess that these are the last exotics I ever will purchase. It is too much like working concrete.

In the meantime, I have some gifts to get finished and in the mail. I chose to revisit two old projects:

A couple of very old projects.
The top one is a small ebony box, the plain one. It looks like I started some dovetails, with the intention of cutting the box open once it is done to make a lid. Back in those days, I didn't know you could fit dovetails right from the saw, so there is a lot of fiddling before the one joint will fit. Then, I will have to dovetail the rest. No telling what this will look like when it is done, but it is started, I might as well finish it.

The bottom one is cocobolo, with mitered edges for a small box. It looks like I have a bottom fitted out of walnut. My guess is when I worked on it last I had some walnut that would work, and anything is better than the plywood that I originally intended. Hopefully I meant to try my hand at veneering, because cocobolo with plywood accents is just crazy.

There was only a groove in the bottom, and rather than mess with hinges, I decided to convert this project into a box with a sliding lid. Since the bottom is walnut, I picked a piece of walnut for the top, plowed a groove for it and glued everything up.

Glued up, with the lid fitted.
I pre-finished the inside with Dick wax and a polissoir.

I was thrilled to be able to use my rehabbed rabbet plane to cut the rabbets for the lid. I also used it to cut the chamfers. Using a fenceless rabbet plane really frees up time otherwise spent with fiddling with fences and depth stops. This lid was done in five minutes. I bet it would have taken me two hours doing it with a table saw.

I think that it needs a little more strength than glued miter joints, so I decided to use keys to strengthen things. I chose maple, thinking it might match the sapwood on the top near the lid. We'll see. To do these, I just cut diagonals using my biggest crosscut saw (for a wider kerf, and because cocobolo isn't any fun with a ripsaw), and inserted the keys.

Here is where we are with this project now:

Keys freshly glued.
Hopefully tomorrow I can get the keys sawed flush and do some shaping to this box before the wax goes on.

I would love to find out I am not the only one who has unfinished projects older than 10 years hiding somewhere in the shop. Please let me know when you plan to finish yours.