Wednesday, September 27, 2017

Laying Out The Board Without Measuring (Part VII)

I don't quite understand how progress in the shop can suddenly come to a screeching halt for no apparent reason. It seems to happen to me on every project lately.

Yes, I am still working on this simple project. No, I haven't gotten anywhere in the last week or two on it. Yes, this post is about work that I did weeks ago, but no, I haven't blogged about it yet.

I blame the Chinese.

Actually, the Chinese have been good to me. I started a new job teaching English online to Chinese kids. The kids are great, and I am having good fun. The only problem is it is interfering with this project.

Perhaps writing a bit about it will get me back in gear.

ACTUAL WOODWORKING CONTENT STARTS HERE:

I am using a piece of mahogany that used to be a drawer front. I rescued it from a dumpster, and this particular piece is very nice. It yielded two boards of appropriate size for this project. Perhaps if I ever finish the first one, I'll make a second.

I printed out a paper gameboard about the same size, and instantly decided that I didn't want to copy it. I want to use the board I have just as it is. To do that, I'll need to lay out the squares on this board.
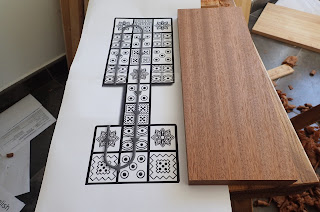
Two mahogany blanks and a paper template that I won't use.
My plan is to have a bold chamfer run along the entire outside of the board, and then have the squares raised on the board above recessed borders about the width of my thinnest chisel.

The chisel I have is about 3/16" or so, so that is what I'll use for measurements.I set my marking gauge at 3/8", enough for the chamfer and the outside border of the game, and ran the gauge all around the outside.

The boxes must fit inside this border.

The trick for laying this out perfectly now lies with the use of dividers. I did not measure a single thing. I used dividers first to divide the width of the target area into three, then I divided the length into eight equal parts.

I just had to make sure I also allowed for the width of the border to be added to the size of the intended square.
It took a couple tries to get the perfect measurement from the dividers. It was smart to mark the points in an area that will get removed later.
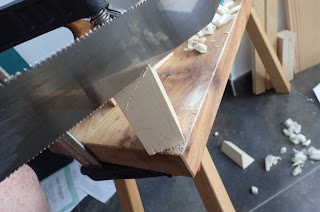
Once that was layed out, it was just a matter of sawing cross grain rabbets to depth, and plowing grooves along the grain to define the raised boxes.
It is turning out just like I planned. Don't screw up the crosscuts!
I then carefully cut out the notches for this particular board. The hardest part was shaping the chamfer in the 'U' shapes.
This is where this project sits now.
I think on the next one, I will wait to cut the chamfer until all of the boxes are done. It will make it a bit easier for my marking gauge and plow plane fence to register where it is supposed to be.

Next up, I will try chip carving for the first time to define the designs on the board.

Tuesday, September 5, 2017

Royal Game of Ur Dice That Anyone Can Make - Popsicle Sticks (Part VI)

It occurred to me that some enthusiasts of the Royal Game of Ur might stumble upon this series of blog posts. Here is a set of dice that require almost no skill at all to make.
Marked on only one side.
Yes, that's right. Popsicle sticks.
Popsicle sticks

Larry left a thoughtful comment on one of my posts last night which got me thinking. He said there is research that flat sticks were probably the most common dice used for this game.

I made some. It took about five minutes.

All I did was cut the popsicle sticks in half (as you can see, I didn't even get all the color off of them), round over the square ends with sandpaper until they matched the roundover on the un-cut end, and in my case I used a couple of leather punches to make a mark on one side.

A mark could be made on one side with anything. Woodburning, Magic Marker, crayon, anything.

And because I'm me, I put on a coat of boiled linseed oil, then wiped them down.
These dice will work just as well as any other. And if one gets lost, a good excuse for a treat is born.

UPDATE:

Larry made some similar dice from some dried bamboo that was in his back yard. One side is naturally black. Here's a photo, and his description is in the comments.
Larry's bamboo dice.
UPDATE #2:

Larry made an entire set.
Nickels would have been cheaper. Just sayin'.

Monday, September 4, 2017

Easy Version - Knuckle Bones (Part V)

In my research of The Royal Game of Ur, I found out that often this game was played with knuckle bones from goats. I find it hard to believe that such a simple game most often used the tetrahedron dice when they aren't easily made.

All this game really takes is an opportunity for all four dice to show either a one or a zero. This could be done with traditional six sided dice. A roll with an odd number is one, and an even number is zero.

I would much rather have something a bit more traditional than plastic dice, though. One video I saw of a guy who was making game sets from cardboard had little rectangular shapes, which I immediately recognized as his version of the dice.

I could do better than cardboard, though.
My version of knuckle bones. Yes, I made an extra.
This was dead simple to do. The hardest part is accurately planing my stick. I used some mystery wood, which could be goncalo alves, but I think probably not. It is very heavy.

Once I had the stick planed as accurately as I could at somewhere near 1/2", I marked out six points on a centerline with my dividers.
This stick is long enough to make five, just in case I screw one up.
I drew layout lines at each of these points, and then marked the centers of each piece on a centerline for my inlay. I did this on both sides.
Here I am drilling holes.
I had some big 5mm bamboo skewers, which should make Greg happy. After drilling in each piece from both sides, I glued in a bamboo peg in each of the holes.
Mine go all the way through. Much easier, and it isn't likely they will pop out.

Waiting for the glue to dry.
After these set for a bit, I got impatient and cut them off with my flush cut saw. Yes, I know hide glue takes 24 hours to cure, but these pegs aren't going anywhere.

Probably.
Flush cutting.

Here's what it looks like.
I also chamfered each corner with two swipes on my block plane. Doing that now will make them much more uniform.

Next just cross-cut as accurately as possible. I still cleaned up each end with a shooting board.
Done!
I'll wait until tomorrow to polish the faces and apply finish.

Two positives regarding this style are they are much easier to construct, and being easier to make, they are likely much more accurate.

The only negative I can see right now is that they are a lot bigger, which might be a challenge for players with small hands.

I'll report back after having played the game several times with each set of dice.

Just in case you are wondering, I haven't given up on the tetrahedrons. In fact, I finished cutting out one of those today, too.
Progress!
UPDATE:

I found this video, which shows the game played with replicas of actual knuckle bones.

Sunday, September 3, 2017

Tetrahedron Success #2! (Part IV)

Right off the saw!
Late last night I got an email from a reader:

 Make a cube. Label all the corners as A or B so that each edge connects an A with a B. Now draw straight lines connecting the A corners. Saw off the B corners using those lines. You have an accurate tetrahedron without needing to make any length or angle measurements. The edge length of your tetrahedron is 1.414 times the edge length of your cube. You recognize the square root of two there.  

Regards,
Tim

This got me thinking that perhaps there is a good way to lay out the tetrahedron with no measuring at all. Just my cup of tea.

I asked Tim for a sketch, and while I waited I found this on YouTube:
It turns out this is exactly what he was talking about. This second way is a great way because there is no measuring, no math calculations, no angles that aren't on my combination square to worry about.

Right up my alley. I decided to try it out.
Start with a block of wood. Duh!
This way is very simple. Start with a four-square block of wood, and ensure one end is also square. (Five square?) Mark the remaining face with a marking gauge, but don't cut it off yet so your clamp has something to hold.

Then, mark the diagonals on each face as per Tim's instructions.
Then it is just a matter of sawing them out like on the video!
 
 I left each of the diagonal cuts a bit short so I could continue to hold the block with a regular clamp. Once I crosscut the cube free, I could easily finish the saw cuts I started.
Cross cut

Perfect cube off the saw.

Finishing the saw cuts.
A pretty darned good tetrahedron!
With just a little care, I was able to make this tetrahedron without any trimming with a plane. It is plenty good enough for my purposes. I am excited now to try it on the real thing: ebony.

The only reason I want to use ebony is I happen to have some laying about. I think pretty much any hardwood would do for these dice. I think the heavier and tighter grained, the better. We'll soon see.

What I will do after cutting the ebony out, is polish the tetrahedrons (tetrahedri?) with fine sandpaper. That is, if I can get them as accurate off the saw as I did this pine one. I also expect it to be a bit more challenging because the ebony ones will be smaller.

In addition, I have an idea that I got from another YouTube video for making some appropriate dice from some regular rectangular stock. There's no reason this has to be so complicated, other than I think the tetrahedrons were a more high-end version for the wealthy, just like the original inlaid game board. There is evidence this game was played with knuckle bones from goats.

This can be a simple game that can be made in a hurry. Stay tuned...

Lastly, I would like to give my most humble thanks to both Sylvain and Tim for sharing their knowledge with a simpleton like me. My first instinct was to start whittling on a stick until I came up with something that more or less suited. Both of these methods are highly superior and are capable of repeatable, accurate results. Guys, have a beer on me.

Saturday, September 2, 2017

Tetrahedron Success! (Part III)

You know when you buy something from the big box store that says, "Some Assembly Required?"

If you are like me, you just jump right in and start putting it together. "Directions? Who needs directions!"

Well, apparently I need directions.

I screwed up the first one by not looking at Sylvain's directions. After reviewing what he said, I got it the second try, easy-peasy.
Taa-daaaaaah!
Take a look at Sylvain's first drawing:
Sylvain's drawing.
This is what I basically did. The first time through, I made my triangular stick equilateral. That means using the above drawing that (a) was the same length as (b).

The trick was to make (b) a little shorter than (a).

I didn't want to have to measure anything, but you need to for this. I think if it is pretty close, it is probably good enough for this purpose.

Measure (a), then multiply that number by .866. The product is the length of (b).

Only then should you lay out the lines for the tetrahedron.
Ready to saw out.
The small tetrahedron that comes off the saw needs a bit of cleaning up. I used a plane for this one, but the real deal will be a much harder wood and much smaller. I probably will use a chisel, or maybe some sandpaper.

And, I have an idea for making the white pips on the corners.

If you've missed my other posts on this project, check them out:

Part I:  Project Idea - The Royal Game of Ur
Part II: Tetrahedron Fail #1

Tetrahedron Fail #1 (Part II)

After looking at Sylvain's first drawing, I thought I had this figured out. "Easy!" I thought.
It's not the camera angle that makes it look wonky, it really is that way.
Perhaps I should go back and read his description.

What I thought I would do was lay out a perfect equilateral triangle one a stick, and cut out the tetrahedron using nothing to measure but a pair of dividers.


That doesn't work.

But, I learned something. Stay tuned for my second attempt...

Friday, September 1, 2017

Project Idea: The Royal Game of Ur (Part I)

I once heard a saying: A shop at rest, stays at rest.

This seems to be the trap I'm caught in at the moment.

I'm not sure what happened, I was working along just great on my June Chair project, and in the middle of this project, work just stopped. Not because I ran into something I couldn't do, I'm not sure what put the brakes on.

I'll get back to that project very soon, as I don't think it should take too long to finish those chairs.

In the meantime, I have found in the past that sometimes a great way to get a shop back in motion is to start with a simple project. I think I found one.
Photo from the British Museum. This board game was made about the year 2600 B.C.
This is a board game that was enjoyed in Mesopotamia and other places for over 3000 years. With a record like that, it must be fun. A curator at the British Museum actually found instructions for this game on a cuneiform tablet that was discovered in the British Museum's collection.

Why am I writing about this rather than building it already?

Well, the short answer is I need some help.

The dice used aren't our standard six sided dice, it uses four sided dice in the shape of tetrahedron, or a three-sided pyramid.

If you were asked to make an accurate equilateral tetrahedron from wood, how would you lay it out?
Photo from BBC.co.uk.

I thought I had it figured out last night, but then realized I had an idea for making four sided pyramids. These have five points rather than the four points required.

They look pretty small, which should help. Probably the best way is just to make one, then try to remember what I did so I can make three more.

I happen to have a little bit of ebony which should make for a nice feel. I have a couple ideas for the white pips on some of the corners, but I'm a bit stumped.

I think that after the dice are made, the other pieces and the board itself should be a snap.

What caught my attention regarding this game was this amusing video. Check it out, you'll love it!
UPDATE:

Ask, and you shall recieve. Sylvain was kind enough to send me this drawing, which goes with his explanation in the comments of this post. This looks way easier than what I was going to do!

UPDATE #2:

Sylvain sent another drawing to further clarify. Thanks, Sylvain!