Monday, September 26, 2016

Chair Fail! How To Fix - SURVEY

A bit more than two years ago, I built my first Roorkee chair. It was constructed with black leather and pear wood. I've built a few more since then, but those were gifts, and this one is mine.

This chair didn't get used a whole lot, until I brought it with us to Spain. We have a furnished apartment here, but it was a simple thing to bring this chair along since it folds up into a neat bundle. I find myself using this chair multiple times per day here, as it is the perfect thing for watching TV in our new apartment here.

That is, it was the perfect thing. A few days ago there was a bit of a mishap:
OK, this is a bit of an exaggeration. This was after I removed the offending stretcher.
I probably was a bit careless in sitting in it that morning. I violated my "No Plopping" rule. I plopped and heard a big, "CRACK" and knew I was in trouble.

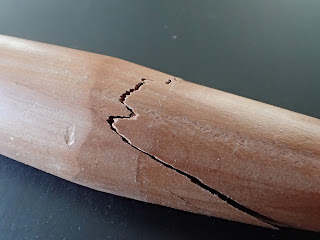
The chair was not as stiff as it had been, and upon inspection, I found the following break in the stretcher on the left side of the chair that goes from front to back. It was on the rear side of the chair.
Ouch!
Upon further inspection, I decided it was a pretty bad break.
Is it really that bad?

Yes. Yes it is really that bad.
I've never seen wood crack across the grain like this before. I think, however, that I know what caused it.

This was the first Roorkee chair I ever made, and I turned the stretchers on a lathe. This chair got me into a bad habit, though. I must confess that I always make this tapered tenon 100% with the tapered tenon cutter from Lee Valley.

The recommended way to make this tenon is to turn the rough shape of it on the lathe, and then finish with just a few turns of the tapered tenon cutter for a finished shape. This method preserves the shape of the tenon being perfectly centered on the dowel.

What I did was turn the dowel on the lathe, put it in a vice and use the tenon cutter like a pencil sharpener to make the tapered tenon from the beginning.

I determined that this really wasn't all that difficult, and since then I've made all my tapered tenons this way.

The big problem, is that it is easy for the tenon cutter to get off a bit. This particular tapered tenon looked like it was bent. What must have happened, is I must have put a bit more pressure on one side of the tenon cutter than the other while turning it, resulting in the center of the tenon not being centered on the center of the dowel.

Long story short, when I put this chair back together, this "bent" tenon was in the back on the side, a position which I have discovered is the highest stress part of the whole chair.

The best fix for this is to turn a new stretcher, corectly taper the tenon and replace.

Unfortunately, I don't think I have enough pear left to make another stretcher like this. If I do, it is in Munich, and not here in Spain with me. For the meantime, I can either try to repair it, or turn a new dowel in a completely new species of wood.

For starters, I think I'll just try to glue it back together and see if that works. I first thought of liquid hide glue, since it's reversible. On the other hand, if it doesn't work the first time, what's the point? Plus, liquid hide glue won't do squat on the crack that runs perpendicular to the grain. Pretty much no glue would.

What I think I'll try is super glue.
How super is Super Glue?
I figured the best part of super glue is it sets in just a few seconds. That is a definite plus, since I have no way of clamping this.
Glue applied.
What I did was squirt as much super glue into every part of the crack that I could. Then I squeezed it together with my fingers, wiped off the excess, and shoved it into the tapered mortise, and put all my weight on it for a minute or so.

The idea was that the tapered mortise would press everything into the shape it needed to be in.

The other thing I did was every few seconds I rotated the dowel, so it did not get glued and stuck to the mortise permanently.

Here's what I wound up with:
Glue is set.
It's ugly, but if it works I will sand it clean and make it pretty again.
The good news is it seems to be working.
When I reassembled the chair, I put the offending broken tenon in a part of the chair that I thought would get the least stress: the front left with the dowel running side to side this time.

The fix seems to be holding. I've been sitting in it for a couple of days, and there were no problems until the other night. I was leaning sideways in the chair, and I heard a snap.

To my chagrin, I could see space in the crack across the grain, but the long grain part of the crack was still holding.
The crack.
 While the crack is outside of the mortise, the long grain glue up that is still holding is deep in the mortise. This seems to be enough that the chair is still holding up.
A bit of a closer view.
I think that this temporary fix will keep together until I get back to Germany next.

I have a couple of options:
  • I could just glue it again
  • saw it apart, and glue it up again with a floating tenon or a dowel. I think this is how I would fix an antique piece. Since this tenon is "bent," I'm not sure it's worth it. Although, I could scrap the current tenon, attach a new piece of wood and re-shape the tenon with the tenon cutter.
  • I could make a new stretcher - although I am pretty sure I do not have enough pear so it might be a contrasting species.
  • I am kind of leaning toward scrapping all of the wood for this chair and building a new one, recycling the leather from this chair.
What do you think? Take my survey, and I will go along with the majority:
Create your own user feedback survey

Thursday, September 8, 2016

Benchless School Box Build - Part II

I didn't get very much done on my build today. It was, however, good to get a little bit of woodworking done. It is clear that I am a bit out of practice.

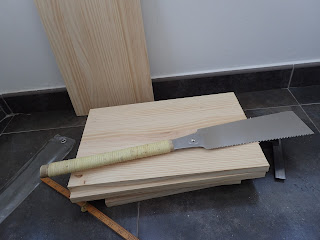
Pretty much all I accomplished was to get the rough boards cut out for the carcase.  To do this, I spent the usual inordinate amount of time looking the boards over to see where my cuts should go.

Oh! I almost forgot. I also got some sharpening in. I brought along two beautiful chisels given to me by Kim Malmberg (@kims.tagram on Instagram), the big one and the medium one. The small one was a great size that I brought along from my mounting collection of Nordic chisels I call the Swedish Hoarde.
A few of the tools I brought with me.

I sharpened the two smaller ones, and my Veritas BU Jack plane using the oil stones I brought along. I had to run to the corner hardware store for some appropriate oil, though. - Back to our scheduled programming:

Once I figured out where the cuts should go, I laid them out like this:

Laying out crosscuts.
I only have a six inch square, which is pretty small for this. For a straightedge, I used my 1.85 Euro bench as the edge on it was square enough. I used the Starrett to double check.

I decided not to use the bidet for crosscuts, as I have this little boink in the wall that worked just fine, using my feet as workholding ala the Japanese.
I need to get some cool toe-socks.
The biggest problem here, is sawdust gets on your socks. Other than that, it works. I think with a little practice, I could probably cut a nice straight line this way.
Close up.


Finished cross cuts.
I have to say that this works just fine. I used an old towel to try to keep the wall and the lumber from getting dinged up, and the OSB seems to work pretty good at leveling out the small inconsistencies in our tile.

The big issue was that everything seemed to take twice as long as in my German shop. Partly as I was learning how to do it this way, and partly because I have all of those jigs and workholding devices in my German shop for a reason - to make things easier and quicker.

Tomorrow there are a few more crosscuts to get the pieces to final dimension, and I have to figure out a way to shoot the ends square.

'Till then!

Wednesday, September 7, 2016

A Woodworking Bench for 1 Euro 85

That's right - a buck eighty-five!

Curious?  Here's a photo:
My 1 Euro 85 cent  workbench
Oh, gosh! What's he on about now?

Let me back up a bit. Here is a photo of my new shop in Alicante, Spain:

My new shop.
If it looks like a home office, that's because it is. We recently moved to Spain. The Frau went ahead to pick out he apartment. She asked me what my MUST-HAVEs were for a place here. I told her that was easy, only one thing - a shop.

She said, "No."

While our place is beautiful, I am going to have to get creative with furniture building here.

A little aside - I would like to make a shout out to Ethan, the Kilted Woodworker, and to the NAF Benefits Office. And a big "Eff-You" to the Defense Finance and Accounting Services in Indianapolis. DFAS took ten weeks to get me a report I needed for some retirement paperwork I had to get done before I left federal service on Monday.

Since they wouldn't scan me the report or mail it to my German address, I had them send it to the Kilted Woodworker, who agreed to scan it to me when it arrived in his mail box.

Everything finally got submitted two days before the deadline and the NAF Benefits Office processed it in one day. Plenty of time for me to mail off what I needed to mail to them on the last possible day. Thanks, Ethan! I literally could not have done that without your help.

Back to woodworking:

I brought a very modest woodworking kit with me. Basically it was whatever I could fit in a plastic tool box I had. The idea now is to get some good woodworking in with the resources I actually have.
Yes, it's a bidet.
Ever wonder how to use one of these?

Me too. I figured it's the perfect hight to use as a sawbench for crosscutting.

Joking aside, I plan on participating in Reddit's Popular Woodworking School Box Build. My plan is to prove you can do decent work with far fewer resources than you might think necessary.

Today I took the bus (we don't plan to get a car) to a local home center to buy some construction lumber for this build. Their construction lumber was crap, but they did have some plastic-wrapped laminated wood that will work. I picked out two of the nicest boards of appropriate size I could find. As a bonus, this is the kind of laminated wood where the pieces that make up the lamination are full-length.
Some assembly required.
I also got some nice pine strips intended for molding that were clear and relatively straight. these bits are around 1/2", for the bottom and box moldings. If there is enough of something left over, I will do the till, too.

I also bought some brad nails and a couple of really nice brass box hinges, because they didn't have anything like the strap hinges in the article that would work. These should look very nice.
Here's everything in my wheelie bag while we wait at the bus stop.
Now that I am not in my beloved Munich shop (for at least two years), I have decided to focus more on the positives of my new workspace: There's a gorgeous view, plenty of natural sunlight, a computer is in there, and air conditioning.

What more could I want?

BTW, I was serious about using that piece of OSB for a workbench. Wait until you see how this build goes! I was at first tempted for a first project to be a sawbench, a bench hook, or some other piece of workshop convenience, but I decided to try an experiment, and do a full on furniture build without any of that.

Wish me luck!