What makes them good to use for furniture is they are square in profile, and tapered. That is, they are thicker at the top than at the bottom. These nails, unlike cut nails, are tapered in both directions, so the profile is square no matter where on the nail you look.
 |
| Tapered nails hold like crazy. |
When using these nails in a softwood, I find a tapered drill bit that is just a bit undersized works just great for a pilot hole. With the tapered wedging action of this nail, a pilot hole is pretty much mandatory to avoid splitting the wood.
I did run into some problems when clenching the nails for the cross-battens on the door panels. I used a hard wood for the cross battens, and the nail didn't react as expected with the undersized pilot hole. That means I need a different drill bit.
To clench the nails I first marked out on the spruce panel with a pencil the line where I wanted the nails to go. I then stepped off the distances for the nails with a pair of dividers. Once I had the spacing, I used a regular brad point drill bit for the holes. This is essentially just to mark on the painted side where the pilot holes should go, avoiding marking up the show face of the panel.
 |
| 2mm brad point bit to mark pilot locations. |
 |
| The show face now has marks for pilot holes. |
 |
| Batten clamped in place for marking it's pilot holes. |
When I tried to drive the tapered nail into these undersized pilot holes, I could not really get them to go in far enough. The pilot hole was just not big enough, and the hard wood (sycamore in this case) would just not give enough to allow the nail to be driven home. In other words, I needed a bigger tapered drill bit.
Instead of buying one, I decided to make one out of one of the nails I would actually use.
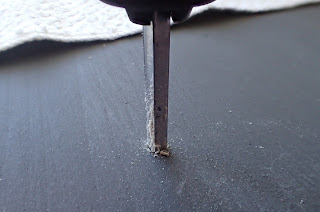
I had a bit of luck with modifying a nail. I cut off the head of the nail with a pair of wire cutters, and then sharpened the edges using a coars diamond plate. I lapped each face of the nail until there was a nice clean, silvery edge on each of the four faces of the nail.
Then, I used a carbon steel burnisher (mine is the cheap Shinwa version, it works great) to turn a hook on each face so the hook faced the direction of travel.
The last step for me was rounding over the square bit on the end of the nail that would be held by the drill chuck. I didn't spend more than a minute or two on this, and it held in the chuck just fine.
 |
| The sharpened nail/tapered drill bit. |
 |
| Using the nail/tapered drill bit. |
 |
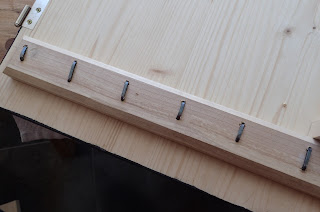
| Completed clenched nails. |
 |
| The front side of the doors with the nails in place. Also shown is my entry in Instagram's #planestackingolympics. |
Do you use tapered pilot holes when using tapered nails?
Brian
ReplyDeleteYou nail' it!!!
:D :D :D
It beats being screwed!
DeleteCool...sort of like an electric awl. I've been making some Japanese style ceramic storage boxes with tapered wooden pegs and tried a tapered bit from Lee Valley but found that it drew itself in and split the thin wood I was using. I reverted to widening the tops of the holes with a birdcage awl. This sounds quicker.
ReplyDeleteI think if I wanted to make this a permanent tool I'd harden it, but I bet it would work for you.
DeleteGood idea, and this way you know it is just the right size..BZ
ReplyDeleteBob, nursing a man cold
Thanks, Bob! It is theoretically possible to make it a little too big, but the angle of the taper sure is perfect.
Delete