My buddy Jonas at Mulesaw posted some pictures of a project he was working on. I immediately zeroed in on what I wasn't supposed to be looking at and asked about an interesting marking gauge he had on his bench. He
posted a bunch more pictures of Danish tools that he had in response to my querry. This looked like a brilliant marking gauge, so I kept bugging him about it.
 |
| Jonas' marking gauge, courtesy Mulesaw. |
My guess is he got tired of me pestering him, so he sent me a spare gauge he had that was of the same design.
I really wasn't looking for a handout, I thought it looked like something that I could make.
Today there was a package from Denmark sticking out of my mailbox. I have to say, I probably wouldn't have figured it out from the photo, but I think it is still something that could be made.
I have never seen a gauge of this design, although I get the impression from Jonas that they are relatively common. It is a great design.
My impressions are that this will make a nice tool. I think it can be adjusted easily with one hand, although my guess is you have to be careful to keep the setting on the first post while adjusting the second. I also think that while it can be used with the cutters pointing the same direction, that it is intended for the cutters to point away from each other. The flat side of the dowel engages better with the wedge this way, and the fence is deeper for better registration against the stock. Two seperate swipes will be required to make both of the marks. This is OK, because these two cutters are so far apart that your marks will surely show past the tennon if you mark mortises this way.
I will use it for a while and give a detailed review. For now, here are some detailed photos.
 |
| Ready to use. |
 |
| All of the parts of this gem. |
 |
| Each arm has a flat side opposite the cutter. I think this helps the wedges keep the arms fast. |
 |
| Each cutter has a knife edge. These will be easy to sharpen. |
 |
The wedges. The cutouts keep the small wedges from falling out when loose.
This is what I couldn't comprehend from Jonas' photos. |
 |
| The stock with a brass wear plate. |
 |
| As you can see, the center wedge is much thinner than the movable arms. |
 |
| Back side of the stock. |
 |
| Look Ma! I got it back together (the second time). |
 |
| Full Monty |
 |
| Close up of the front. |
 |
| Extreme close up of the front. |
 |
| The back side with wedges. |
 |
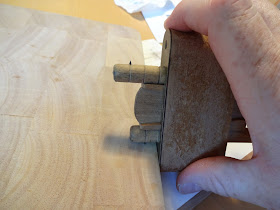
| Easy to adjust with one hand. |
 |
| This seems to be the easiest way to use it. Flip it over for the other mark. |
Thanks, Jonas! I plan to use this tool as my main mortise gauge.


that is very cool. Thank you for sharing.
ReplyDeleteThanks, Dave, that's what I thought.
DeleteAlso, thanks for the link in Lumberjocks. I didn't know about the tool swap. Sounds fun.
Glad you liked it :-)
ReplyDeleteJonas
I will say, that it is quite an honor to have a tool from Jonas' shop.
ReplyDeleteNice gizmo indeed.
ReplyDeleteI have another type of marking gauge with two opposed pins, a little bit like this one. And I always tend to forget which one of the two has the correct setting (when you use only one of them).
Haha! I can see that happening. My plan is to continue using my old marking gauge, and use this for mortise and tenons.
Delete