Pages

Thursday, May 30, 2013

VIDEO: Shop Tour

Last year I took a class at Dictum with Christopher Schwarz to build my Roubo bench. The class was a blast, and I wound up with a beast of a bench with a 5 1/2" thick French oak top.

Wow.

It gets better. Chris had to get back to Munich, so I offered to give him a ride if he would help me unload the bench from the SUV.  

Good move.

Chris not only has build a bunch of these, but I found out he is the world's formost expert on unloading benches from an SUV. I think without his help I would still be in the hospital.

He was so amused by what I was using for a shop, he made a video and posted it on the LAP blog.

I have since reorganized everything in my storage room/shop and thought you might want to take a look. My whole shop is about 90 square feet. This is also our storage room, so I have to share space with that.  

I have moved and gotten rid of a bunch of unnecessary stuff, and am mostly happy here. Don't get me wrong, I wouldn't sneeze at a bigger shop or a window, but this is my space, it's all I have.


Park Row (LeGroulx) (Matt LeGroulx) / CC BY-NC-SA 3.0

Tuesday, May 28, 2013

For Sale: Double 07s (Millers Falls) UPDATE: on eBay

Update:  These items are now on an eBay auction.  Click HERE.

I don't know why, but I have a thing for Millers Falls block planes.  My first block plane was an MF, and I've just rolled with it.  

Once upon a time, I thought I wouldn't be able to do good work without something like a Stanley 140, which this is an awful lot like.  Essentially, it is a skew angled block plane.  One wall of the body is removable making it a rabbet plane.  Lie Nielsen makes one similar, too.  Although that one has fences.

I wen't crazy on eBay, and after winning two, I have yet to use either of these.

It's not like they aren't what they are supposed to be, it's just that I never bothered to sharpen the blades, and every time I could have used one, I made due with my standard block plane.

Thus, they have to go.


They both have the potential to be nice users, although one looks shinier than the other.


They must have been made at different times, because the bodies are ever so different.


The less shiny one.

The more shiny one.


The less shiny one has this weird front knob with a crack.  No idea if this is original or not.  I suspect not.


At the time I was into aftermarket blades for everything.  This is a nice one, but the angle is wrong.  Regrinding will  be necessary to make it fit one of these.


$20 for the IBC blade and $70 for each plane, plus shipping.  Buy both planes and I'll throw the IBC blade in for free!  The first email to my addy gets it.  As always, domestic shipping to either Germany or the US, but I'll ship anywhere.


Monday, May 27, 2013

For Sale: Stanley 48 - SOLD

I am getting comfortable with my tools.

I pretty much am happy with the tools that are in my tool chest.  My shop is just way too small to properly store tools that I don't really need.

This tool falls in that category, at least for me.

This actually was one of the very first planes that I acquired.  An online auction purchase.

The plane works great.  I compensated for some slop in the fence with a couple of washers.  When you pull the knob to turn the fence, they come out and need to be replaced when the fence turns.  This seems to work well, keeping the fence from jiggling when in use.

There also are aftermarket blades on this one.  I don't remember where the originals are.  If I find them, I'll throw them in.  The blades that are on it worked well when I last used this plane, in 2005.  There also is another blade (shown, still in wrapper) that allows one to use this plane to do T&Gs in 2x4 inch stock.

This old user needs a home where it will be used.  I use this plane too infrequently to justify keeping it in my chest.

$15 US plus shipping.

I have the advantage of being able to ship domestically in Germany, and also the US via USPS Priority mail.

Just send a note to my email address at the bottom of this post.


Sunday, May 26, 2013

Old Tool Fever!

I haven't been able to get in the shop all that much lately.  Funny how that works.

It's not that I'm not motivated, or in-between projects or something.  I am dying to get this freaking Shaker side table finished up.  It is still waiting for me to finish mortising the legs.

Life goes on, and often time in involves things that have nothing to do with woodworking. It would be nice to have a nice, normal job with stable hours, but since I don't, I will take shop time as I get it.

Instead, I have been hanging out online surfing eBay with a new friend with similar interests. 

Actually, he has been a bad influence, as before we started looking, I didn't think I needed any more tools.

Over the last couple weeks I got an 8mm gimlet bit for my brace, and an awesome French tapered-hole reamer that might be suitable for escapements on rabbet planes (assuming I ever get to start a new project in the shop).

I also got a nice looking pair of snipe's bill moulding planes from the UK and a beautiful looking 18th century British moulding plane (an ogee, I think).

Oh, and in a few minutes I expect to be the owner of a whole collection of gimlet bits.  I didn't know they came in different sizes.

Pictures will be forthcoming as soon as this stuff arrives.

There are advantages to living in Germany.  Tools on German eBay can be low, if you find something worth buying.  The real old tool heaven, though, is in the UK.

Comparing prices from US eBay and the UK flavour is amazing.  Certain things are priced high in the US, while super cheap there.

That is, if they will ship out of the country.

I missed out on a pristine Stanley type 11 #4 with an aftermarket blade and chipbreaker for twenty pounds.  Infill shoulder planes abound, three for a dollar (practically).  Stanley 45s NIB with all the cutters and attachments can be had for less than thirty pounds.

It is weird that most of these sellers won't ship out of the country, because prices for some of these items are through the roof in the US.

There are a few, though.  So, I am on the hunt for a new plow plane.  Or, should I say, a plough.

I have a Veritas small plow plane with the tongue and groove and wide blade attachments (still in the box - I am a sucker for introductory prices).  I like this plane, but it is kind of small.  I also think that vintage plow plane blades look awesome.  They are nice and thick, and I imagine in a plane that works right will feel a lot better. My plan is to sell the Veritas once I get a suitable replacement.

Plough planes abound on British eBay.  The problem, at least for me, is that you are really taking a gamble when buying a used tool from an auction where the seller knows nothing about these tools except how nice they would look nailed to the wall in your dining room.

Plus, blades for plow planes aren't necessarily interchangeable.  Almost all reasonably priced (sub-50 pound) plow planes have only the blade that is mounted in the tool, if that.  Getting matching irons for your new plane might be a challenge, indeed.

A used tool at a flea market is a great find. However I feel the trick of these markets is to be open and flexible with what tools present themselves. Good deals can be had, but for what you won't know until you get there. It is possible I could find a suitable plow plane at one here in Germany, but I could wind up waiting 350 years for it to present itself.  Or, I might find three next weekend.  You can't count on it.

There are other options.  Plough planes in basket-case shape can be had for as little as 99 cents.  I could get one of these and rehab it, or build a new one from scratch using it as a model.

It is also worth sending a note to my favorite old-tool resellers like Joshua Clark, Patrick Leach or Sanford Moss to inquire if they happen to have a decent user for sale.  This has the enormous advantage that these sellers will tell you in woodworker lingo about the plane, and it's functionality and/or collect-ability.  They also will likely match the plane with irons that actually work on your new plane, saving you the trial-and-error method of getting good fitting irons from eBay.

Whenever I buy a tool from one of these guys, I have absolutely no problem paying four or five times more for these tools than would be my limit on eBay.  Knowing exactly what is going to show up in the mail is worth it, to me.

For now I have nothing but time.  I have a theory about online auctions:  what you want will show up for how much you want to pay, sooner or later.  Just don't miss the opportunity when it presents itself.

Oh, also never (I mean NEVER) bid one cent higher than what it is you want to pay.  Don't worry, another one will come along sooner or later.  If you are raising your own bid, you didn't bid correctly in the first place.  And you'll feel like a sucker.  Don't ask me how I know this.

Wednesday, May 15, 2013

Fresh Shavings in Bavaria!

Spargelzeit in Bayern
This time of year is great.  Fresh asparagus, potatoes and ham.  Yummy!

Yesterday I was having some problems chopping mortises.

Well, the problem is that banging on a mortise chisel in the basement storage room of my apartment building is likely to get me evicted.
Lucky thing.

My progress yesterday consisted of marking out all of the mortises for the legs on my Shaker side table and chopping out one and a little bit of the other one on the same leg.  Then it was quiet time in my building and I had to stop all the racket.

Last night, while laying in bed not sleeping, it occured to me that I marked all the legs the same.  In other words, I marked out each leg to take the mortise from an apron.  That's OK for the dining table I made last, but this table will have a drawer in the front.  Only two legs need mortises like that on each side.

Duh!

When I got home from work, I was worrying about these legs.  I have two that the grain is dead perfect gorgeous.  These were supposed to be the front two.  The rear legs the grain runs out a little bit.  Only the back legs get apron mortises on both faces.  I figured I had a 50/50 chance that I did it right.

I didn't.

Now the options are to either change the leg orientation or leave the orientation and insert a patch.  The patch shouldn't look too bad, as it will be covered by the front drawer.

But I'll know it is there.

What do you think?  Please take a moment and answer the poll at the right side of this blog.

At least I only screwed up one leg so far.

Tuesday, May 14, 2013

Build the Milkman's Mortise Gauge

I had a whole day to waste in the shop today.  My plan was to finish up the base of my Shaker side table, as it has been three weeks since I got to do anything to it.  Weird how life can get in the way of your shop time.

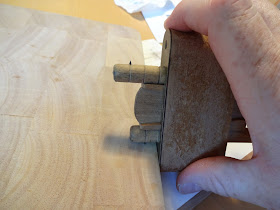
I used my new mortise gauge that Jonas sent me.

Milkman's Mortise Gauge
It worked fantastic for laying out the mortises on the legs.  I started chopping mortises, and immediately got a guilty conscience because I was making so much noise in the storage room of my apartment building.  We are allowed to pound nails and drill holes except from noon until three in our building.  But really, pounding mortises is LOUD.  

I came up with a system that would work holding the legs to my sawbench, and I could do it outside. 

Perfect.

Except it was now past noon, and I thought I probably should wait until three before pissing off not only my building, but the whole neighborhood.

Instead, I decided to build a replica of Jonas' mortise gauge.

Unfortunately, I left my camera in Garmisch again, so you'll have to live with these pics from my phone.


This thing was a blast to make.  I finished it, but wound up with no more time for chopping mortises.  Perhaps next week.

I bored holes in the stock with a brace and a 1/2" bit.  The practice I got doing dogholes on my workbench paid off.  These were pretty straight.  I went halfway through, turned the piece over and finished the hole from the other side.  A little rasping with a rattail rasp and that was done.  The center bit was cut out with a coping saw (I couldn't figure out how to get the blade out of my turning saw, it would have worked better), and cleaned up the saw cuts with some floats.

The best part was making the dowels for the movable rods.  I had never made dowels with a plane before, and was looking forward to it.  It is just like making chamfers with a block plane.  Once they would roll on the bench, I finished the dowel with some sand paper.

I chose to make the two rods from contrasting woods, because another blogger, Kees, mentioned he sometimes forgets which gauge he is using and messes up the mark.  Perhaps this will help.

The wedges I basically copied from the original.  I accidentally cut the middle wedge a bit short and am thinking of doing that over.

The cutters are some steel nails I had in my stash, that had some black enamel on them.  I ground them down until I couldn't statnd it anymore (they are still a bit long).  They are sharpened on one side, and installed so each post has a cutter with the sharpened side facing opposite directions.  Something I didn't think about is countersinking these nails, as the heads stick out a bit.  If you put the gauge close to the stock, the nail sticks out and interferes with the wedge.  It still seems to hold, though.

Lastly, I burnished all of the pieces with my polisoir, and then finished with DICK wax.  I think this stuff is fantastic!

Oh, and I call it the Milkman's Mortise Gauge because Jonas is the guy who took pictures of his dad's portable bench and sent the photos to Chris Schwarz, who has made this bench go viral.  Perhaps the gauge came from the same guy!

Overall, I am pretty happy with it.  I will probably make another one now that I have some of this figured out.

Wednesday, May 8, 2013

A Brilliant Gift

My buddy Jonas at Mulesaw posted some pictures of a project he was working on.  I immediately zeroed in on what I wasn't supposed to be looking at and asked about an interesting marking gauge he had on his bench.  He posted a bunch more pictures of Danish tools that he had in response to my querry.  This looked like a brilliant marking gauge, so I kept bugging him about it.

Jonas' marking gauge, courtesy Mulesaw.
My guess is he got tired of me pestering him, so he sent me a spare gauge he had that was of the same design.

I really wasn't looking for a handout, I thought it looked like something that I could make.  

Today there was a package from Denmark sticking out of my mailbox.  I have to say, I probably wouldn't have figured it out from the photo, but I think it is still something that could be made.

I have never seen a gauge of this design, although I get the impression from Jonas that they are relatively common.  It is a great design.  

My impressions are that this will make a nice tool.  I think it can be adjusted easily with one hand, although my guess is you have to be careful to keep the setting on the first post while adjusting the second.  I also think that while it can be used with the cutters pointing the same direction, that it is intended for the cutters to point away from each other.  The flat side of the dowel engages better with the wedge this way, and the fence is deeper for better registration against the stock.  Two seperate swipes will be required to make both of the marks.  This is OK, because these two cutters are so far apart that your marks will surely show past the tennon if you mark mortises this way.

I will use it for a while and give a detailed review.  For now, here are some detailed photos.

Ready to use.

All of the parts of this gem.

Each arm has a flat side opposite the cutter.  I think this helps the wedges keep the arms fast.

Each cutter has a knife edge.  These will be easy to sharpen.

The wedges.  The cutouts keep the small wedges from falling out when loose.
This is what I couldn't comprehend from Jonas' photos.

The stock with a brass wear plate.

As you can see, the center wedge is much thinner than the movable arms.

Back side of the stock.

Look Ma!  I got it back together (the second time).

Full Monty

Close up of the front.

Extreme close up of the front.

The back side with wedges.

Easy to adjust with one hand.

This seems to be the easiest way to use it.  Flip it over for the other mark.
Thanks, Jonas!  I plan to use this tool as my main mortise gauge.


Monday, May 6, 2013

Joining the Elite Hot Hide Glue Club

Today I joined the ranks of the uber-snobbish club that uses hot hide glue.

This stuff is so hard to use, and requires such expensive specialty equipment, none but the very elite class of woodworkers can use it.

I got a glue pot at a local specialty store.  This thing is high tech, and is specifically made to be used with a special glue container.  I rescued one of these containers from the trash.  I don't know why anyone would throw such a treasure away.

Hi-Tech Hot Glue Setup.
I got a package of hide glue at Dictum.  It was less than five Euros, but don't tell anyone.

Hide Glue from Dictum.
It should stay good forever, as long as it stays dry.
I tested the fancy glue-pot to see where I had to set the thermostat for the proper temperature for glue.  Luckily, if I turn it all the way up, the pot warms the liquid inside of the glue container to just shy of the recommended temperature.  This works fine, and this also means that there is no danger of the glue getting too hot by accident.

Thermostat.  If I turn it up all of the way, the temperature is just right.
I made a test run by following the directions that came with the glue.  Start with twice as much glue powder as water, slowly heat while stirring, and when it is up to temperature, add more water until it is the desired consistency.   I used a heaping spoonful of glue granules and one spoonful of warm water.  It seemed to mix great, and it thinned out as it got warm.

When I added more water, I accidentally added about ten times what I meant to, so it turned out a bit thin.  However, I tried a rub joint with two little bits of scrap I had laying around, and it seems to be holding just fine.

Test joint, glue seems plenty strong.
Everything cleaned up nicely, too.  A bit of soap and water, and all is ready for my next glue-up.