Pages

Wednesday, December 30, 2020

Flooring Dutch Tool Chest - Part VII - Finished! (for now)

Ta-daaaaa!
We left off having painted and BLO'd the chest. I normally finish off an oiled finish with some type of paste wax. My favorite is one that I make myself from beeswax, orange oil, and a few other goodies. I happen to have all of my paste wax ingredients in Spain, not in Germany where I am at the moment. After digging around, however, I found some Howard's Feed-N-Wax This has beeswax and orange oil in it, so I thought I'd give it a try.
 
Feed-N-Wax

The consistency of this product is a little more liquid-y than what I make. It seemed to work well, though, and it is very easy to apply this way. What I did was squirt a glob in the middle of a cloth, wrap the cloth around it, and use the cloth as an applicator. After letting it sit for 10-15 minutes, I buff it out with a clean cloth.

I like the look.

Now that the finish is done, let's get rid of those ugly drywall screws and replace them with roman nails. Unfortunately the only Roman nails I happened to have are 60mm long, about 2 1/2" or so. Total overkill for this, but it's what I have.

Out with the old...
In with the new!

This engineered hardwood is much more fragile than solid 3/4" pine, so I had to be very careful. Most of the screws I backed out left a hole big enough that I could push the nail in with finger pressure until less of an inch of the nail was sticking out.

Notice a Roman nail makes a good hammer handle wedge.

It's just then a matter of carefully tapping the nail home.
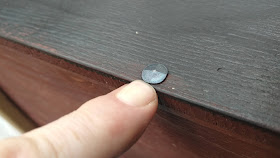
But not too far!

I've learned the hard way that if you keep banging on these nails, the head will crush the wood fibers around it, spoiling a nice paint job. One only needs to tap until the sound changes. I check it is deep enough if I'm unable to get a fingernail under the head of the nail.

One minor blowout.

There were only two nails that decided to misbehave. One is pictured above, it blew out on the underside of the center shelf. It's not too bad, and it's in a hidden place, so I left it be. The other was on a corner with a dovetail. Remember, I reinforced my dovetails with nails, and I think this reinforcing nail pushed my Roman nail out of the way. While I was tapping it home, I noticed it started to come out of the bottom of the chest. Since I still had  little way to go with the nail, I decided to remove the nail and squirt some PVA glue in the wood that was deforming. I then nipped an inch of length off the nail with some nippers, and pounded the nail in. Good as new.

My method of clenching nails in a single photo.

I decided to attach the battens on the fall front with clenched nails. I really like this technique. It holds forever, like it or not.

Now I can say I'm done with the carcass of the chest. Here's some glamour shots:

There's obviously a bit more to do, such as organize the top compartment to hold my leather working tools, add some handles on the sides, and maybe a lock. I might also decide to make another matching box for this one to sit on that is on casters. That would give me even more storage for stuff I didn't need that often, as well as making it easily transportable around my apartment.

Overall I'm extremely happy with this chest. I didn't really have high expectations for it. In fact, I figured it would be something that perhaps I would throw out someday and build again when I had better materials. But this box is surprisingly strong. 

Someone asked about the weight. I'm not a very good judge, but I think it is probably similar to a chest made of pine. This one as it is weighs 13.4 kilograms ( about 30 pounds). Not too bad for a huge box. 

The single best part of this chest for me is the finish. I toyed with the idea of turning the beech side out, but I figured the joints would bee too ugly and weird. I'm glad I chose this. I am stunned at how well those Japanese burnishers prepared the soft underside of the flooring material for milk paint. Sadly, it can't be properly displayed in photos. I find myself running my hands over the surface of the lid every time I walk by it.

The milk paint turned out so well, that I'm wondering what else I could make and finish this way. It just dawned on me that my ATC that I built in 2011 is still unpainted. Perhaps it would be fun to try red over black?

I look forward to many years of use from this tool chest. I hope you enjoyed the build half as much as I did.

Tuesday, December 29, 2020

Flooring Dutch Tool Chest - Part VI

 Paint.

This chest is nearly done.

Just like any other project, the quality of the finish depends greatly on surface preparation. In this case, I spent a lot of time with my Japanese burnishers in order to get a specific texture on the wood that I wanted to show through the milk paint. 

I chose milk paint because it is a traditional look for tool chests, plus it is pretty easy and safe to use.

The brand of milk paint mix I use is Old Fashioned Milk Paint. There are others, but this is the one I know best. I used some home-made milk paint on the last chest I made, and I have to say this mix is much easier and more consistent. Perhaps I need to work on my home-made recipe a little.

Anyway, for quite some time I've really admired the black over red look that is often seen on Windsor chairs. Curtis Buchanan has some really great YouTube videos on how he makes his, and in one of them he goes over his method for achieving the look he gets with this finish. If you would like to watch it, search "Curtis Buchanan - 46. Preparing to Paint" on YouTube.

I've tried this before, and haven't really gotten the results I was looking for. This time I tried to do everything the same exact way he does, and I'm very pleased.

The first bit that I took away from his video, is the water to milk paint ratio he uses. For red, he uses a 2:1 ratio, and for black he uses a 2.5/1 ratio.

Barn red basecoat.

The other thing I may have done wrong in the past was apply too-thick coats. This time it worked well to use just a little paint on the brush, and drag it as far as can be done. I spent some real time trying to avoid runs, as those will show through in the end.

After two coats of red, I let it rest over Christmas and moved onto the black.
Black over the red.
With the black, I also didn't worry about applying it in thick coats. This is more of a wash coat than anything. I slapped on a thin coat, covering 80%-90%, then for the second coat I just touched up the endgrain and the large panels. I didn't worry about making sure I covered up all the red. I wanted some of the red to peek through in the end.
Maroon and gray 3M scratchy pads.
After the paint is cured, it is time to burnish it. This is the main thing I have never gotten right in the past. I started with a medium scratchy pad, a maroon 3M pad in this case, and rubbed down everything with medium pressure. I worried at first that this would take off the paint I just spent so long applying, but it didn't. The only parts I had to be careful on were the sharp corners, and even some of them I scrubbed down to bare wood. I think the look is fine.

This already is giving the paint a much more refined look. After the maroon pad, I went to a fine, gray pad, and really pressed hard while burnishing. This had the surprising effect of shining up everything. I've never achieved a shiny look with milk paint before.
Underside of the lid. The ash grain is still obvious through the paint.
The front panel of the chest. The texture left behind by the Japanese burnishers looks beautiful.
Finished with burnishing, masking tape removed.
Now we're getting somewhere. I feel like up until now we are still doing surface prep, and I can apply whatever finish I would like now. I chose the natural Swedish boiled linseed oil (BLO) from Dictum. I slathered it on with a paintbrush, waited up to 20 minutes, then buffed it off with an old dishtowel.
The finish is beautiful!
This is the look I have been going for! Tomorrow I'll apply a light furniture wax and the finish will be done. The only part left will then be to attach the hardware and see about replacing the screws with nails.

Monday, December 28, 2020

Flooring Dutch Tool Chest - Part V

Before and after.
One big decision I always struggle with is regarding hardware for a chest. My thought on this one was since I was using free material to build it, I would try to save a bit with the hardware and stick to hinges and hardware commonly available at the big box store.

I found some hinges for just a few Euros that have an OK shape, although a hideously ugly finish. The finish on the hinges isn't the usual zinc coating that is usually found on screws and such (I don't think), but some kind of brass-colored, presumably weatherproof coating.

The hinges I chose as they came from the big box store.

Rather than dissolving this coating off with chemicals, it turns out that this one was very easy to remove with some 300 grit wet/dry sandpaper.

To get a finish on them that I liked I took them to my barbecue. What I usually do is wipe a light coat of raw linseed oil on the hardware, heat it up with a torch until it turns a color I like, then apply some more oil while it's still hot. This was a little more challenging than usual because of the size. I wasn't able to heat an entire hinge up to the ideal heat at once, I had to do it in stages.

Pay no attention to the cheese on the BBQ left from the hamburgers I grilled the night before.
The results (after a couple of attempts) weren't perfect, but I can live with them.
Finished hinges.
For the rest of the hardware, consisting of bolts, nuts and washers (because of the thin nature of the flooring I'm using to build the chest), I stripped off the zinc coating with essence of vinigar mixed with tap water, 50/50.
After a few hours in vinegar, the coating is gone.

I rinsed this hardware off in clean water, and dropped them into a cup of raw linseed oil.

From there, I took them straight to the barbecue. I tried a few different things with these ones. Usually, I'll heat them up in a toaster oven until the linseed oil turns a nice, toasty-black color. This time, I found the best results with a propane torch, and I went a little beyond the normal temperature. At a certain point, the oil burns completely off of the hardware, and at this point I dropped them directly into another cup with linseed oil. The result was a very even, very dark color.

I like the dark finish. Much better.
With the hardware prepared, I can attach it. This flooring took a little more care than usual to install, because the center ply has the wood going up and down, instead of side to side. I just sawed the sidewalls of where I wanted the hinges, like usual, and then chopped the waste out with a chisel and mallet with the chest flipped upside down on my bench.
Chopping a hinge-mortise in engineered flooring.
I took my time laying out where the holes needed to be drilled once the mortise was at the right depth.
Drilled holes for the hinge bolts.

I didn't get any pictures of what I did to line up the lid for the hinges, but I'll try to describe it. The trick is to be very precise and take as much time as is needed. I bolted the hinges to the carcass, and held the lid exactly where it needed to go. Not being able to mark the underside of the lid when it is closed, I instead used a pencil to draw a line across the barrel of the hinge where it met the lid, and marked a line on the lid on either side of the hinge, so I could line the hinge up on the lid later.

With the lid upside down on my bench, I could then mark the holes that needed to be drilled. I placed the hinge about where it was supposed to go, used a square to make sure it was aligned straight, and moved the hinge until the pencil line on it lined up with the end of the lid like it was when I was holding it on the chest.

Surprisingly, all ten of the holes I drilled lined up with the hinges. I only needed to wallow out one just a little in order to get it's bolt to fit in.

Installing the hinges on the underside of the lid.

With the hinges installed, this chest is starting to look like it's almost done!

Now it's ready for paint!

Sunday, December 27, 2020

Flooring Dutch Tool Chest - Part IV

Most of the body of the tool chest is now done, so I can get started with the lid. 

The flooring plank for the lid that next came out of the packet looked terrible on the underside: an awful lot of knots, some of them had popped out and were missing. This would make no difference if this plank was going on the floor, but this one will be the lid - the most visible part of the chest. I decided to look at the next plank in the box, and the underside of that one was perfectly clear, the entire thing. 

So I used the clear one for the lid.

A perfectly clear board for the lid: the knot at top will get cut off.
After gluing and clamping the joints like I have done for the rest of the chest, I cut the angle on the back of the lid to match the angle of the top of the chest.
Laying out the angled cut for the back of the angle-front lid.
Eye-balling the cut, then finishing it with a plane.
"Edge" shavings look weird.
After using a handsaw to cut the angle, I cleaned it up and dialed it in with a hand plane. I expected this cut to look pretty rough, but with a little care, it can be made pretty smooth. Even with the different cross-grain layers of wood.
Using a Stanley #3 to smooth the edge of this weird material.
After I cut the rest of the lid to dimension (90 degree cuts this time), I found some 3/4"-ish ash strips which I used to bolster the outside edges. Well, the three visible edges, anyway.
The lid with ash edging.

I glued them on with lots of PVA glue, taking special care to ensure all of the 3mm beech on the front had lots of glue, and the middle ply on the edges, as these are the long-grain parts that will hold the glue the strongest.

Test-fitting the top.

After the lid cured a while in the clamps, I planed a deep chamfer on the top of the ash strips, and a smaller chamfer on the underside.

The finishing touch for the edge banding of the lid were a few of the same headless, cut-finishing nails I've used elsewhere on the body of the chest.

Ash banding finished with cut nails.
With the lid ready to go, next I'll show how I made the hardware store hinges and hardware look appropriate for this chest.

Saturday, December 26, 2020

Flooring Dutch Tool Chest - Part III

Now that the joinery is cut for the carcass. I can glue it up and see what we're working with.

Lotsa glue and clamps

Weird dovetails, but they are strong. Especially with some nails.

Cleaned up a little.

I joined the main carcass with glue and cut finishing nails. These nails seem to work well, but I've drilled pilot holes just to be safe.

The front pieces go on next. The carcass was just a bit out of square, but a clamp across the body straightened it out while I attached the front. For the front and back panels, I am using drywall screws to temporarily hold everything. After it's painted, I will (hopefully) back them out one at a time  and replace them with Roman nails.

Once again, I thought that the front edge of the chest will get the most contact with my forearm, so I decided to use a strip of solid wood in order to make it smoother. I happened to have a strip of black American walnut about the right thickness.

Before this project, I actually thought I had too many clamps.
This strip worked out just fine. It might not be necessary, but in the end this edge will be touched a lot.

Once the front is attached, the back can go on. My idea here is to screw the entire panel on at once, a little oversize, and then trim it to fit. This way any imperfections won't be seen. Also, there is a smaller chance of anything splitting when I drive the screws.

The back before trimming. You can also see I've made a front flap lock already out of oak.

Trimmed and sitting pretty.

With the front flap, I decided to prepare the outside surface for finish before attaching the battens, just in case I want to install them with clenched nails already. This outside surface is a wild grained softwood, which I would like to be seen through the milk-painted finish. This outer veneer of construction grade lumber is only about 1/16" thick, so planing it might easily tear through and destroy it. 

I think the perfect way to prepare this is with a light sanding block to knock the fuzz off, then treat with my Japanese burnishers.

My Japanese burnishing tools.

A few years back I bought some of these burnishers, and I always enjoy using them. They are similar to the French burnisher, except there are three: course, medium and fine. Also the point isn't so much to polish up the wood as to bring out the texture of the grain. 

They idea is with woods (especially softwoods), early wood and late wood have different hardnesses. When the wood erodes, the softwood erodes faster than the harder parts. Japanese burnishers take advantage of this. 

I probably could spend a month or more burnishing all of the exposed parts of this tool chest, so I didn't go all out. 

I started with the rough burnisher, which I made from broom straw and zip ties. This one is very much like the French one, except I usually apply some downward force with the French polissoir, whereas with this one I just use like I'm sweeping shavings off of my benchtop.

Once I'm tired of this, I move to the medium one, which is a much finer fiber. I don't remember what this one is made from, but using it makes a big difference. After that, I move on to the fine, horsehair polisher. This really makes the surface smooth to the touch.

Before on the left, after on the right.
The surface that is left is smooth to the touch, but not like a freshly planed, glass-like surface. The surface it leaves reminds me of the pews in an old church: worn to a glossy sheen after decades of use. The grain of the wood really stands out, and I'm hoping after it is painted that this texture will be telegraphed through the paint.

Tomorrow we'll tackle the lid and the hardware.