Pages

Sunday, December 27, 2015

Constructing the Satan Santa Pope Chair - Part VII - AAR and a Poll

This chair was a lot of fun, and in many ways surpasses any of my previous Roorkies. One big success was the cigar shaped octagonal stretchers. Those really weren't so hard. I'll definitely be using those again.

One of the unnecessary challenges was using a drawknife on this dry lumber. One leg was nearly ruined because I took too heavy of a cut, and the resulting split dove deep into the surface. I felt I was really at the mercy of the grain here. I want to try this again, but next time instead of carving the legs with a knife, I will use a technique like the one Roy Underhill uses when making his bench hooks. I will make several relief cuts with a saw and chop out the bulk with a chisel. Then I can smooth it out with a spokeshave.

I also might go with the more angular look if I use this charred finish again.

I did really like using the knurled knobs for the back of the arm straps. I probably will do that again. I just ordered the same ones that Christopher Schwarz wrote about. It only took a few minutes to polish them on sharpening stones, and I think it might be fun to punch some initials in these. Also, I think it might make sense to install two threaded inserts closer together, permitting the use of fewer holes (or farther apart).
I like this.
I think the charred finish was an unmitigated success. I look forward to trying this with other woods. Although I used a paste wax for this, it might be fun to experiment with some other finishes, too. I am pretty sure BLO or shellack would both work equally well, depending on what the goal was. More on this later.
I like how the texture of the endgrain looks.
I really enjoy playing around with different aspects of this chair. In total, I have done four, and I feel I did something unconventional and new on all of them.

The first one I did was this black one. I have this set up at home and use it to watch TV often. It seems to be holding up well.

I used pear wood for this one, which I have never heard of anyone else doing. Having not built one before, I followed Christopher Schwarz' instructions closely. With the exception of planing down the legs a bit farther than he suggests. This chairs legs a a slender 1 5/8" square, as opposed to CS' recommended 1 7/8". The result is a bit of a more slender look. It seems to be holding up so far.
Pear and black leather.
The second chair was one I built with my dad when I travelled home to visit a while back. He builds walking canes and the like with diamond willow, which he collects from the wild himself. I had an idea that this would make a really cool rustic look. I was surprised how refined the leather made it look. Dad is really proud of this chair.
Diamond willow chair.
The next chair I made was a gift for my sister Janet. I bought a hair-on cowhide for this build, and repurposed some wenge I had laying around from an abandoned project. Honestly, I expected this chair to turn out with a kind of Western cowboy look. I didn't expect it to look so swank.

Janet was thrilled.
Coffee and Cream.
Of course if you are still here you should know about the story with this one. It was a gift for my sister Linda. She loves it and says this is her favorite color of red. She claims she has some decorations in her house this exact color, so it should fit in.

If it does, it was purely by accident.

My opinion is this is a very striking chair that will dominate a room. Once again, I think it looks swank.
Red and black SSP chair.
Now that you see them, I would really like some feedback on these chairs. I am happy with them all and am confident and secure in my thoughts of how they look. Even so, I think it would be fun to see what you all think of  what I have done so far. Go ahead and answer the poll of which one is your favorite and which one comes fourth on your list of my chairs. I also would love to read any comments regarding your choices, too.

Which chair is your favorite?


pollcode.com free polls

Which chair is your least favorite?


pollcode.com free polls
Until my next chair...

Finished Chair
Part I
Part II
Part III
Part IV
Part V
Part VI

Saturday, December 26, 2015

Constructing the Satan Santa Pope Chair - Part VI - Leather

See the first in this series HERE.

Overnight I started thinking about my torched finish, and there are a couple things I forgot to mention. First, burning the wood is hard on sharp corners. A sharp arris will catch on fire a lot easier than the surrounding wood. This will create a bit of a roundover, but it is difficult to control. I planed a tiny chamfer on all of my 90 degree corners to assist with this problem. A related issue is the inside corners, as in a rebate or a molding do not darken as quickly as the surrounding wood. If the flame is left too long on those parts, the surrounding wood will char too much. I found brushing the wood pushes ashes out of the pores, and this can be used to brush the ashes into those corners to soften the look of a white stripe right there.

I also wanted to mention that brushing the wood does a couple of things. This wood is ash, which is ring pourous like oak. The early wood is made up of fat hollow tubes which you can see on the wood. Many finishes require you to use a wood filler to fill in these pores to get an even finish.  What torching this wood does is burn away these porous parts a lot faster than the more dense latewood parts. Brushing the wood pulls all of the ashes of the early wood parts out, highlighting the grain's texture. It's a really neat effect.

Last, the fine horsehair brush that I used really polishes up the bare wood. This means that imperfections in the surface that were there before charring will still be there after. I had some small sections of tear out that I figured would even out after burning, but nope, they can still be seen.

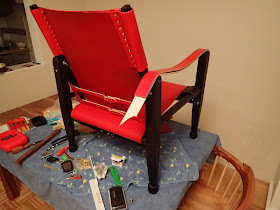
Time to get some leather on this puppy. Here's what I now have to work with. My leather template can be seen on the floor.
The first thing I did was make the 3/4" belts that go side to side and are screwed to the legs. For these to work right, pilot holes need to be drilled.
It's weird to drill a hole in black wood and have white shavings come out.
This red leather actually dictated to me everything else about this chair. I ordered it online because it was a really good deal. I figured the photo I saw didn't quite get the color right, and I expected it to be a little more burgundy-ish when it arrived in the mail.
It took some real thought to get the most out of this leather.
NOPE! That was the real color. I have named it, "Holy Shit! Red."
Besides it being very bright in color, it was a pretty small side of leather. There was barely enough to get the parts I needed. Let's just say the main parts now have very long belt straps. Luckily it works.

The good news was this leather was vegetable tanned and took to coloring really well. The color on this side doesn't go all the way through, so some treatment was needed for those parts. Because of time constraints, I only dyed the parts that are visible from the front.
In fact, the leather color/finish I bought matched perfectly, allowing me to blend the edges in perfectly. These parts look like they were cut at the factory.

Linda, if you would like to put some of this paint on the edges of the belts on the underside and the back, I would think you can buy this exact stuff from the saddle shop that Dad and I went to. Or, you can buy it online from Tandy Leather.

I screwed the arm straps on to the front like a Klindt Safari chair, and doubled up the leather arms with some thick 10 ounce veg-tan leather for extra stout arms.
Here my clamping set up is shown. I used Tandy's leather glue, which I think is just regular white PVA glue like Elmer's.
Since the leather was so thick on these arms, I laminated them together in place so the bend would have no wrinkles.
I ordered some of these brass thumb screws from McMaster-Carr along with matching threaded inserts.
I thought the circle pattern on the heads was a bit unsightly, so I polished them smooth on my sharpening stones. Over time these should darken up. The big benefit with these fasteners is over time if the arms start to sag, they can be tightened up.
Done! Next up are lessons learned and comparing this to my previous Roorkies.

Finished Chair
Part I
Part II
Part III
Part IV
Part V
Part VII

Friday, December 25, 2015

Constructing the Satan Santa Pope Chair - Part V - FIRE! With VIDEO

See the first in this series HERE.

Not much to be said, so watch:


I made the medium brush from a three dollar broom and some zip ties.
Make sure to stay safe with a fire extinguisher, just in case.
The fine horsehair burnishing brush came from the Japan Woodworker. It was expensive, but resulted in a real nice finishing touch.

The wax I used was a combination of beeswax and orange oil. However, I think any finish would probably work. Next time I want to try using boiled linseed oil first.

Now it's coming together.  Next up, leather.

Finished Chair
Part I
Part II
Part III
Part IV
Part VI
Part VII

Constructing the Satan Santa Pope Chair - Part IV - Stretchers

See the first in this series HERE.

In my opinion the most important part in this chair is ensuring the grain runs from one end of each stretcher to the other as straight as possible. Ripping the stretchers out with a handsaw (or a bandsaw) makes this easy, as long as the lumber is straight.

My problem was the lumber I had wasn't quite wide enough to rip enough square pieces at 1 1/4", and then taper them down to one inch on the ends for the nice tapered cigar shape. However, I could get one inch on the ends that spread out to 1 1/4" in the middle. Perfect! Half done already.

After that, it was short work with a jack plane to taper the other ends of the sticks. All four are 1 1/4 inch in the center, and one inch at the ends.
A funny shape that really isn't necessary, but cool nonetheless.
Next it is just a matter of making squares into octagons. I found some joiner's saddles that I forgot I made years ago, and they worked perfectly to cradel the sharp corner up so it could easily be planed off.

I hogged off most of the wood with a wooden jack, then finished the cut with my smooth plane.
This photo also shows Olav's trick octagon marking tool.
Each corner required planing up one side and another swipe down the far side. I wanted to maintain the hump in the middle.
Here's a closer look at the setup. Ignore the circle on the joiner's saddle. I must have used it as a backing board at some point.
The trick with making even octagons is to mark it out with Olav's magic tool, but not get too precise with planing to the line. Once you get close, finish it off by eye.
In short order they were done.
Now for the tapered tenons. This is easy with a tapered tenon cutter like the Veritas model. It would be a little easier to rough out the shape on the lathe, and then use it to finish. I am not using a lathe, so using this from the start is the only way. It is easy to get off line, leaving a tenon that points the wrong way, so some care must be taken to keep it centered.
Big pencil sharpener.
This was actually much easier than shaping the legs.
Now for my prefered method of tapering the mortices: with a brace.
I have found this is just as good as a drill press, perhaps even better.
I think that using a drill press for this prevents making adjustments that are needed to ensure a perfect mortice. As long as you keep your chin on the brace, you will be mostly straight.
Once I get close to the bottom, I set up a square and check to make sure everything is perfect. If it is not (it rarely is), small adjustments correct the problem. Stop when you get to the bottom of the mortice, unless it isn't straight. Another turn might be all it takes to fix it.
Dead-nuts perfect. Just make sure it is clamped square to the bench top.
Now I can finish shaping the legs. I mark centers at all of the tops.
This tool isn't strictly necessary, but I find myself using it all the time.
Once this is done, I can use a compass to define the roundovers.
X marks the spot.
I roughly cut the 45 (or so) degree angle by eye,
Just don't cut past the line!
and use a rasp to bring the rest down to the line.


Easy peasy.
You guys are going to love the next part. It involves a blow torch.
 
Finished Chair
Part I
Part II
Part III
Part V
Part VI
Part VII

Constructing the Satan Santa Pope Chair - Part III - Legs Continued

See the first in this series HERE.

I decided the octagonal look was a bit too angular.  In hindsight, it probably would have looked fine with the finish I chose, but this way looks great, too.

First, a few more details on how I carved these legs. I used the drawknife to rough out the shape, then refined and smoothed it with a spokeshave.  This worked great, except for the little bit that a spokeshave couldn't reach by the foot. This has to be cleaned up with a sharp chisel.

Cleaning up the bit by the foot with a chisel.
I also always make extensive use of a story stick when making Roorkies. This really helps in ensuring all the multiple parts turn out the same. Here I have marked out where I want the top of the next cut to go. I made the choice to turn the octagon in to a sixteenth-agon.
This story stick tells me where everything on this chair has to go. I have marked the following: the feet, where the various tapers start, and where all of the holes for the stretchers should be bored.
I did most of the sixteenth-agonalizing with a spokeshave. There really wasn't much more wood to come off by this point.
And cleaning up the bit by the foot with a chisel again.
And here is the result. It makes for a much less angular look, but the facets still proclaim they are hand carved rather than turned. I chose to leave the feet octagonal.
Now the legs are finished! Or are they?

Next up, shaping the stretchers!

Finished Chair
Part I
Part II
Part IV
Part V
Part VI
Part VII

Constructing the Satan Santa Pope Chair - Part II - Shaping Legs

See the first in this series HERE.

I am pretty sure one could use this technique to make legs that are round, mimicking the look of a turned leg. I decided I wanted facets to highlight the fact this was not turned on a lathe. I thought about how to do this for a long time, and decided I would use a drawknife for most of the work, and aim for an octagonal pattern with the tapered lower leg. 
Preparing for a saw cut to define the feet.
To get the feet to all look the same, I used a crosscut saw to saw the four faces to a specific depth, then matched that depth on the octagonal axes.

How about that? The plural of axis is a woodworking word!
My trusty DICK saw with dry-erase marking the proper depth for the first cut.
Perhaps this is easier to see from a bit farther out.
Do this on all four legs before going to the octagonal, which needs to be a bit deeper.
Honestly, I don't remember how I came up with this measurement, but the octagonal bit definitely needs to be deeper than the horizontal cut.
My four color pack of dry erase markers came in handy.  Green for the first cut, blue for the second!
To make this easy and repeatable, I just opended my vice a little and used it as a bench hook.
I think that perhaps I am putting in way too much thought for describing defining the feet. It was easier to do than explain. Going about it in a methodical way, I hoped that I could get the legs all to look as much alike as possible.

Moving on. Next up, the tapered, diagonal, stopped cut on the lower leg.

I was excited to try the drawknife that was kindly given to me by Ray Schwanenberger. This knife is a proper drawknife, compared to the short one I have. I found this to give much more power and control. Despite it being bigger, it can be a much finer tool. Much more versatile.
I tried to keep the angle a consistent 45 degrees with my new angle gauge. This really helped, and assisted in my efforts to make legs that all look about the same.

This worked pretty well. I went from a mark where I wanted the top of the taper to start, and ended when I bottomed out the saw kerf at the foot. I found it easiest to try to keep this cut as flat as possible the whole time, rather than hog out all of the depth and then try to make it flat, but I imagine that could just be my preference.
I am not that experienced with a drawknife, so I imagine there was much I wasn't doing correctly. Even though the grain was mostly straight, I found sometimes the grain direction made things easy, and sometimes very hard.
This process took me way longer than it would have had I used a lathe. I found out during this process that the old carbon steel on the vintage drawknife does not hold up well to this kiln-dried ash. I had to sharpen it much more often than I would have liked. The steel on the modern, short knife I had felt much harder and held up better, so I used that. I also found using a chisel near the foot was required.
When I finished, this is the shape I wound up with.
By the time I was finished with all sixteen tapered cuts, I found I was using the following tool kit: short drawknife, flat spokeshave, a 1" chisel, an angle gauge, and occasionally a low angle vintage spokeshave when the grain wouldn't behave.
The toolkit I found most useful for this.
I wound up with four legs that looked pretty similar.
The finished legs.
This looked a bit more angular than what I was going for, so in the next post I carve on them a bit more.

Finished Chair
Part I
Part III
Part IV
Part V
Part VI
Part VII