Pages

Thursday, December 25, 2014

Coffee and Cream Roorkee - Merry Christmas, Janet!

Merry Christmas to my wonderful sister Janet!  Since I didn't plan far enough ahead to build your gift in time for you to receive it by Christmas, here are some photos of your gift to show you what is on it's way via the US Postal system:

The Coffee and Cream Roorkee.
I am the youngest of seven children, and to make things less painful for us when we were kids, we used to draw names from a hat to determine for which of our siblings we would get a Christmas gift.  We continue this tradition today, although we rotate who gets whom for Christmas.  This year, I had my sister Janet, the third girl in our family.
Here is an old photo of the whole family.  I'm the youngest, the boy with his fly open.  Janet is the third oldest, the one whose head is hidden behind my brother Chuck.
The chair is made from wenge (Millettia laurentii) and a hair-on cow hide.  I was originally going to use oak or ash.  On my way to the lumber yard to buy some lumber for this project, The Frau asked if I had anything in my own lumber pile that would work.  It turns out I had some wenge from a project that never got started.  Lucky for Janet, it was perfect for this project.


Wenge and hair-on cowhide.
I am extremely happy with how this chair turned out.  It was a bit of a challenge:  I did most of the work at the Dictum woodshop, but didn't quite get everything done in the few days I had allotted. 

It was a comedy of errors that prevented this chair from getting done in plenty of time to be mailed by Christmas.  It was finished just yesterday.  Mental note, start Linda's gift earlier next year.


Details, details.
Most all of the woodwork was done with machines this time, in order to make this a fast project.  The woodwork actually did go fast.  Rough work such as cutting rough stock to dimension, jointing and planing are undoubtedly quicker with good machines.  I turned the legs using both my Easy Rougher, and a roughing gouge that Andy at Dictum helped me with.  I even used a router table to make the octagonal stretchers.  It worked well.  The trick is finishing everything off with a swipe from a plane to remove machine marks.

Laminated leather.
One challenge I had to overcome was the relative delicacy of the cowhide.  It was too soft, pliable and stretchy to be used by itself.  For the arms, I toyed with the idea of using only 10 ounce vegetable tanned leather with the color seen on the belting elsewhere on this chair.  It didn't look quite right.  The cowhide was way too thin for use in the arms of this chair, so I glued the cowhide to the veg-tan for a stout arm strap that looked the way I wanted it to.
The carriage bolt shown was stripped, sanded and blued with gun-blue.
I finished this chair with pure tongue oil thinned with some organic turpentine.  Once this was well cured, I applied a thin layer of paste wax.  This is a nice, no-nonsense finish that leaves you admiring the wood, as opposed to the finish. 

One other thing that I had to think about when cutting out the leather, was the fact that the direction the hair fell on the hide needed to be in a certain orientation.  I wanted it to go front to back on all parts.  This I did, but it required wasting a bit more material than when I use plain leather.

Merry Christmas, Janet!  Here's your gift.
The seat needed some strengthening, too.  I chose to leave the back piece alone, but I knew the chair would not last more than a few days if I didn't do something with the seat.  I thought a long time about how to attach canvas to the leather.  I decided to use wood glue on the front and back.  While I was fetching some glue, I realized I had some spray glue, and instantly knew this was the way to go.

I attached the red canvas with spray glue - you know, the stuff that is used in the cartoons.
I cut it to the exact width and a couple inches longer than the seat piece.  I folded over the edges, and ironed the creases crisp.  Then, I sprayed a little glue under the fold before spraying both the canvas and the leather seat liberally with glue.

This worked awesome.
Canvas spray glued to the cowhide for strength.
I wasn't sure how this would work with copper rivets, but I needn't have worried.  Everything turned out perfectly.

Copper rivets fix the leather straps with the canvas-backed cowhide.
One other bit that required attention was the edges of the arm straps.  The leather on the cowhide was a grey color, and the veg-tan is a flesh color.  The answer was after trimming and smoothing the edge, to paint with some brown Edge Kote.  I think it turned out just right, if I do say so myself!

Edge Kote on the laminated arm strap (it is upside down on the floor in this photo).
This is the third Roorkee chair that I have built.  Having done a few of these now, I think I would like to comment a bit on their construction.
The new and the old:  My first chair from pear.
A chair I built with my dad:  diamond willow.
Much of the woodworking can easily be done by hand, and there really isn't too much wood that is needed.  Care should be given to the stretchers, that the grain is as straight as possible with no runout, if possible.  Strong stretchers are a necessity. 

All three chairs I built had a different style of dowel:  The first one I cut the wood along the grain and turned the dowels to a cigar shape as laid out in Chritopher Schwarz's book, Campaign Furniture. 

The second, diamond willow chair I used store bought oak dowels, but picked out ones that had as straight of grain that was possible. 

This chair I sawed out the stretcher blanks along the grain as best I could, and made them octagonal with a chamfer bit on a router table.  The octagonal shape left a little more meat on the one inch dowel blanks, and was a bit simpler for me as a novice turner.

All three methods I can recommend.

Also, do not be afraid to drill the holes for the stretchers and ream the tapers by hand.  Using a bit and brace is not much slower than a drill press, once setting up the machine is added to the time.  Just use a square to check your work once the taper gets close.  You can 'steer' the brace one way or the other a bit until it is dialled in just perfect.

Most of all, I think that one should not be afraid to go outside of the box when making a Roorkee chair.  Unless you are trying to make a faithful reproduction, why not put your own stamp on it?  This chair has a lot of room for being flexible with the design.

Thursday, December 11, 2014

Side Trip to London

The Frau and I had the opportunity to spend a few days in London this week, and we had a great time.  The first thing we did was 'afternoon tea.'  The Frau ordered a traditional afternoon tea.  It came with Earl Grey, cucumber sandwiches and the whole works.

I intended to do this, but there was something on the menu called 'Gentleman's Tea,' and I felt morally obligated to order it.  Turns out this version of afternoon tea came with beer and meat.  Perfect!

Afternoon tea at the Kensington Close Hotel.
Having been to London as a tourist before, I didn't need too many more photos of me with Big Ben, so it turns out I took relatively few pictures this time.  One of the things I forgot to take pictures of, was a fellow woodworker I got to meet up with, Travis from Snakeye Toolworks for a few pints.  That was fun.

What I did find on my camera on my way home was a bunch of pics of furniture from one of the museums we went to:  the Victoria and Albert Museum.  Technically this museum is free, but they do a good job of guilting you into donating a few bucks to see the displays.

There was a lot of cool future in this place.  I saw a couple pieces of note that I will share here.

The first is a sideboard designed by E.W. Godwin around 1870.  I can't see myself building either of these two pieces, but of the two I can see including some elements from this piece on a future project.

Designed by E.W. Godwin
Here's  the placard describing the piece.
Close up of some details.
Interesting hardware.
The next piece I want to show you is another sideboard.  This one says it is made of ebony with ivory inlay.  I don't know if it is solid ebony, or ebony veneer.  The sensible thinking part of my brain says it must be veneered, but the Tim Taylor part of my brain really would like to think it is solid ebony.  Just for posterity and all of your amazement, here it is:

This piece is even more incredible in person.  Designed by Bruce James Talbert.

The museum's blurb.
Close up of the detail.  It is amazingly clean and crisp, and there is a LOT of it.
I wound up at the V&A museum because The Frau wanted to see a photography exhibition there.  What I really wanted to see this time was the Museum of London, with all the history of the local area there.  Unfortunately, there was very little woodworking of note displayed there.  The coolest piece I found was this wooden Highlander.  It was used to sell snuff much like wooden tobacco indians were in the U.S.
Me and the Highlander.

Friday, November 28, 2014

Stupid Table

Although it has been a couple months (!) since I have posted last, it doesn't mean I haven't been doing any woodworking.

Just not much.

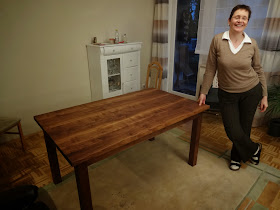
Most notably, I finished our stupid walnut (Juglans nigra) table.  It is not a stupid table, it is just one of those stupid projects that takes years to finish just because it is no fun.  Now that I think about it, it wasn't no fun because it was a dining table, it was no fun because of the particular nature of the walnut I used.  It wanted to tear out no matter which way it was planed.

I did all of the joinery, which included gluing up the top panel, planing it flat, and cutting all of the mortises and tenons by hand at the Army woodshop on the post where I work.

Once that was done, I took all the parts to our Garmisch apartment for assembly and finish.  The Frau helped with several parts of this build, most notably the finishing.

Many of you probably won't approve of our choice of finishes, but we are pretty gentle with our furniture, so we used boiled linseed oil followed by pure beeswax applied with a polisoir.  This is truly an amazing finish on walnut.

The walnut panel resting on top of our old, temporary table. 

This is the underside of the table, which shows some of the tearout I was dealing with.  There also are a couple knot holes that don't go all the way through.
M+T joinery with drawbored pins.  This was the most pleasant part of the build.  I really took my time to make sure these joints all fit together perfect before hammering the pegs home.  The goo is just some paste wax which lubricates and assists the pin when driving home.   I chose to drawbore these joints using no glue at all.  Great choice.  It made for a completely stress free assembly.  Oh, and you might notice the end grain looking weird compared to the face grain.  I laminated 8/4 stock together to make the thick legs, then veneered the faces of the legs that showed the glue line.  It looks awesome.

Done.
A close-up of the finished top.
The finish is amazing.  However, it turned out a bit different than we expected.  On the base, we went straight from a planed surface to the BLO, then applied the beeswax with straw burnishers.  On the top, we added the step of burnishing the raw wood before applying any finish.  The base looks just the way we wanted, but the top practically glows in the dark.  It is a bit glossy-er than we envisioned.  It almost looks like French Polish.  We wanted a little bit more of a matte finish.  I have let it set for about six weeks to cure, hoping the gloss would mute over time a little bit like paste wax would, but no luck.  I am thinking we might have to apply something else over the top of the wax to subdue the shine a little.

In other news, I have two unfinished projects sitting on my bench in a state of only needing a little more work until they are finished - the Welsh stick chair and the Shaker side table.  I have some time off to myself this week so I should be able to get them both finished - unless I start another project which is exactly what I did.

I need to get a Christmas gift built, so no time for anything until this is done.  Unfortunately, I left my camera in Garmisch so I have no pictures of this chair yet.  I spent two days at the Dictum shop in Munich working on it, so it is almost done.  Diane talked me into using some lumber I already had rather than buying some new ash or oak for this project.  I'm glad she did.

I had some wenge (Millettia laurentii) intended for something else that I haven't started yet laying around from when I used to think that exotic wood was good to use in every project.  I probably will stay away from using exotics for future hand tool projects, but I had this stuff laying around and it looked like it would make a freaking bad-ass Roorkee.  All of the woodworking is done, and it indeed looks bad-ass.  The leather is almost done, and it looks cool, too.  I am using leather from a whole hide of hair-on leather I got a few months back for exactly this project.  I thought it was going to look kind of silly-western, but with the wenge it looks super refined and swanky.  I can't wait to put a picture of it up.  I've decided to call it Coffee and Cream.  Coffee, because the pile of shavings left from the lathe looked exactly like coffee grounds, and Cream, because the rest of the chair was obviously made from cow, and Coffee and Steak just doesn't have the right ring to it.

It would have been finished yesterday, as I had the whole day to myself (The Frau works on Thanksgiving, being it isn't a German federal holiday).  While I was getting my shop ready for working on the Roorkee, I cut my finger bad enough on a loose tool while rooting around in the trunk of my car to earn a trip to the emergency room.  I sliced a chunk of skin off of the end of my finger.  The slice wasn't terribly big, but it was deep enough that it started to bleed like crazy and wouldn't stop.  Note to self - keep your car clean.

Hopefully, in a day or two I'll be back in the shop and the Roorkee will be in the mail.

Sunday, September 21, 2014

Olav's Chair - Finished!

There was a nice note in my inbox from Olav today along with a couple pictures:

      Hej Brian!
           Mission accomplished, Sir.
               This piece of gargantuaesque artwork got a coat of blended linseed oil and tung oil.
                      Hoping the best for you and your chair.
                             The big CHairmaker shall be with you.
                                  With regards

                                                                   Olav


I think his chair turned out spectacular.  He based this one off of this photo I posted on my blog a while back, a chair that was on an antique dealer's page:
Photo courtesy Paul Dunn Antiques.
This was my favorite chair out of all of the historical examples I posted on an earlier blog.  I was really hoping someone would make it, and it is the one Olav picked.  He really did a nice job on this reproduction, down to the shape of the seat.  He also chose to leave the seat unsaddled, just like the original.

By the way, Olav was really taken with John Brown's book.  He mentioned to me in it that he loved John Brown's phrase, "The Great Chairmaker in the sky."

Thursday, September 18, 2014

Vacation is Getting in the Welsh Stick Chair Building

But with a day like this, how can you NOT go outside!
Near the Alpspitze in Garmisch today.
The Frau and I have a couple of weeks off together, and we decided not to go too far out of the area.  Instead, we are going to enjoy our surroundings in the area we live.  Luckily, we have had the first couple days of summer the whole year, or so it seems.

Before we headed off to the mountains, I thought I would try to get somewhere with my Welsh stick chair.  I have been able to spend only about an hour on it since I brought this thing home from Denmark.  Happily, I got almost a whole day in the shop with it.

Boring Arm Rail Holes
I left off having roughly shaped the arm rail and crest.  After some thought, I decided to take sandpaper to the sticks after all.  They were all a bit too 'rustic' and I don't think two of them had the same diameter.  This was easily fixed with some sandpaper.

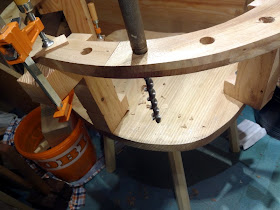
I bored some holes in the arm rail.  I built the jigs in Drew Langsner's book to help hold it in the right spot so I could just eyeball the angles the holes needed to be.  That was easy enough.
Now the hard part.
I thought I would be clever, so I bought an 18" brace extension off of eBay.  It functions perfectly, but I realized too late that it was too big to fit in the 5/8" holes I bored in the arm rail.
Still a problem.
"No problem," I thought.  I'll just bring it in from the underside and bore that way.  WRONG!  I still can't lift the drill bit high enough to get started.

Plan 'B' was to take the arm rail off and eyeball the angles, so that's what I did.  I thought that if I used the extension, I might be a bit more accurate on the angles, which not only worked, it made me feel better about having blown my hard-earned moolah on a useless tool.
A bonus on this shot, you get to see the pristine state of my shop.
It seems to have worked.
I got all of the sticks in.  Next up, just drop on the arm rail and we're good.  Only problem is, putting the arm rail on this way was a bit hairy.  Since the sticks all fan out from the seat, they don't really line up with the holes on the arm rail until it is in place.  This mean that I had to bend the sticks into place one at a time, while whacking with my rubber mallet (Trevor the Mallet died not long ago).  This must have put an incredible stress on the rail, as I had a small issue:
Potential for disaster?  Naaah - I just squeezed some glue in there, got the sticks in place and clamped it back together.
We'll see what this looks like when I get the clamps off.

Here is the state my chair now is in:
Starting to look like a chair.
When I get back from vacation, I'll take the clamps off of that break and see how we're doing.  If it looks like doodie, then I'll heat it up (hide glue is great for this) and re-do it.  However, I think that I can probably make this work.

The only bit of construction left on this chair is to attach the crest, which glues directly to the arm rail.

I will still have a lot of work left on shaping everything to it's final shape.  Things need to be a bit rounder for comfort, and I need to think of something to prevent me from winning a Darwin Award while it is sitting in my dining area. 

Monday, September 8, 2014

Magic Tricks from Olav the Great

Since I returned from Denmark with my mostly-completed chair packed in the trunk stacked neatly in pieces, I haven't had the opportunity to work on it.  This has been driving me crazy, because Jonas finished his settee while I was still in the car driving back home.
Jonas' stunning Windsor settee in elm and ash.
I have some time today and tomorrow to spend in the shop, and hope to make progress on it.

Meanwhile, I sent a note to the third member of our band of wood-hooligans, and asked him if he has finished his chair yet.  Olav sent me the following response:

               Hej chairmaker Brian,
nope, I havn’t finished the chairy work because of the necessity to get butter on the bread.
 Just drilled a couple of holes into the wood.
    But:
        I remembered some utilities for the workbench, I once had seen and recreated them.
              I hope the pictures will tell the rest.

Remembering the weekend of the brothers in wood
                                       your

                                                         Olav


Olav is a self-employed carpenter, so has a collection of some pretty cool tools, including the super-long auger bit in the first photo.  This allows him to mock-up his arm rail to it's actual height, bore the hole at the correct angle in the arm, and then bore the hole in the seat with the auger still in the hole from the arm.  I think it makes for correct angles on everything without doing too much triginometry and advanced rocket-surgery.  I plan to do the same with my chair, only I have an auger bit extension from eBay rather than a super-long electrician's auger bit like Olav.

The next photo shows a pair of what another woodworker described to me as "bench puppets."  I'm not sure of the term as it doesn't sound manly enough, like "sphygmomanometer," but that word was already taken.  This looks like a fantastic way for making square sticks round with a plane or spokeshave.  I'm thinking they could be made with a nail for a pivot point, but Olav used what looks to be hinge parts that he filed to a point. 

My guess is that his sticks turned out a lot rounder than mine have.

Looking at these photos reminded me of another example of Olav's cleverness with a tool he whipped out to help him mark out octagons for his tapered legs.  Before he rounded them off, I was amazed at how perfect his octagons were, as mine looked more like a Picasso experiment gone wrong.  I spent a lot of time trying to lay mine out using tricks that I thought I understood, but wound up just eyeballing the octagons with limited success.  Olav's were spot-on using this simple jig he spent about 30 seconds making:
3-4-3


It works on straight stock as well as tapered, and will layout a perfect octagon of any size you need.  It is constructed much like a center-finding jig, but instead of the pencil being in the center, it is offset a little bit. 

How much?  Olav says to use the ratio 3-4-3.

Centimeters, inches, miles, it doesn't matter.  Take a stick for your octagon-maker, mark a spot for one of the dowels, from there go out three units (I would just eyeball a length on your dividers, and step off three steps), make a mark, step off four units, make another mark, then step off the final three where your second dowel goes.  The hole for the pencil goes in one of the center marks.  If you look at the first photo of this tool, it will make a bit more sense, and you can actually see the unused mark on the side opposite the pencil.

Olav, you get the prestigious notoriety of the Toolerable Jig of the Week. 

OK, I just made up the Jig of the Week, but "sphygmomanometer" is a real word.