Pages

Sunday, September 21, 2014

Olav's Chair - Finished!

There was a nice note in my inbox from Olav today along with a couple pictures:

      Hej Brian!
           Mission accomplished, Sir.
               This piece of gargantuaesque artwork got a coat of blended linseed oil and tung oil.
                      Hoping the best for you and your chair.
                             The big CHairmaker shall be with you.
                                  With regards

                                                                   Olav


I think his chair turned out spectacular.  He based this one off of this photo I posted on my blog a while back, a chair that was on an antique dealer's page:
Photo courtesy Paul Dunn Antiques.
This was my favorite chair out of all of the historical examples I posted on an earlier blog.  I was really hoping someone would make it, and it is the one Olav picked.  He really did a nice job on this reproduction, down to the shape of the seat.  He also chose to leave the seat unsaddled, just like the original.

By the way, Olav was really taken with John Brown's book.  He mentioned to me in it that he loved John Brown's phrase, "The Great Chairmaker in the sky."

Thursday, September 18, 2014

Vacation is Getting in the Welsh Stick Chair Building

But with a day like this, how can you NOT go outside!
Near the Alpspitze in Garmisch today.
The Frau and I have a couple of weeks off together, and we decided not to go too far out of the area.  Instead, we are going to enjoy our surroundings in the area we live.  Luckily, we have had the first couple days of summer the whole year, or so it seems.

Before we headed off to the mountains, I thought I would try to get somewhere with my Welsh stick chair.  I have been able to spend only about an hour on it since I brought this thing home from Denmark.  Happily, I got almost a whole day in the shop with it.

Boring Arm Rail Holes
I left off having roughly shaped the arm rail and crest.  After some thought, I decided to take sandpaper to the sticks after all.  They were all a bit too 'rustic' and I don't think two of them had the same diameter.  This was easily fixed with some sandpaper.

I bored some holes in the arm rail.  I built the jigs in Drew Langsner's book to help hold it in the right spot so I could just eyeball the angles the holes needed to be.  That was easy enough.
Now the hard part.
I thought I would be clever, so I bought an 18" brace extension off of eBay.  It functions perfectly, but I realized too late that it was too big to fit in the 5/8" holes I bored in the arm rail.
Still a problem.
"No problem," I thought.  I'll just bring it in from the underside and bore that way.  WRONG!  I still can't lift the drill bit high enough to get started.

Plan 'B' was to take the arm rail off and eyeball the angles, so that's what I did.  I thought that if I used the extension, I might be a bit more accurate on the angles, which not only worked, it made me feel better about having blown my hard-earned moolah on a useless tool.
A bonus on this shot, you get to see the pristine state of my shop.
It seems to have worked.
I got all of the sticks in.  Next up, just drop on the arm rail and we're good.  Only problem is, putting the arm rail on this way was a bit hairy.  Since the sticks all fan out from the seat, they don't really line up with the holes on the arm rail until it is in place.  This mean that I had to bend the sticks into place one at a time, while whacking with my rubber mallet (Trevor the Mallet died not long ago).  This must have put an incredible stress on the rail, as I had a small issue:
Potential for disaster?  Naaah - I just squeezed some glue in there, got the sticks in place and clamped it back together.
We'll see what this looks like when I get the clamps off.

Here is the state my chair now is in:
Starting to look like a chair.
When I get back from vacation, I'll take the clamps off of that break and see how we're doing.  If it looks like doodie, then I'll heat it up (hide glue is great for this) and re-do it.  However, I think that I can probably make this work.

The only bit of construction left on this chair is to attach the crest, which glues directly to the arm rail.

I will still have a lot of work left on shaping everything to it's final shape.  Things need to be a bit rounder for comfort, and I need to think of something to prevent me from winning a Darwin Award while it is sitting in my dining area. 

Monday, September 8, 2014

Magic Tricks from Olav the Great

Since I returned from Denmark with my mostly-completed chair packed in the trunk stacked neatly in pieces, I haven't had the opportunity to work on it.  This has been driving me crazy, because Jonas finished his settee while I was still in the car driving back home.
Jonas' stunning Windsor settee in elm and ash.
I have some time today and tomorrow to spend in the shop, and hope to make progress on it.

Meanwhile, I sent a note to the third member of our band of wood-hooligans, and asked him if he has finished his chair yet.  Olav sent me the following response:

               Hej chairmaker Brian,
nope, I havn’t finished the chairy work because of the necessity to get butter on the bread.
 Just drilled a couple of holes into the wood.
    But:
        I remembered some utilities for the workbench, I once had seen and recreated them.
              I hope the pictures will tell the rest.

Remembering the weekend of the brothers in wood
                                       your

                                                         Olav


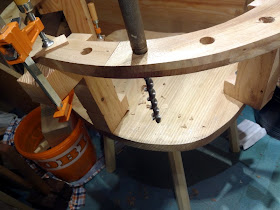
Olav is a self-employed carpenter, so has a collection of some pretty cool tools, including the super-long auger bit in the first photo.  This allows him to mock-up his arm rail to it's actual height, bore the hole at the correct angle in the arm, and then bore the hole in the seat with the auger still in the hole from the arm.  I think it makes for correct angles on everything without doing too much triginometry and advanced rocket-surgery.  I plan to do the same with my chair, only I have an auger bit extension from eBay rather than a super-long electrician's auger bit like Olav.

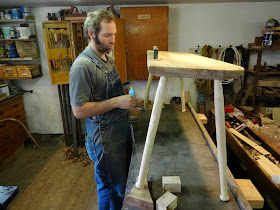
The next photo shows a pair of what another woodworker described to me as "bench puppets."  I'm not sure of the term as it doesn't sound manly enough, like "sphygmomanometer," but that word was already taken.  This looks like a fantastic way for making square sticks round with a plane or spokeshave.  I'm thinking they could be made with a nail for a pivot point, but Olav used what looks to be hinge parts that he filed to a point. 

My guess is that his sticks turned out a lot rounder than mine have.

Looking at these photos reminded me of another example of Olav's cleverness with a tool he whipped out to help him mark out octagons for his tapered legs.  Before he rounded them off, I was amazed at how perfect his octagons were, as mine looked more like a Picasso experiment gone wrong.  I spent a lot of time trying to lay mine out using tricks that I thought I understood, but wound up just eyeballing the octagons with limited success.  Olav's were spot-on using this simple jig he spent about 30 seconds making:
3-4-3


It works on straight stock as well as tapered, and will layout a perfect octagon of any size you need.  It is constructed much like a center-finding jig, but instead of the pencil being in the center, it is offset a little bit. 

How much?  Olav says to use the ratio 3-4-3.

Centimeters, inches, miles, it doesn't matter.  Take a stick for your octagon-maker, mark a spot for one of the dowels, from there go out three units (I would just eyeball a length on your dividers, and step off three steps), make a mark, step off four units, make another mark, then step off the final three where your second dowel goes.  The hole for the pencil goes in one of the center marks.  If you look at the first photo of this tool, it will make a bit more sense, and you can actually see the unused mark on the side opposite the pencil.

Olav, you get the prestigious notoriety of the Toolerable Jig of the Week. 

OK, I just made up the Jig of the Week, but "sphygmomanometer" is a real word.

Thursday, September 4, 2014

Learning From Others

Having recently returned from Denmark where I had the amazing opportunity to build Welsh stick chairs with Jonas from Mulesaw, I thought I might share a few observations I had about the experience, along with how it might change the way I work.

I highly recommend taking advantage of any opportunity that comes along to work with others.  The solitary nature of wood working is contrary to our ability to absorb information and techniques that one can get in a shop full of other woodworkers. 

The main thing I learned attending Christopher Schwarz' Anarchist's Tool Chest class was that hand tools are indeed efficient tools to work with.

Building chairs last weekend was a great experience in several ways.  One of which was the opportunity to work with Jonas and Olav.

Olav trained in Germany.

Olav is a local Danish carpenter who trained in Germany, not far from where I live.  He brought a relatively simple tool kit full of user tools.  Nothing too fancy, many of them older tools, but everything well maintained and extremely sharp.  I'll never forget what he first told me.  He said it was uncommon for Danish carpenters to have tools made by recent high-end makers such as Lie-Nielsen, because any carpenter worth his salt should be able to tune an old Stanley style plane to work just as well.  "Those tools are for amateurs," he said.

I think he's right.

Look at it this way - how much would those tools cut into a professional's profits when he can probably get just as good of results with flea market finds?  This doesn't have to be looked at negatively for us amateurs, though.  One thing you are paying for with a new tool is that it is set up and ready to go out of the box.  It is important to have a decent tool to learn woodworking with.  If you don't know what a decent tool can do, how do you know what needs to be done to tune a vintage tool?

Jonas and I failed at trying to steam rived lumber.  But, it was fun trying to figure out!  Plus, he looks like a badass with a broad hatchet.

Watching Jonas work was enlightening in a couple of ways.

First of all is his shop.   His work area is moderately sized, having enough room for his bench, his hand tools and a mixture of vintage machines including a jointer/planer combo, a table saw, a bandsaw and a lathe.  The real beauty of this shop, though, is it is essentially in an entire barn dedicated to woodworking (but I bet he never thought of it that way).

Not only is there plenty of storage for wood to air dry, he has two functional lumber mills!  One is his 'mule saw,' which has a giant reciprocating blade ideal for flitch cutting logs, and the other is a circular saw blade powered by his tractor, and it is combined with a sliding table that is something like four meters long.  This machine is amazing in that it can rip an entire elm log in half in about four seconds.

One day while I was trying to decide on what I should use for the center of my laminated arm rail, I found myself with Jonas milling an entire elm log just to get a nice burl piece about 8/4, 4" by 8".  I wound up not even using that piece.

Normally I buy all of my lumber from a local yard and it is all air dried, and relatively expensive.  Jonas will just process a log, stack it up somewhere and in a couple years he'll go through it to find the piece he needs for that project.

There really isn't a way I can use that in my 100 square foot shop, but there is something else he did that I can use.

Jonas is really fast.  My Drew Langsner book said a settee is just like making a chair, except it takes twice as long.  Jonas' settee was finished just a couple hours after I left, while there was still plenty for both Olav and I to do before our chairs done.

I watched very carefully how he does this, and I think I may have figured it out.  When I work, I usually focus on the step I am working on, and when that step is complete, I mentally stand back and congratulate myself before doing a little research on what the next step is.  This winds up with consistent results, but is not very efficient.

Jonas, on the other hand, tends to move smoothly from one operation right to the next without skipping a beat.  Although none of us had built this style of chair before, he joked before the build that I was going to be the class instructor because I read a book.

The book was indispensable, but it was interesting watching Jonas try to figure out his own way of doing things, relying on operations he was familiar with.  This was far different from my method of exploring new tools and techniques, many of which didn't exactly work the way I predicted.

For example, one day I decided to build a shooting board, because that was the way I would have trimmed the end grain on one of the pieces I was working on.  "What do you need that for?" Jonas said.  I realized I could make the same cut using my bench hooks laying the plane on it's side directly on the bench. 

I think a shooting board is an important fixture to have, but if you don't have one, there might be another way to get that step done rather than spend the time building a tool you only need for that one operation.

I will implement this way of thinking during my next project.  Hopefully it will result in a bit more production in my shop without really changing anything.

Tuesday, September 2, 2014

Stick Chairs - Days 4 and 4 1/2

Day 4 was pretty awesome.  In fact, it was so awesome, that we finally drug ourselves inside from the shop around midnight.  That made things a bit late to be fair with a proper blog post, so here it is today, instead.

I decided to stick around and do a little bit more on day 5 in the morning before packing everything up for the long drive home. 

In pictures, here's what happened:

Jonas leveling his bench preparing to cut the legs to length.

Me gluing a tenon getting with hot hide glue.

Jonas is holding the seat stable for me while I pound the legs home.

Leg seated.

Time to run some stick stock through the planer!

Olav working on his legs.

Mrs. Mulesaw and Asger trying out Jonas' bench now that it is at final the height.

Working on my sticks.

Olav is working on a reproduction from a photograph.  It had tapered, round legs.  The most efficient way to do this with this splintery ash was to plane them octagonal, and sand them round on the lathe.

Shaving my sticks round. 

What a nice coffee table!

Us adults didn't hog all of the fun!  Here Asger is smoothing a pine board.

Half of my sticks are rounded!

I found this to be a good technique for shaving thin stock at the bench.  I am supporting the thin wood with my thumb, but keeping it behind the blade, otherwise the end of the stick doesn't get shaped.

I used a round scraper after shaving.

Yes, even professionals refer to the plans every once in a while.

Meanwhile, Jonas is moving along. 

Here is a close-up of a wedged leg near where the hoop pierces the seat.

I suppose I should quit goofing off and start working on my arm rail, too!

Jonas drilled all of his stick holes by eye.

Olav referring to the photo of the original he is reproducing along with the John Brown book.

I needed to cut a lap joint for my laminated arm rail.

Meanwhile, Jonas is moving right along.
That is about as far as we got on day 4, which was officially our last day.  But we did get to sneak in a little more work the next morning.
Jonas showed me one of his chests that he built out of pallet wood while on board his ship.  It is even more impressive in real life than in the photos from his blog!

Here is the rough shape of my arm rail.  It is resting on some temporary mounting blocks.

Jonas' bench all but done.  Supposedly a settee takes twice as long as a chair to build.  Jonas got farther than I did, and I expect his chair will have finish on it in no time.

Time for me to cut my legs to length.

Olav testing his seat after cutting his legs to length.
At this point I really had to get on the road, so I loaded up the car and took off.  Jonas' parents invited me to pop in on them on the way home, which was about two hours away, but on the way home. 

They have an absolutely gorgeous house converted from an old one-room school house.  They have furnished it with a collection of some of the finest Scandinavian furniture I have ever seen.  One such piece is this fantastic Windsor rocking chair from Sweden.  It is very much like one in a photo of a Swedish Windsor in Drew Langsner's book.
Swedish rocking Windsor.
I couldn't figure out how the seat was constructed, so I peeked underneath.  The seat is actually coopered.  There are several boards glued up at angles with the grain going side to side.  The top is smoothed out and lacquered to complete this dramatic shape.

There is only a little left to do on the chair at home before mine is complete.  I need to drill the holes and insert the sticks, shape the crest and apply finish.

Hopefully I'll get to post pictures of the completed chair soon.